
Introduction
In this lab, you will learn how to use GitHub Actions Secrets. Secrets are encrypted environment variables that you create in an organization, repository, or repository environment. The secrets that you create are available to use in your GitHub Actions workflows.
This is essential for keeping sensitive information like API keys, access tokens, and passwords secure. GitHub Actions automatically redacts secrets from logs, ensuring they are not exposed.
This lab builds on the repository you created in the previous labs. You will add a secret to your github-actions-demo repository and create a workflow that uses it.
You will go through the following steps:
- Add a repository secret to your existing GitHub repository.
- Clone the repository and create a workflow file that references the secret.
- Add steps to use the secret.
- Push the workflow to GitHub.
- Verify that the secret is masked in the execution logs.
Create a repository secret named MY_SECRET on GitHub settings
In this step, you will add a secret to your existing github-actions-demo repository on GitHub and clone the repository to your LabEx environment.
Add a Repository Secret
- Open your web browser and navigate to your
github-actions-demorepository on GitHub:https://github.com/your-username/github-actions-demo - Click on the Settings tab.
- In the left sidebar, scroll down to the Security section, click on Secrets and variables, and then select Actions.
- Click the green New repository secret button.
- Enter the following details:
- Name:
MY_SECRET - Secret:
SuperSecretValue123
- Name:
- Click Add secret.
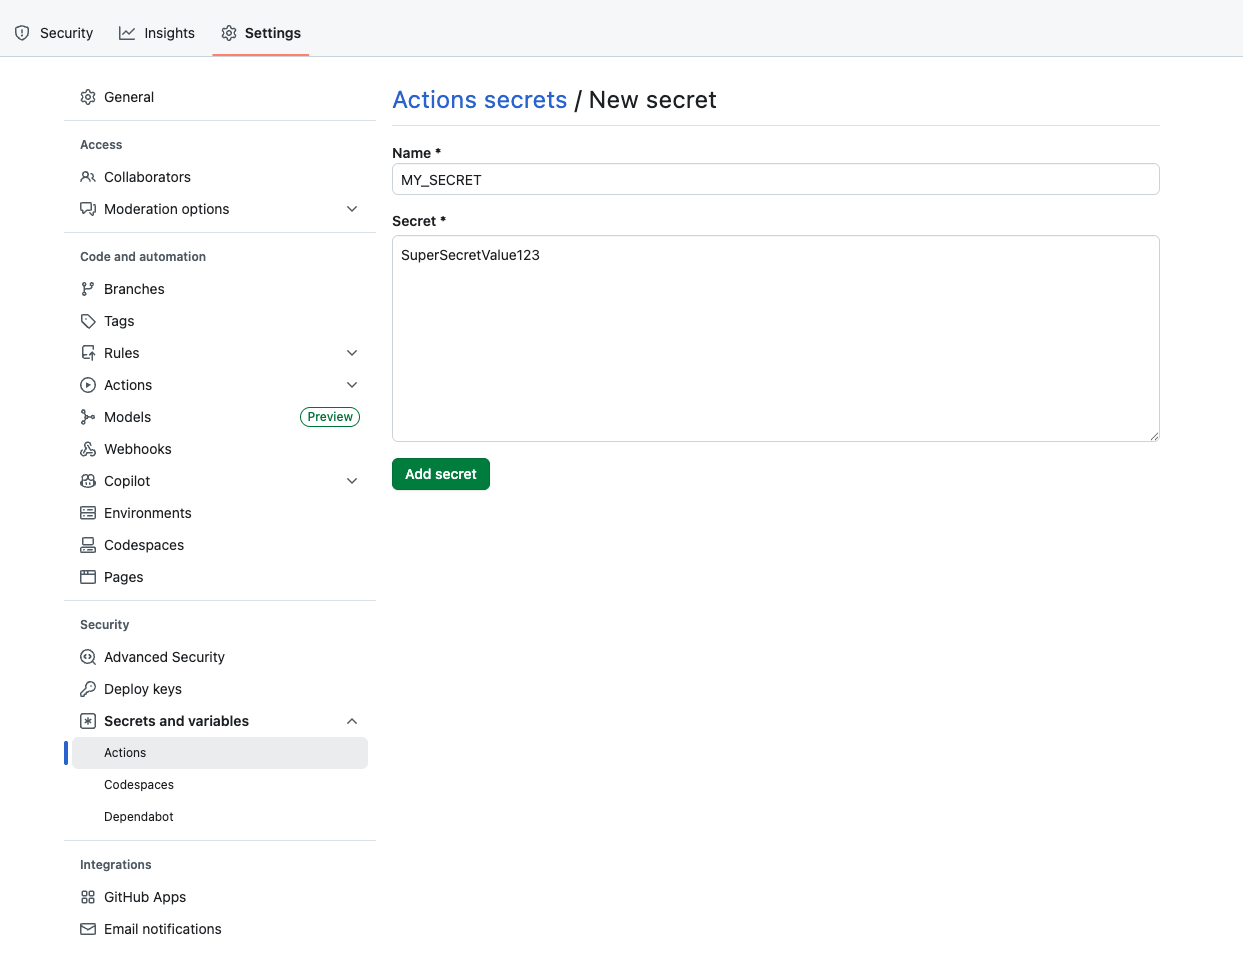
You should now see MY_SECRET listed under "Repository secrets".
Clone the Repository
Now, switch back to the LabEx environment to clone the repository.
- On your GitHub repository page for
github-actions-demo, click the green Code button. - Ensure the HTTPS tab is selected and copy the URL. It should look like
https://github.com/your-username/github-actions-demo.git. - Open the terminal in the LabEx environment. The default path is
~/project. - Use the
git clonecommand to download the repository. Replaceyour-usernamewith your actual GitHub username.
cd ~/project
git clone https://github.com/your-username/github-actions-demo.git
Example Output:
Cloning into 'github-actions-demo'...
remote: Enumerating objects: X, done.
remote: Counting objects: 100% (X/X), done.
remote: Total X (delta 0), reused 0 (delta 0), pack-reused 0
Receiving objects: 100% (X/X), done.
- Navigate into the cloned repository:
cd ~/project/github-actions-demo
Reference the secret in workflow with ${{ secrets.MY_SECRET }}
In this step, you will create a workflow file that references the secret you just created.
- Ensure you are in the repository directory:
cd ~/project/github-actions-demo
- Create a new file named
secrets-demo.ymlinside the.github/workflowsdirectory:
touch .github/workflows/secrets-demo.yml
- Open
.github/workflows/secrets-demo.ymlin the WebIDE and add the following content. This defines a basic workflow that triggers on push events.
name: Secrets Demo
on: [push]

jobs:
  use-secret:
    runs-on: ubuntu-latest
    steps:
      - name: Checkout code
        uses: actions/checkout@v4
This sets up the job. In the next step, we will add the logic to use the secret.
Add a step to echo the secret value safely
In this step, you will modify the workflow to access the secret. GitHub Actions allows you to access secrets using the ${{ secrets.SECRET_NAME }} syntax.
Modify the Workflow
Open .github/workflows/secrets-demo.yml and append the following step to the steps list. Ensure the indentation is correct.
- name: Print Secret
  env:
    MY_SECRET_VAL: ${{ secrets.MY_SECRET }}
  run: |
    echo "Printing secret directly (masked): ${{ secrets.MY_SECRET }}"
    echo "Printing secret from env (masked): $MY_SECRET_VAL"
Your complete file .github/workflows/secrets-demo.yml should look like this:
name: Secrets Demo
on: [push]

jobs:
  use-secret:
    runs-on: ubuntu-latest
    steps:
      - name: Checkout code
        uses: actions/checkout@v4

      - name: Print Secret
        env:
          MY_SECRET_VAL: ${{ secrets.MY_SECRET }}
        run: |
          echo "Printing secret directly (masked): ${{ secrets.MY_SECRET }}"
          echo "Printing secret from env (masked): $MY_SECRET_VAL"
Key Concept
When you use a secret in a workflow, GitHub automatically masks it in the logs. Even if you try to echo it, the output will show asterisks (***) instead of the actual value.
Commit and push the workflow with secret reference
In this step, you will commit your changes and push them to GitHub. This will trigger the GitHub Action.
- Ensure you are in the repository directory:
cd ~/project/github-actions-demo
- Stage the workflow file:
git add .github/workflows/secrets-demo.yml
- Commit the changes with a descriptive message:
git commit -m "Add workflow to test secrets"
- Push the changes to the remote repository on GitHub:
git push
Note on Authentication:
When you run git push, the WebIDE will automatically prompt you to authenticate. Follow these detailed steps:
- A popup will appear with the message: "The extension 'GitHub' wants to sign in using GitHub." Click Allow.
- A new notification will appear. Click "Copy&Continue to GitHub", then click "Open" in the next prompt.
- Log in to your GitHub account in the browser window that opens, and enter the authorization code that was copied. After confirming the authorization, the page will automatically close.
- Wait a few seconds, and you will see the terminal successfully complete the push operation.
Privacy Note: The WebIDE will request full access to your GitHub account for authentication purposes. You don't need to worry about privacy concerns - the LabEx VM will be immediately destroyed after you complete the current lab, and your credentials and authorization information will not be retained.
Check logs to ensure secret is used without exposure
After pushing your code, the workflow will automatically trigger on GitHub. You can view the workflow run logs to verify that the secret is being used securely.
- Visit your repository on GitHub in a web browser:
https://github.com/your-username/github-actions-demo - Click on the Actions tab at the top of the repository page.
- You should see a workflow run listed, likely named "Add workflow to test secrets" or "Secrets Demo".
Note: When you push code, multiple Actions may be triggered if you have multiple workflow files in your repository. Please identify the correct workflow run by checking the workflow name in the left sidebar or using the workflow run list on the right side.
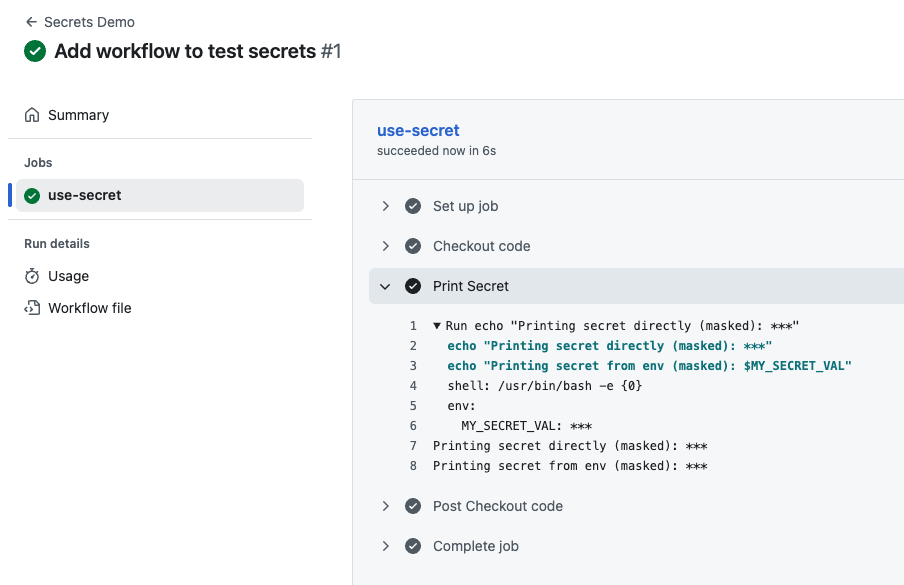
- Click on the workflow run title, then click on the use-secret job.
- Expand the Print Secret step to see the output.
You should see something like this:
Printing secret directly (masked): ***
Printing secret from env (masked): ***
Notice that even though the workflow tried to print the secret value, GitHub Actions automatically masked it with *** in the logs. This is a critical security feature - it prevents sensitive information from being accidentally exposed in logs, even if you try to print it. This confirms that your secret is securely configured and being used in the workflow without exposing its actual value.
Summary
In this lab, you have successfully learned how to:
- Create a Repository Secret in GitHub Settings to store sensitive data.
- Create a GitHub Actions workflow file.
- Reference the secret using the
${{ secrets.MY_SECRET }}syntax. - Pass the secret to environment variables within a job step.
- Verify that GitHub automatically masks the secret value in the build logs.
This practice ensures that your sensitive data, such as deployment keys and API tokens, remains secure throughout your CI/CD process.


