
Introduction
In real-world CI/CD pipelines, workflows are rarely just a single list of steps. They are often composed of multiple distinct "jobs" that need to run in a specific order.
For example, you might have a Build job that compiles your code, and a Deploy job that pushes it to a server. You definitely don't want the Deploy job to run if the Build job fails, and you can't run them at the same time because the deployment needs the built artifacts.
In this lab, you will split your workflow into two separate jobs and use the needs keyword to enforce a dependency, ensuring the deploy job waits for the build job to complete successfully.
This lab builds on the repository you created in the previous labs. You will work with the github-actions-demo repository.
Define a build job
First, we will clean up our existing workflow to have a focused build job. We'll simplify the matrix strategy from the previous lab for clarity, going back to a single version to keep the focus on job dependencies.
- On your GitHub repository page for
github-actions-demo, click the green Code button. - Ensure the HTTPS tab is selected and copy the URL. It should look like
https://github.com/your-username/github-actions-demo.git. - Open the terminal in the LabEx environment. The default path is
~/project. - Use the
git clonecommand to download the repository. Replaceyour-usernamewith your actual GitHub username.
cd ~/project
git clone https://github.com/your-username/github-actions-demo.git
Example Output:
Cloning into 'github-actions-demo'...
remote: Enumerating objects: X, done.
remote: Counting objects: 100% (X/X), done.
remote: Total X (delta 0), reused 0 (delta 0), pack-reused 0
Receiving objects: 100% (X/X), done.
- Navigate into the cloned repository:
cd ~/project/github-actions-demo
Create a new workflow file
.github/workflows/job-dependencies.ymlusing the WebIDE editor. You can find the file in the file explorer on the left side underproject/github-actions-demo/.github/workflows/.Start by creating the basic workflow structure. Add the workflow name and trigger:
name: Job Dependencies

on: [push]
- Add the jobs section and define the build job with its runner:
jobs:
  build:
    runs-on: ubuntu-latest
- Add the steps section. First, add the checkout step to get the repository code:
steps:
  - uses: actions/checkout@v4
- Add the Node.js setup step:
- name: Use Node.js
  uses: actions/setup-node@v4
  with:
    node-version: "20"
- Add the step to install dependencies:
- name: Install dependencies
  run: npm install
- Add the step to run tests:
- name: Run tests
  run: npm test
- Add the build step that creates the artifact directory and file:
- name: Build project
  run: |
    mkdir dist
    echo "Build artifact created at $(date)" > dist/build.txt
- Finally, add the upload artifact step. This step is crucial because it saves the build output so the next job can use it:
- name: Upload build artifact
  uses: actions/upload-artifact@v4
  with:
    name: dist-files
    path: dist
Your complete file should now look like this:
name: Job Dependencies

on: [push]

jobs:
  build:
    runs-on: ubuntu-latest
    steps:
      - uses: actions/checkout@v4
      - name: Use Node.js
        uses: actions/setup-node@v4
        with:
          node-version: "20"
      - name: Install dependencies
        run: npm install
      - name: Run tests
        run: npm test
      - name: Build project
        run: |
          mkdir dist
          echo "Build artifact created at $(date)" > dist/build.txt
      - name: Upload build artifact
        uses: actions/upload-artifact@v4
        with:
          name: dist-files
          path: dist
Explanation
- We removed the
matrixstrategy for simplicity. - We kept the
Upload build artifactstep. This is crucial because the next job will need these files!
Save the file (Ctrl+S or Cmd+S) after making changes.
Define a deploy job that needs build
Now we will add a second job named deploy. This job should only run if build succeeds. We achieve this using needs: build.
Append the following
deployjob to your.github/workflows/job-dependencies.ymlfile. Make sure it is at the same indentation level asbuild.Start by adding the deploy job definition with its runner and dependency:
deploy:
  runs-on: ubuntu-latest
  needs: build
The needs: build line is crucial - it tells GitHub Actions that this job depends on the successful completion of the build job.
- Add the steps section. First, add the step to download the artifact:
steps:
  - name: Download artifact
    uses: actions/download-artifact@v4
    with:
      name: dist-files
      path: dist
This downloads the artifact that was uploaded in the build job. The name must match the name used in the upload step.
- Add the deploy step:
- name: Deploy project
  run: |
    echo "Deploying project..."
    ls -R dist
    echo "Deployment successful!"
This step simulates a deployment by listing the downloaded files.
- Your full file structure should look like this:
name: Job Dependencies

on: [push]

jobs:
  build:
    runs-on: ubuntu-latest
    steps:
      - uses: actions/checkout@v4
      - name: Use Node.js
        uses: actions/setup-node@v4
        with:
          node-version: "20"
      - name: Install dependencies
        run: npm install
      - name: Run tests
        run: npm test
      - name: Build project
        run: |
          mkdir dist
          echo "Build artifact created at $(date)" > dist/build.txt
      - name: Upload build artifact
        uses: actions/upload-artifact@v4
        with:
          name: dist-files
          path: dist

  deploy:
    runs-on: ubuntu-latest
    needs: build
    steps:
      - name: Download artifact
        uses: actions/download-artifact@v4
        with:
          name: dist-files
          path: dist
      - name: Deploy project
        run: |
          echo "Deploying project..."
          ls -R dist
          echo "Deployment successful!"
Explanation
needs: build: This is the key line. It tells GitHub Actions that this job depends on the successful completion of thebuildjob.uses: actions/download-artifact@v4: Since jobs run on different virtual machines, they don't share filesystems. To get thedistfolder created in thebuildjob, we must download the artifact we uploaded earlier.name: dist-files: Must match the name used in the upload step.
Save the file (Ctrl+S or Cmd+S).
Commit, push, and verify sequential execution
Now let's verify that the jobs run in the correct order.
- Ensure you are in the repository directory:
cd ~/project/github-actions-demo
- Stage the changes:
git add .
- Commit the changes:
git commit -m "Add deploy job with dependency on build"
- Push the changes to the remote repository on GitHub:
git push
Note on Authentication:
When you run git push, the WebIDE will automatically prompt you to authenticate. Follow these detailed steps:
- A popup will appear with the message: "The extension 'GitHub' wants to sign in using GitHub." Click Allow.
- A new notification will appear. Click "Copy&Continue to GitHub", then click "Open" in the next prompt.
- Log in to your GitHub account in the browser window that opens, and enter the authorization code that was copied. After confirming the authorization, the page will automatically close.
- Wait a few seconds, and you will see the terminal successfully complete the push operation.
Privacy Note: The WebIDE will request full access to your GitHub account for authentication purposes. You don't need to worry about privacy concerns - the LabEx VM will be immediately destroyed after you complete the current lab, and your credentials and authorization information will not be retained.
This authentication process does not require manual configuration of username or Personal Access Token.
Verify on GitHub
- Visit your repository on GitHub in a web browser.
- Click on the Actions tab.
- Click on the latest workflow run.
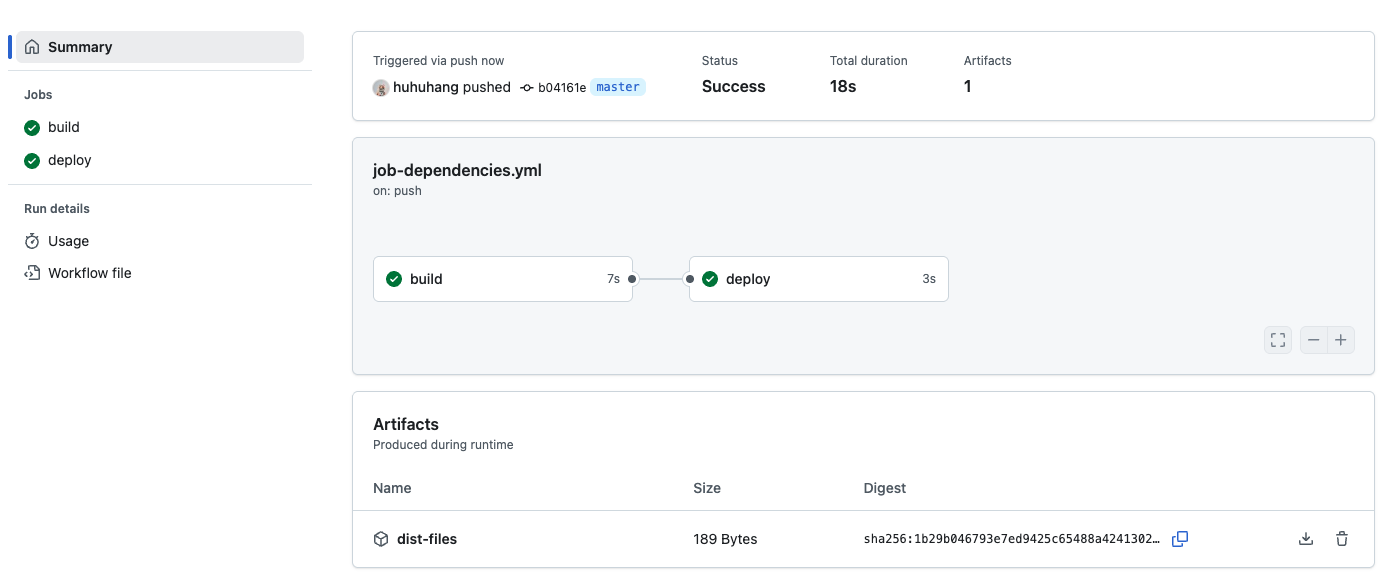
- Look at the visualization graph. You should see two circles (jobs) connected by a line.
- The
buildjob will be on the left. - The
deployjob will be on the right.
- The
- Watch the progress. You will notice that
deploystays in a "Pending" or "Waiting" state untilbuildturns green (Success). - Once
buildfinishes,deploywill start. - Click on the
deployjob logs to see the "Deploying project..." message and the file listing of the downloaded artifact.
Summary
In this lab, you learned how to orchestrate multi-job workflows in GitHub Actions. You:
- Created separate
buildanddeployjobs. - Used the
needskeyword to define a dependency, ensuringdeployruns only afterbuild. - Used
upload-artifactanddownload-artifactto pass data (files) between these separate jobs.
This pattern is fundamental for building robust CI/CD pipelines where you want to build once and then deploy to multiple environments (staging, production) only if previous steps succeed.


