
Introduction
In this lab, students will learn how to create and manipulate HTML tables using fundamental HTML table tags and attributes. The lab focuses on understanding the core structure of HTML tables, including essential tags like <table>, <tr>, <td>, and <th>, which are crucial for organizing and presenting data in a structured grid-like format on web pages.
Participants will progress through a comprehensive learning journey that covers creating basic tables, adding headers and body sections, merging cells using colspan and rowspan, and applying basic styling attributes. By the end of the lab, students will have practical skills in constructing well-structured HTML tables, understanding how to represent data effectively using HTML table elements and their associated attributes.
Understand HTML Table Structure and Basic Tags
In this step, you'll learn the fundamental structure and basic tags used to create HTML tables. HTML tables are essential for organizing and displaying data in a structured, grid-like format on web pages.
HTML tables are created using several key tags:
<table>: The main container for the entire table<tr>: Defines a table row<td>: Defines a standard table cell (data cell)<th>: Defines a table header cell
Let's create a simple example to demonstrate these basic table tags. Open the WebIDE and create a new file called basic_table.html in the ~/project directory.
touch ~/project/basic_table.html
<!doctype html>
<html lang="en">
<head>
<meta charset="UTF-8" />
<title>Basic HTML Table</title>
</head>
<body>
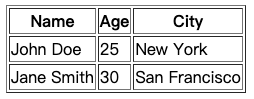
<table border="1">
<tr>
<th>Name</th>
<th>Age</th>
<th>City</th>
</tr>
<tr>
<td>John Doe</td>
<td>25</td>
<td>New York</td>
</tr>
<tr>
<td>Jane Smith</td>
<td>30</td>
<td>San Francisco</td>
</tr>
</table>
</body>
</html>
Let's break down the table structure:
<table border="1">creates the table container with a visible border,borderattribute is optional.- First
<tr>contains<th>header cells for column titles - Subsequent
<tr>elements contain<td>data cells with actual content
Notes: Learn more about How to preview HTML files in the WebIDE.
Key points to remember:
- Each
<tr>represents a row in the table <th>is used for header cells (typically bold and centered)<td>is used for standard data cells- The
borderattribute helps visualize the table structure (though CSS is preferred for styling in real-world applications)
Create a Simple Table with Rows and Columns
In this step, you'll learn how to create a more complex table with multiple rows and columns. Building on the previous step, we'll explore how to structure tables with different numbers of rows and columns to display information effectively.
Open the WebIDE and create a new file called product_table.html in the ~/project directory. We'll create a product inventory table to demonstrate table creation with multiple rows and columns.
touch ~/project/product_table.html
<!doctype html>
<html lang="en">
<head>
<meta charset="UTF-8" />
<title>Product Inventory Table</title>
</head>
<body>
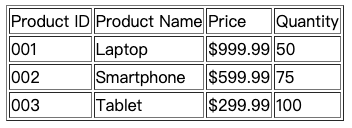
<table border="1">
<tr>
<td>Product ID</td>
<td>Product Name</td>
<td>Price</td>
<td>Quantity</td>
</tr>
<tr>
<td>001</td>
<td>Laptop</td>
<td>$999.99</td>
<td>50</td>
</tr>
<tr>
<td>002</td>
<td>Smartphone</td>
<td>$599.99</td>
<td>75</td>
</tr>
<tr>
<td>003</td>
<td>Tablet</td>
<td>$299.99</td>
<td>100</td>
</tr>
</table>
</body>
</html>
Key points about creating tables with multiple rows and columns:
- Each
<tr>(table row) represents a horizontal row in the table - Inside each
<tr>, multiple<td>(table data) elements create columns - The number of
<td>elements in each<tr>determines the number of columns - All rows should have the same number of columns for a consistent layout
- The
borderattribute helps visualize the table structure
Notice how we've created a 4-column table with:
- First row as column headers
- Three additional rows with product information
- Each row contains four cells corresponding to the columns
Example output in a web browser would show a 4x4 grid displaying product inventory details.
Add Table Headers and Body Sections
In this step, you'll learn how to improve table structure by using semantic HTML tags <thead>, <tbody>, and <tfoot> to organize table content more effectively. These tags help improve the readability and accessibility of your HTML tables.
Open the WebIDE and create a new file called student_grades.html in the ~/project directory. We'll create a student grade table demonstrating the use of table section tags.
touch ~/project/student_grades.html
<!doctype html>
<html lang="en">
  <head>
    <meta charset="UTF-8" />
    <title>Student Grades Table</title>
  </head>
  <body>
    <table border="1">
      <thead>
        <tr>
          <th>Student ID</th>
          <th>Name</th>
          <th>Math</th>
          <th>Science</th>
          <th>Total</th>
        </tr>
      </thead>
      <tbody>
        <tr>
          <td>001</td>
          <td>Alice Johnson</td>
          <td>85</td>
          <td>90</td>
          <td>175</td>
        </tr>
        <tr>
          <td>002</td>
          <td>Bob Smith</td>
          <td>78</td>
          <td>82</td>
          <td>160</td>
        </tr>
        <tr>
          <td>003</td>
          <td>Charlie Brown</td>
          <td>92</td>
          <td>88</td>
          <td>180</td>
        </tr>
      </tbody>
      <tfoot>
        <tr>
          <td colspan="2">Class Average</td>
          <td>85</td>
          <td>86.67</td>
          <td>171.67</td>
        </tr>
      </tfoot>
    </table>
  </body>
</html>
Key points about table sections:
<thead>: Contains header rows with column titles<tbody>: Contains the main data rows<tfoot>: Contains summary or footer rows- Use
<th>for header cells instead of<td> - These semantic tags help improve table structure and accessibility
The example demonstrates:
- A header row with column titles using
<th> - Multiple data rows in the
<tbody> - A footer row with class averages in
<tfoot>
Example output in a web browser would show a structured table with clear sections for headers, body, and footer.

Merge Table Cells Using Colspan and Rowspan
In this step, you'll learn how to merge table cells horizontally and vertically using colspan and rowspan attributes. These attributes allow you to create more complex and flexible table layouts by combining multiple cells.
Open the WebIDE and create a new file called event_schedule.html in the ~/project directory. We'll create an event schedule table demonstrating cell merging.
touch ~/project/event_schedule.html
<!doctype html>
<html lang="en">
  <head>
    <meta charset="UTF-8" />
    <title>Conference Event Schedule</title>
  </head>
  <body>
    <table border="1">
      <thead>
        <tr>
          <th>Time</th>
          <th>Room A</th>
          <th>Room B</th>
        </tr>
      </thead>
      <tbody>
        <tr>
          <td>9:00 AM</td>
          <td rowspan="2">Keynote Speech</td>
          <td>Workshop 1</td>
        </tr>
        <tr>
          <td>10:00 AM</td>
          <td>Workshop 2</td>
        </tr>
        <tr>
          <td>11:00 AM</td>
          <td colspan="2">Lunch Break</td>
        </tr>
        <tr>
          <td>12:00 PM</td>
          <td>Panel Discussion</td>
          <td>Networking Session</td>
        </tr>
      </tbody>
    </table>
  </body>
</html>
Key points about colspan and rowspan:
colspan: Merges cells horizontally across columns- Example:
<td colspan="2">spans the cell across 2 columns
- Example:
rowspan: Merges cells vertically across rows- Example:
<td rowspan="2">spans the cell across 2 rows
- Example:
- When using these attributes, remove the corresponding cells in other rows
In this example:
- The "Keynote Speech" spans 2 rows in Room A
- The "Lunch Break" spans 2 columns across both rooms
- Other cells maintain their standard single-cell layout
Example output in a web browser would show a table with merged cells creating a more compact and organized schedule.
Style and Customize Table Attributes
In this step, you'll learn how to style and customize HTML tables using inline CSS and HTML attributes. Proper styling can improve the readability and visual appeal of your tables.
Open the WebIDE and create a new file called styled_table.html in the ~/project directory. We'll create a table with various styling techniques.
touch ~/project/styled_table.html
<!doctype html>
<html lang="en">
<head>
<meta charset="UTF-8" />
<title>Styled Product Catalog</title>
<style>
table {
width: 100%;
border-collapse: collapse;
font-family: Arial, sans-serif;
}
th {
background-color: #4caf50;
color: white;
padding: 10px;
text-align: left;
}
tr:nth-child(even) {
background-color: #f2f2f2;
}
td {
border: 1px solid #ddd;
padding: 8px;
}
tr:hover {
background-color: #ddd;
}
</style>
</head>
<body>
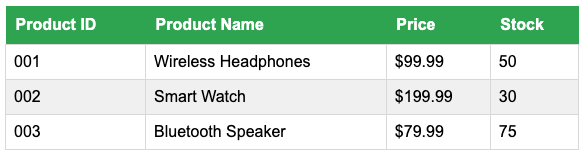
<table>
<thead>
<tr>
<th>Product ID</th>
<th>Product Name</th>
<th>Price</th>
<th>Stock</th>
</tr>
</thead>
<tbody>
<tr>
<td>001</td>
<td>Wireless Headphones</td>
<td>$99.99</td>
<td>50</td>
</tr>
<tr>
<td>002</td>
<td>Smart Watch</td>
<td>$199.99</td>
<td>30</td>
</tr>
<tr>
<td>003</td>
<td>Bluetooth Speaker</td>
<td>$79.99</td>
<td>75</td>
</tr>
</tbody>
</table>
</body>
</html>
Key styling techniques demonstrated:
border-collapse: Removes spacing between table cells- Custom font and typography
- Colored header row
- Alternating row colors using
:nth-child(even) - Hover effect on table rows
- Padding and border styling for cells
Styling options include:
- Inline CSS in
<style>tag - Separate CSS file (recommended for larger projects)
- Inline styles using
styleattribute - CSS properties for layout, colors, and interactivity
Example output in a web browser would show a professionally styled, easy-to-read table with hover and color effects.
Summary
In this lab, participants learned the fundamentals of creating HTML tables using essential HTML tags such as <table>, <tr>, <td>, and <th>. The lab guided learners through understanding table structure, creating basic tables with rows and columns, and exploring techniques for adding headers, merging cells, and customizing table attributes.
The practical exercises demonstrated how to construct structured, grid-like data presentations in web pages, covering key concepts like defining table rows, creating header and data cells, and using attributes like border to enhance table visualization. Participants gained hands-on experience in building semantic and well-organized HTML tables that can effectively display information across various web design scenarios.


