
Introduction
In this lab, you will embark on a foundational journey into the world of Linux command-line operations, specifically within a Red Hat Enterprise Linux (RHEL) environment. You will gain hands-on experience with essential commands to identify user and system information, manage user passwords, and inspect various file types.
Through practical exercises, you will learn to view file content using cat, head, and tail, count file statistics, and efficiently navigate your command history. Furthermore, you will master crucial command-line editing shortcuts, enhancing your productivity and proficiency in managing Linux systems.
Identify User and System Time
In this step, you will learn how to identify the current user logged into the system and how to display the system's current date and time using basic Linux commands. Understanding these fundamental commands is crucial for navigating and managing any Linux environment.
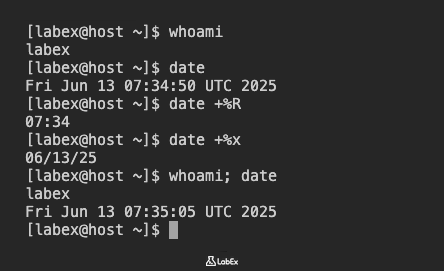
First, let's find out which user you are currently logged in as. The whoami command is used for this purpose. It prints the effective username of the current user.
Type the following command in your terminal:
whoami
You should see labex as the output, indicating that you are logged in as the labex user.
labex
Next, we will explore the date command. This command is used to display or set the system date and time. When used without any options, it displays the current date and time in a default format.
Execute the date command:
date
The output will show the current day of the week, month, day of the month, time (HH:MM:SS), time zone, and year. The exact output will vary depending on when you run the command.
Mon Jul 22 10:30:45 AM UTC 2024
The date command is very flexible and allows you to format the output in various ways using format specifiers. For example, to display only the current time in 24-hour format (HH:MM), you can use +%R.
Try displaying only the time:
date +%R
The output will be similar to:
10:30
To display only the current date in MM/DD/YYYY format, you can use +%x.
Try displaying only the date:
date +%x
The output will be similar to:
07/22/2024
Finally, you can execute multiple commands on a single line by separating them with a semicolon (;). This can be useful for quickly running a sequence of commands.
Let's try running whoami and date on the same line:
whoami; date
You will see the output of both commands, one after the other:
labex
Mon Jul 22 10:30:45 AM UTC 2024
Manage User Passwords and View File Types
In this step, you will learn how to change a user's password and how to determine the type of a file using the file command. Understanding file types is essential for working with various data formats and executables in Linux.
First, let's observe how a password change begins without changing the lab's default password. The passwd command is used to change user passwords. For the labex user, it prompts for the current password and then a new password. The current password is labex.
Type the following command in your terminal:
passwd
At the current password prompt, type labex and press Enter. When the new password prompt appears, press Ctrl+C to cancel the command and return to the shell. Do not enter a new password.
Changing password for user labex.
Current password:
New password: ^C
Note: When you type passwords in Linux, nothing will appear on the screen for security reasons. This is normal behavior and does not mean the VM is not responding. The system is still receiving your input even though you cannot see the characters being typed.
Next, we will explore the file command. This command determines the type of a file. It's very useful for understanding what kind of data a file contains, especially when the file extension is missing or misleading.
Let's examine the type of the /etc/passwd file. This file contains information about all user accounts on the system.
file /etc/passwd
The output will indicate that /etc/passwd is an ASCII text file.
/etc/passwd: ASCII text
Now, let's check the type of an executable file, such as /bin/bash, which is the shell program you are currently using.
file /bin/bash
The output will show that /bin/bash is an executable file, along with details about its architecture and other properties.
/bin/bash: ELF 64-bit LSB pie executable, x86-64, version 1 (SYSV), dynamically linked, interpreter /lib64/ld-linux-x86-64.so.2, BuildID[sha1]=<omitted>, for GNU/Linux <omitted>, stripped
Finally, let's determine the type of a directory. We will use the /home directory as an example.
file /home
The output will simply state that /home is a directory.
/home: directory
These examples demonstrate how the file command can help you quickly identify the nature of different files and directories on your Linux system.
Inspect File Content with cat, head, and tail
In this step, you will learn how to inspect the content of text files using three essential Linux commands: cat, head, and tail. These commands are fundamental for viewing file contents, especially configuration files and log files.
First, let's use the cat command. The cat command (short for concatenate) is primarily used to display the content of files. It can also be used to combine multiple files into one.
Let's view the entire content of the /etc/passwd file. This file contains user account information.
cat /etc/passwd
You will see the full content of the /etc/passwd file printed to your terminal. The output will be extensive, showing all user entries.
root:x:0:0:root:/root:/bin/bash
bin:x:1:1:bin:/bin:/sbin/nologin
daemon:x:2:2:daemon:/sbin:/sbin/nologin
adm:x:3:4:adm:/var/adm:/sbin/nologin
...output omitted...
Now, let's create two simple text files in your ~/project directory to demonstrate cat with multiple files.
Create file1.txt:
echo "Hello World!!" > ~/project/file1.txt
Create file2.txt:
echo "Introduction to Linux commands." > ~/project/file2.txt
Now, use cat to display the content of both files:
cat ~/project/file1.txt ~/project/file2.txt
The output will show the content of file1.txt followed by file2.txt.
Hello World!!
Introduction to Linux commands.
Next, we will use the head command. The head command displays the first few lines of a file. By default, it shows the first 10 lines.
Let's view the first 10 lines of /etc/passwd:
head /etc/passwd
You will see the first 10 lines of the /etc/passwd file.
root:x:0:0:root:/root:/bin/bash
bin:x:1:1:bin:/bin:/sbin/nologin
daemon:x:2:2:daemon:/sbin:/sbin/nologin
adm:x:3:4:adm:/var/adm:/sbin/nologin
lp:x:4:7:lp:/var/spool/lpd:/sbin/nologin
sync:x:5:0:sync:/sbin:/bin/sync
shutdown:x:6:0:shutdown:/sbin:/sbin/shutdown
halt:x:7:0:halt:/sbin:/sbin/halt
mail:x:8:12:mail:/var/spool/mail:/sbin/nologin
operator:x:11:0:operator:/root:/sbin/nologin
You can specify the number of lines to display using the -n option. For example, to view the first 3 lines:
head -n 3 /etc/passwd
root:x:0:0:root:/root:/bin/bash
bin:x:1:1:bin:/bin:/sbin/nologin
daemon:x:2:2:daemon:/sbin:/sbin/nologin
Finally, let's use the tail command. The tail command displays the last few lines of a file. By default, it also shows the last 10 lines.
Let's view the last 10 lines of /etc/passwd:
tail /etc/passwd
You will see the last 10 lines of the /etc/passwd file.
systemd-coredump:x:999:997:systemd Core Dumper:/:/sbin/nologin
systemd-resolve:x:998:996:systemd Resolver:/:/sbin/nologin
systemd-network:x:997:995:systemd Network Management:/:/sbin/nologin
dbus:x:81:81:System Message Bus:/:/sbin/nologin
polkitd:x:996:994:User for polkitd:/:/sbin/nologin
unbound:x:995:993:Unbound DNS resolver:/:/sbin/nologin
tss:x:59:59:TPM software stack:/:/sbin/nologin
gdm:x:42:42::/var/lib/gdm:/sbin/nologin
gnome-initial-setup:x:980:978::/run/gnome-initial-setup/:/sbin/nologin
dnsmasq:x:979:977:Dnsmasq DHCP and DNS server:/var/lib/dnsmasq:/sbin/nologin
Similar to head, you can specify the number of lines to display using the -n option. For example, to view the last 3 lines:
tail -n 3 /etc/passwd
gdm:x:42:42::/var/lib/gdm:/sbin/nologin
gnome-initial-setup:x:980:978::/run/gnome-initial-setup/:/sbin/nologin
dnsmasq:x:979:977:Dnsmasq DHCP and DNS server:/var/lib/dnsmasq:/sbin/nologin
These commands are invaluable for quickly examining file contents without opening them in a text editor, which is especially useful for large files or when you only need to check specific parts.
Count File Statistics and Use Command History
In this step, you will learn how to use the wc command to count lines, words, and characters in files, and how to effectively use the command history feature in your terminal. Managing command history is crucial for efficiency and recalling previously executed commands.
First, let's explore the wc command (word count). This command is used to count the number of lines, words, and characters in a file.
Let's count the lines, words, and characters in the /etc/passwd file:
wc /etc/passwd
The output will show three numbers followed by the filename: lines, words, and characters. The exact numbers may vary slightly depending on your system configuration.
41 98 2338 /etc/passwd
You can use options to display only specific counts:
-lfor lines-wfor words-cfor characters
Let's count only the lines in /etc/passwd and /etc/group (which contains information about user groups). We can do this on a single line using a semicolon.
wc -l /etc/passwd
wc -l /etc/group
You will see the line counts for each file:
41 /etc/passwd
63 /etc/group
Now, let's count only the characters in /etc/group and /etc/hosts (which maps hostnames to IP addresses).
wc -c /etc/group /etc/hosts
The output will show the character count for each file and a total count.
883 /etc/group
114 /etc/hosts
997 total
Next, we will learn about the command history. Your shell keeps a record of all commands you have executed. This is incredibly useful for re-running commands or remembering what you did previously.
To display your command history, use the history command:
history
You will see a numbered list of all commands you have entered in your current session and previous sessions. The output will vary greatly depending on your activity.
...output omitted...
   23  clear
   24  whoami
   25  date
   26  file /etc/passwd
   27  cat /etc/passwd
   28  head /etc/passwd
   29  tail /etc/passwd
   30  wc /etc/passwd
   31  history
You can re-execute a command from your history using the exclamation point (!) followed by the command number or a string.
For example, to re-execute the command at number 26 (which was file /etc/passwd in the example above, but will be different for you), find its number in your history output and use it:
!26 ## Replace 26 with the actual number of 'file /etc/passwd' from your history
The shell will first display the command it's about to execute, then its output:
file /etc/passwd
/etc/passwd: ASCII text
You can also re-execute the most recent command that starts with a specific string. For instance, to re-run the last command that started with wc:
!wc
This will execute the last wc command you ran.
wc -c /etc/group /etc/hosts
883 /etc/group
114 /etc/hosts
997 total
These history features can significantly speed up your workflow by allowing you to quickly recall and re-execute complex commands without retyping them.
Practice Command Line Editing Shortcuts
In this step, you will learn and practice useful command-line editing shortcuts. These shortcuts can significantly improve your efficiency when typing and modifying commands in the terminal, allowing you to navigate and edit text without constantly reaching for the mouse.
First, let's understand how to write a long command on multiple lines. This can improve readability for complex commands. You can use a backslash (\) at the end of a line to indicate that the command continues on the next line.
Let's try displaying the first 3 lines of two dictionary files using a multi-line command. These files are typically found on Linux systems and contain lists of words.
head -n 3 \
  /home/labex/project/words \
  /home/labex/project/linux.words
When you press Enter after the first line, your terminal will show a > prompt (or similar) indicating that it's waiting for the rest of the command. Type the remaining parts and press Enter again.
==> /home/labex/project/words <==
1080
10-point
10th

==> /home/labex/project/linux.words <==
1080
10-point
10th
Now, let's practice some command-line editing shortcuts. These shortcuts work in most modern Linux terminals (like Bash or Zsh).
Type a long command, but do not press Enter yet:
echo "This is a very long command that we will edit using shortcuts."
- Ctrl+A: Jump to the beginning of the command line.
- Type the command above, then press
Ctrl+A. Your cursor will move to the beginning of the line.
- Type the command above, then press
- Ctrl+E: Jump to the end of the command line.
- After pressing
Ctrl+A, pressCtrl+E. Your cursor will move back to the end of the line.
- After pressing
- Ctrl+U: Clear from the cursor to the beginning of the command line.
- Type the command again. Place your cursor somewhere in the middle of the line (e.g., after "very"). Press
Ctrl+U. The text from the cursor to the beginning will be deleted.
- Type the command again. Place your cursor somewhere in the middle of the line (e.g., after "very"). Press
- Ctrl+K: Clear from the cursor to the end of the command line.
- Type the command again. Place your cursor somewhere in the middle of the line (e.g., after "very"). Press
Ctrl+K. The text from the cursor to the end will be deleted.
- Type the command again. Place your cursor somewhere in the middle of the line (e.g., after "very"). Press
- Ctrl+LeftArrow (or Alt+B): Jump to the beginning of the previous word on the command line.
- Type the command again. Place your cursor at the end of the line. Press
Ctrl+LeftArrowrepeatedly to move word by word to the left.
- Type the command again. Place your cursor at the end of the line. Press
- Ctrl+RightArrow (or Alt+F): Jump to the end of the next word on the command line.
- Place your cursor at the beginning of the line. Press
Ctrl+RightArrowrepeatedly to move word by word to the right.
- Place your cursor at the beginning of the line. Press
- Ctrl+R: Search the history list of commands for a pattern.
- Press
Ctrl+R. A(reverse-i-search)prompt will appear. Start typing a part of a command you previously executed, e.g.,date. The terminal will show the most recent command from your history that matches. Keep pressingCtrl+Rto cycle through older matches. Press Enter to execute the found command, or Left/Right arrow to edit it.
- Press
These shortcuts will significantly speed up your command-line interaction once you get used to them. Practice them regularly to build muscle memory.
Summary
In this lab, you learned fundamental Linux commands for identifying user and system information. You practiced using whoami to determine the current logged-in user and date to display the system's current date and time, including various formatting options like +%R for time and +%x for date. Additionally, you discovered how to execute multiple commands on a single line using a semicolon, enhancing efficiency in the command-line environment.


