
Introduction
In this lab, you will learn how to use the actions/checkout action, which is one of the most essential steps in any GitHub Actions workflow. By default, a GitHub Actions runner starts in an empty directory. To build, test, or deploy your code, you must first check out the repository into the runner's workspace.
You will create a workflow file, configure it to check out your code, and then verify that the files are accessible by listing them in the logs. This process simulates a standard Continuous Integration (CI) pipeline setup.
This lab builds on the repository you created in the previous labs. You will clone the github-actions-demo repository and create a new workflow that uses the checkout action.
Add a step to use actions/checkout@v4 in the workflow
In this step, you will clone the repository and create a workflow that uses the actions/checkout action. This action checks out your repository under $GITHUB_WORKSPACE, so your workflow can access it.
- On your GitHub repository page for
github-actions-demo, click the green Code button. - Ensure the HTTPS tab is selected and copy the URL. It should look like
https://github.com/your-username/github-actions-demo.git. - Open the terminal in the LabEx environment. The default path is
~/project. - Use the
git clonecommand to download the repository. Replaceyour-usernamewith your actual GitHub username.
cd ~/project
git clone https://github.com/your-username/github-actions-demo.git
- Navigate into the cloned repository:
cd ~/project/github-actions-demo
- Create a new workflow file named
ci.ymlinside the.github/workflowsdirectory:
touch .github/workflows/ci.yml
- Open
.github/workflows/ci.ymlin the WebIDE editor and add the following content. This configuration defines a workflow named "CI" that runs on every push event. It includes a single job namedbuildrunning onubuntu-latest, with a step to check out the code.
name: CI

on: [push]

jobs:
  build:
    runs-on: ubuntu-latest

    steps:
      - name: Checkout code
        uses: actions/checkout@v4
This uses: actions/checkout@v4 line tells GitHub Actions to download and run the v4 version of the official checkout action.
Add a step to list files with run ls -la command
In this step, you will add a second step to your workflow to verify that the checkout action successfully retrieved your files. You will use a standard shell command to list the files in the current directory.
Open .github/workflows/ci.yml and append the following step to the steps list. Ensure the indentation aligns correctly with the previous step.
- name: List files
  run: ls -la
Your complete .github/workflows/ci.yml file should now look like this:
name: CI

on: [push]

jobs:
  build:
    runs-on: ubuntu-latest

    steps:
      - name: Checkout code
        uses: actions/checkout@v4

      - name: List files
        run: ls -la
The run keyword allows you to execute command-line programs. Here, ls -la will list all files, including hidden ones, in the repository root.
Create a sample file named index.js in the repository
In this step, you will create a sample file in your repository. This file will serve as proof that the actions/checkout action is working correctly when we see it listed in the workflow logs.
- Ensure you are in the repository directory:
cd ~/project/github-actions-demo
- Create a simple JavaScript file named
index.jsin the root of your repository:
echo "console.log('Hello, GitHub Actions!');" > index.js
- You can verify the file creation by running:
ls -l index.js
This file represents the source code of your application that the CI pipeline would typically build or test.
Commit and push the sample file and workflow updates
In this step, you will commit your changes and push them to GitHub. Pushing this commit will trigger the workflow we defined because of the on: [push] configuration.
- Ensure you are in the repository directory:
cd ~/project/github-actions-demo
- Check the status of your repository to see the untracked files:
git status
You should see .github/workflows/ci.yml and index.js as untracked.
- Stage all changes:
git add .
- Commit the changes with a descriptive message:
git commit -m "Add CI workflow and index.js"
Example Output:
[main ... ] Add CI workflow and index.js
 2 files changed, 14 insertions(+), 0 deletions(-)
 create mode 100644 .github/workflows/ci.yml
 create mode 100644 index.js
- Push the changes to the remote repository on GitHub:
git push
Note on Authentication:
When you run git push, the WebIDE will automatically prompt you to authenticate. Follow these detailed steps:
- A popup will appear with the message: "The extension 'GitHub' wants to sign in using GitHub." Click Allow.
- A new notification will appear. Click "Copy&Continue to GitHub", then click "Open" in the next prompt.
- Log in to your GitHub account in the browser window that opens, and enter the authorization code that was copied. After confirming the authorization, the page will automatically close.
- Wait a few seconds, and you will see the terminal successfully complete the push operation.
Privacy Note: The WebIDE will request full access to your GitHub account for authentication purposes. You don't need to worry about privacy concerns - the LabEx VM will be immediately destroyed after you complete the current lab, and your credentials and authorization information will not be retained.
This authentication process does not require manual configuration of username or Personal Access Token.
Example Output:
Enumerating objects: 6, done.
Counting objects: 100% (6/6), done.
Delta compression using up to 4 threads
Compressing objects: 100% (4/4), done.
Writing objects: 100% (4/4), 512 bytes | 512.00 KiB/s, done.
Total 4 (delta 1), reused 0 (delta 0), pack-reused 0
To https://github.com/your-username/github-actions-demo.git
   1234567..abcdef1  main -> main
This push triggers the workflow on GitHub.
Check workflow run to verify file listing in logs
After pushing your code, the workflow will automatically trigger on GitHub. You can view the workflow run logs to verify that the checkout action successfully retrieved your files.
- Visit your repository on GitHub in a web browser:
https://github.com/your-username/github-actions-demo - Click on the Actions tab at the top of the repository page.
- You should see a workflow run listed, likely named "Add CI workflow and index.js" or "CI".
Note: When you push code, multiple Actions may be triggered if you have multiple workflow files in your repository. Please identify the correct workflow run by checking the workflow name in the left sidebar or using the workflow run list on the right side.
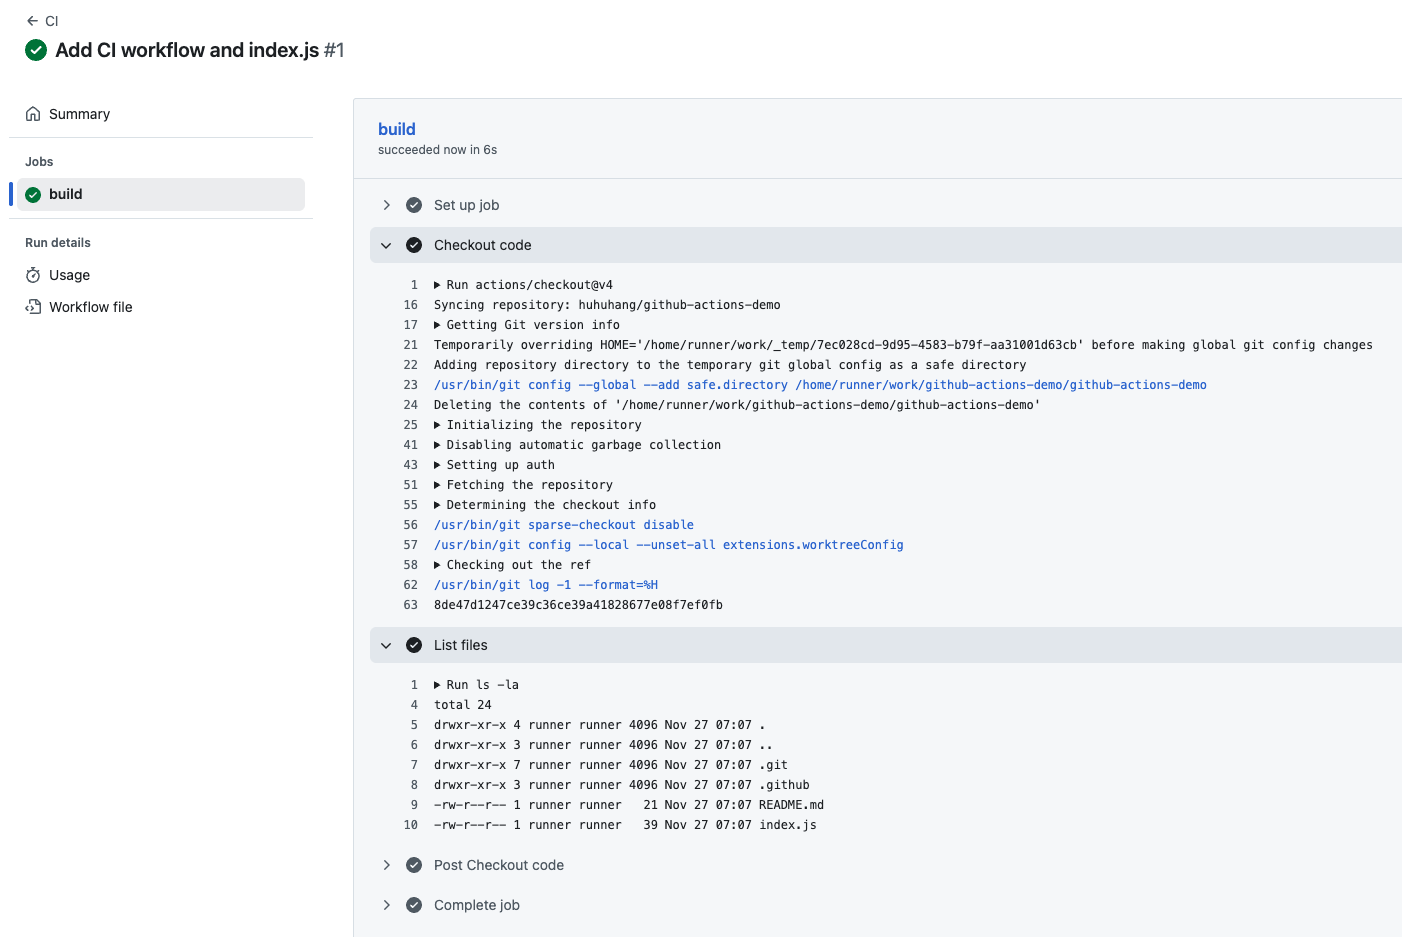
- Click on the workflow run title, then click on the build job.
- Expand the List files step to see the output.
You should see the ls -la command output, which includes index.js and other files from your repository:
Run ls -la
  ls -la
  shell: /usr/bin/bash -e {0}
total XX
drwxr-xr-x  X runner ... .
drwxr-xr-x  X runner ... ..
drwxr-xr-x  X runner ... .git
drwxr-xr-x  X runner ... .github
-rw-r--r--  X runner ... index.js
...
This confirms that the actions/checkout step successfully checked out your repository. Without the checkout step, the ls -la command would only show an empty directory. This demonstrates why the checkout action is essential - it makes your repository files available to the workflow runner.
Summary
In this lab, you have successfully created a GitHub Actions workflow that uses the actions/checkout action. You learned how to:
- Set up the
.github/workflowsdirectory structure. - Define a workflow that triggers on push events.
- Use
actions/checkout@v4to clone your repository into the runner. - Add a step to verify the file presence using
ls -la.
This is the foundational step for almost all CI/CD pipelines, enabling subsequent steps to build, test, and deploy your application code.


