
Introduction
In modern software development, Continuous Integration (CI) is a crucial practice where developers frequently merge their code changes into a central repository. Automated builds and tests are run to verify these changes.
GitHub Actions is a popular CI/CD platform that allows you to automate your build, test, and deployment pipeline directly within GitHub.
In this lab, you will learn how to create a basic GitHub Actions workflow for a Node.js project. You will define steps to set up the Node.js environment, install dependencies, and run tests. Finally, you will commit and push these changes to your GitHub repository.
This lab builds on the repository you created in the previous labs. You will clone the github-actions-demo repository and create a CI workflow for a Node.js project.
By the end of this lab, you will understand the structure of a .yml workflow file and how to configure essential CI steps.
Add Node.js setup with uses actions/setup-node@v4
In this step, you will clone the repository and create a workflow file with Node.js environment setup. GitHub Actions workflows are defined in YAML files located in the .github/workflows directory of your repository.
- On your GitHub repository page for
github-actions-demo, click the green Code button. - Ensure the HTTPS tab is selected and copy the URL. It should look like
https://github.com/your-username/github-actions-demo.git. - Open the terminal in the LabEx environment. The default path is
~/project. - Use the
git clonecommand to download the repository. Replaceyour-usernamewith your actual GitHub username.
cd ~/project
git clone https://github.com/your-username/github-actions-demo.git
- Navigate into the cloned repository:
cd ~/project/github-actions-demo
- Create a new file named
node-ci.ymlinside the.github/workflowsdirectory:
touch .github/workflows/node-ci.yml
- Open
.github/workflows/node-ci.ymlin the WebIDE and start by adding the workflow name and trigger:
name: Node.js CI

on: [push]
- Add the jobs section and define the build job with its runner:
jobs:
  build:
    runs-on: ubuntu-latest
- Add the steps section. First, add the checkout step to get the repository code:
steps:
  - uses: actions/checkout@v4
- Add the Node.js setup step:
- name: Use Node.js
  uses: actions/setup-node@v4
  with:
    node-version: "20"
Your complete file should now look like this:
name: Node.js CI

on: [push]

jobs:
  build:
    runs-on: ubuntu-latest

    steps:
      - uses: actions/checkout@v4
      - name: Use Node.js
        uses: actions/setup-node@v4
        with:
          node-version: "20"
Explanation
name: The name of your workflow.on: [push]: Triggers the workflow whenever code is pushed to the repository.jobs: Groups together all the tasks that run in the workflow.runs-on: ubuntu-latest: Configures the job to run on a virtual machine hosted by GitHub running the latest Ubuntu version.steps: A sequence of tasks.uses: actions/checkout@v4: Checks out your repository so the workflow can access it.uses: actions/setup-node@v4: This is the official action to install Node.js on the runner. We specify version '20'.
Add step to install dependencies with run npm install
Now that the environment is set up with Node.js, the next logical step in a CI pipeline is to install the project's dependencies. This ensures that all external libraries required by your application are available before building or testing.
Open .github/workflows/node-ci.yml again and append the step to install dependencies.
Add the following lines to the end of the steps section (make sure to maintain the indentation):
- name: Install dependencies
  run: npm install
Your complete .github/workflows/node-ci.yml should now look like this:
name: Node.js CI

on: [push]

jobs:
  build:
    runs-on: ubuntu-latest

    steps:
      - uses: actions/checkout@v4
      - name: Use Node.js
        uses: actions/setup-node@v4
        with:
          node-version: "20"
      - name: Install dependencies
        run: npm install
Explanation
run: npm install: This executes thenpm installcommand in the shell of the runner. It reads thepackage.jsonfile (which we will create later) and installs the listed dependencies.
Add step to run tests with run npm test
After installing dependencies, the most critical part of Continuous Integration is running automated tests. This ensures that the new changes do not break existing functionality.
Open .github/workflows/node-ci.yml and append the step to run tests.
Add the following lines to the end of the steps section:
- name: Run tests
  run: npm test
Your final .github/workflows/node-ci.yml should look like this:
name: Node.js CI

on: [push]

jobs:
  build:
    runs-on: ubuntu-latest

    steps:
      - uses: actions/checkout@v4
      - name: Use Node.js
        uses: actions/setup-node@v4
        with:
          node-version: "20"
      - name: Install dependencies
        run: npm install
      - name: Run tests
        run: npm test
Explanation
run: npm test: This executes the test script defined in yourpackage.json. If the tests fail (exit with a non-zero code), the GitHub Action workflow will be marked as failed.
Create a package.json and simple test file
For the workflow we just created to actually work, we need a Node.js project structure. Specifically, npm install needs a package.json file, and npm test needs a test script defined.
- Ensure you are in the repository directory:
cd ~/project/github-actions-demo
- Create a
package.jsonfile in the repository root:
touch package.json
- Open
package.jsonand add the following content. This defines a basic project and a simple test script that always passes (exits with code 0).
{
  "name": "github-actions-demo",
  "version": "1.0.0",
  "description": "Demo project",
  "main": "index.js",
  "scripts": {
    "test": "echo \"Running tests...\" && exit 0"
  },
  "keywords": [],
  "author": "",
  "license": "ISC"
}
- Next, let's update
index.jsto represent our application code.
echo "console.log('Hello, GitHub Actions!');" > index.js
Now you have a minimal Node.js project that satisfies the requirements of the workflow we defined:
npm installwill run (even though there are no dependencies, it will checkpackage.json).npm testwill run the commandecho "Running tests..." && exit 0.
Commit, push, and verify build/test in workflow run
Now that we have created the workflow definition and the project files, we need to commit and push them to GitHub. Pushing these commits will trigger the Action runner to execute the steps we defined.
- Ensure you are in the repository directory:
cd ~/project/github-actions-demo
- Check the status of your repository:
git status
- Add all files to the staging area:
git add .
- Commit the changes with a descriptive message:
git commit -m "Add Node.js CI workflow and project files"
- Push the changes to the remote repository on GitHub:
git push
Note on Authentication:
When you run git push, the WebIDE will automatically prompt you to authenticate. Follow these detailed steps:
- A popup will appear with the message: "The extension 'GitHub' wants to sign in using GitHub." Click Allow.
- A new notification will appear. Click "Copy&Continue to GitHub", then click "Open" in the next prompt.
- Log in to your GitHub account in the browser window that opens, and enter the authorization code that was copied. After confirming the authorization, the page will automatically close.
- Wait a few seconds, and you will see the terminal successfully complete the push operation.
Privacy Note: The WebIDE will request full access to your GitHub account for authentication purposes. You don't need to worry about privacy concerns - the LabEx VM will be immediately destroyed after you complete the current lab, and your credentials and authorization information will not be retained.
Verify the Workflow Run
- Visit your repository on GitHub in a web browser:
https://github.com/your-username/github-actions-demo - Click on the Actions tab at the top of the repository page.
- You should see a workflow run listed, likely named "Add Node.js CI workflow and project files" or "Node.js CI".
Note: When you push code, multiple Actions may be triggered if you have multiple workflow files in your repository. Please identify the correct workflow run by checking the workflow name in the left sidebar or using the workflow run list on the right side.
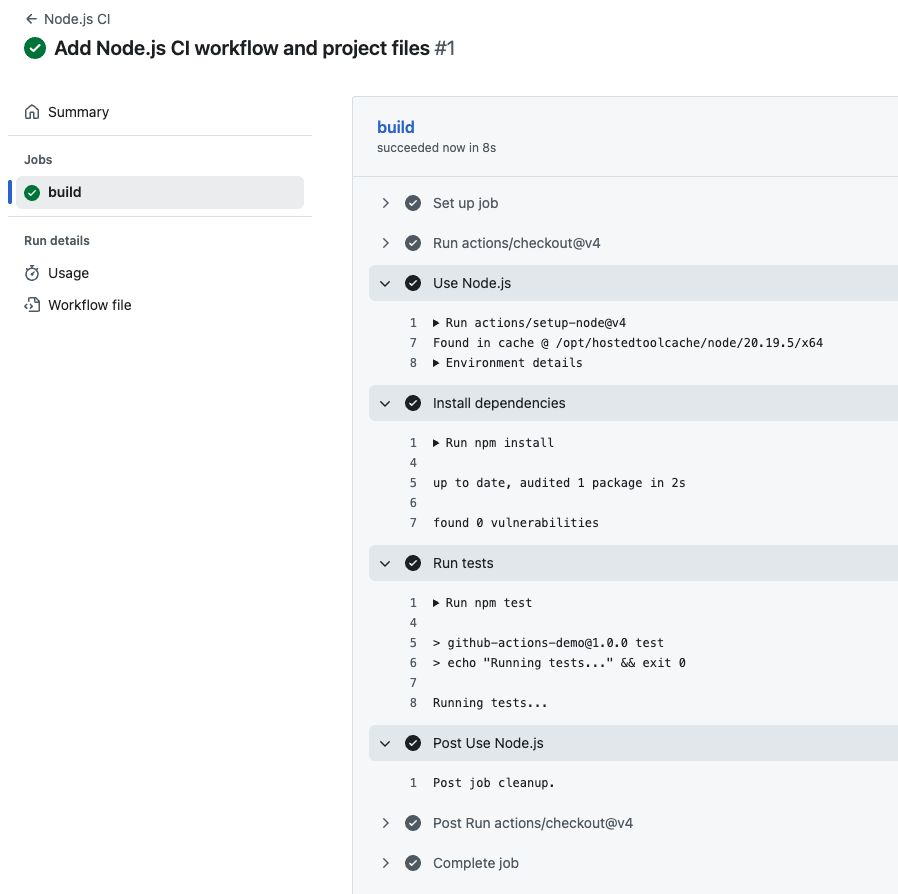
- Click on the workflow run title, then click on the build job to see the detailed logs.
You can expand each step to see what happened:
- Checkout code: Shows that the repository was checked out
- Use Node.js: Shows Node.js v20 was installed
- Install dependencies: Shows
npm installwas executed - Run tests: Shows
npm testwas executed and you should see the outputRunning tests...
If all steps completed successfully, your CI workflow is working correctly.
Summary
In this lab, you have successfully created a basic Continuous Integration (CI) workflow using GitHub Actions. You learned how to:
- Create a
.ymlworkflow file in the.github/workflowsdirectory. - Configure the workflow to trigger on
pushevents. - Use the
actions/setup-nodeaction to configure the Node.js environment. - Add steps to install dependencies (
npm install) and run tests (npm test). - Set up a basic Node.js project structure to support the workflow.
These skills form the foundation of modern DevOps practices, allowing you to automate the verification of your code every time you make a change.


