Introduction
Welcome to your AWS learning journey. Amazon Web Services (AWS) provides services for running applications, storing files and managing data. You are starting AWS Foundations for Beginners, the first course in this learning path. Across eight guided labs, this portfolio website will help you learn publishing, access control, asset storage, recovery and monitoring. You will then explore resource management and individual services in more depth.
Launch a cloud server and open your first portfolio website. The website already has a layout, project artwork and example profile, so you can focus on getting it running. At the end, you will remove the server you created.
No AWS, Linux or programming experience is required. The AWS CLI, connection and website materials are prepared. You do not need a personal AWS account or access keys. This lab starts independently; later labs will supply their own starting website.
Certification Relevance
| Certification | Exam task | Practice |
|---|---|---|
| AWS Certified Cloud Practitioner (CLF-C02) | Tasks 3.1, 3.3 | Use the AWS CLI and launch an EC2 compute instance for a website. |
Lab Overview
Launch and Open Your Website
In this step, you will get familiar with your prepared workspace, start one server and open its portfolio website.
LabEx provides a virtual machine (VM), a prepared computer you use through your browser. The AWS CLI (AWS’s command-line tool), this lab’s access configuration, website files and starting network are already prepared. You do not need to install tools on your own computer, register a personal AWS account, sign in to AWS or provide access keys.
Find these areas before entering your first command:
| Area | What you do there |
|---|---|
| Step instructions | Read the current task and follow the steps in order. |
| AWS View, above Terminal | Observe the lab resources and their state, then use the website link after creating the server. |
| Terminal, at the bottom | Type or paste commands at the prompt and read their responses. |
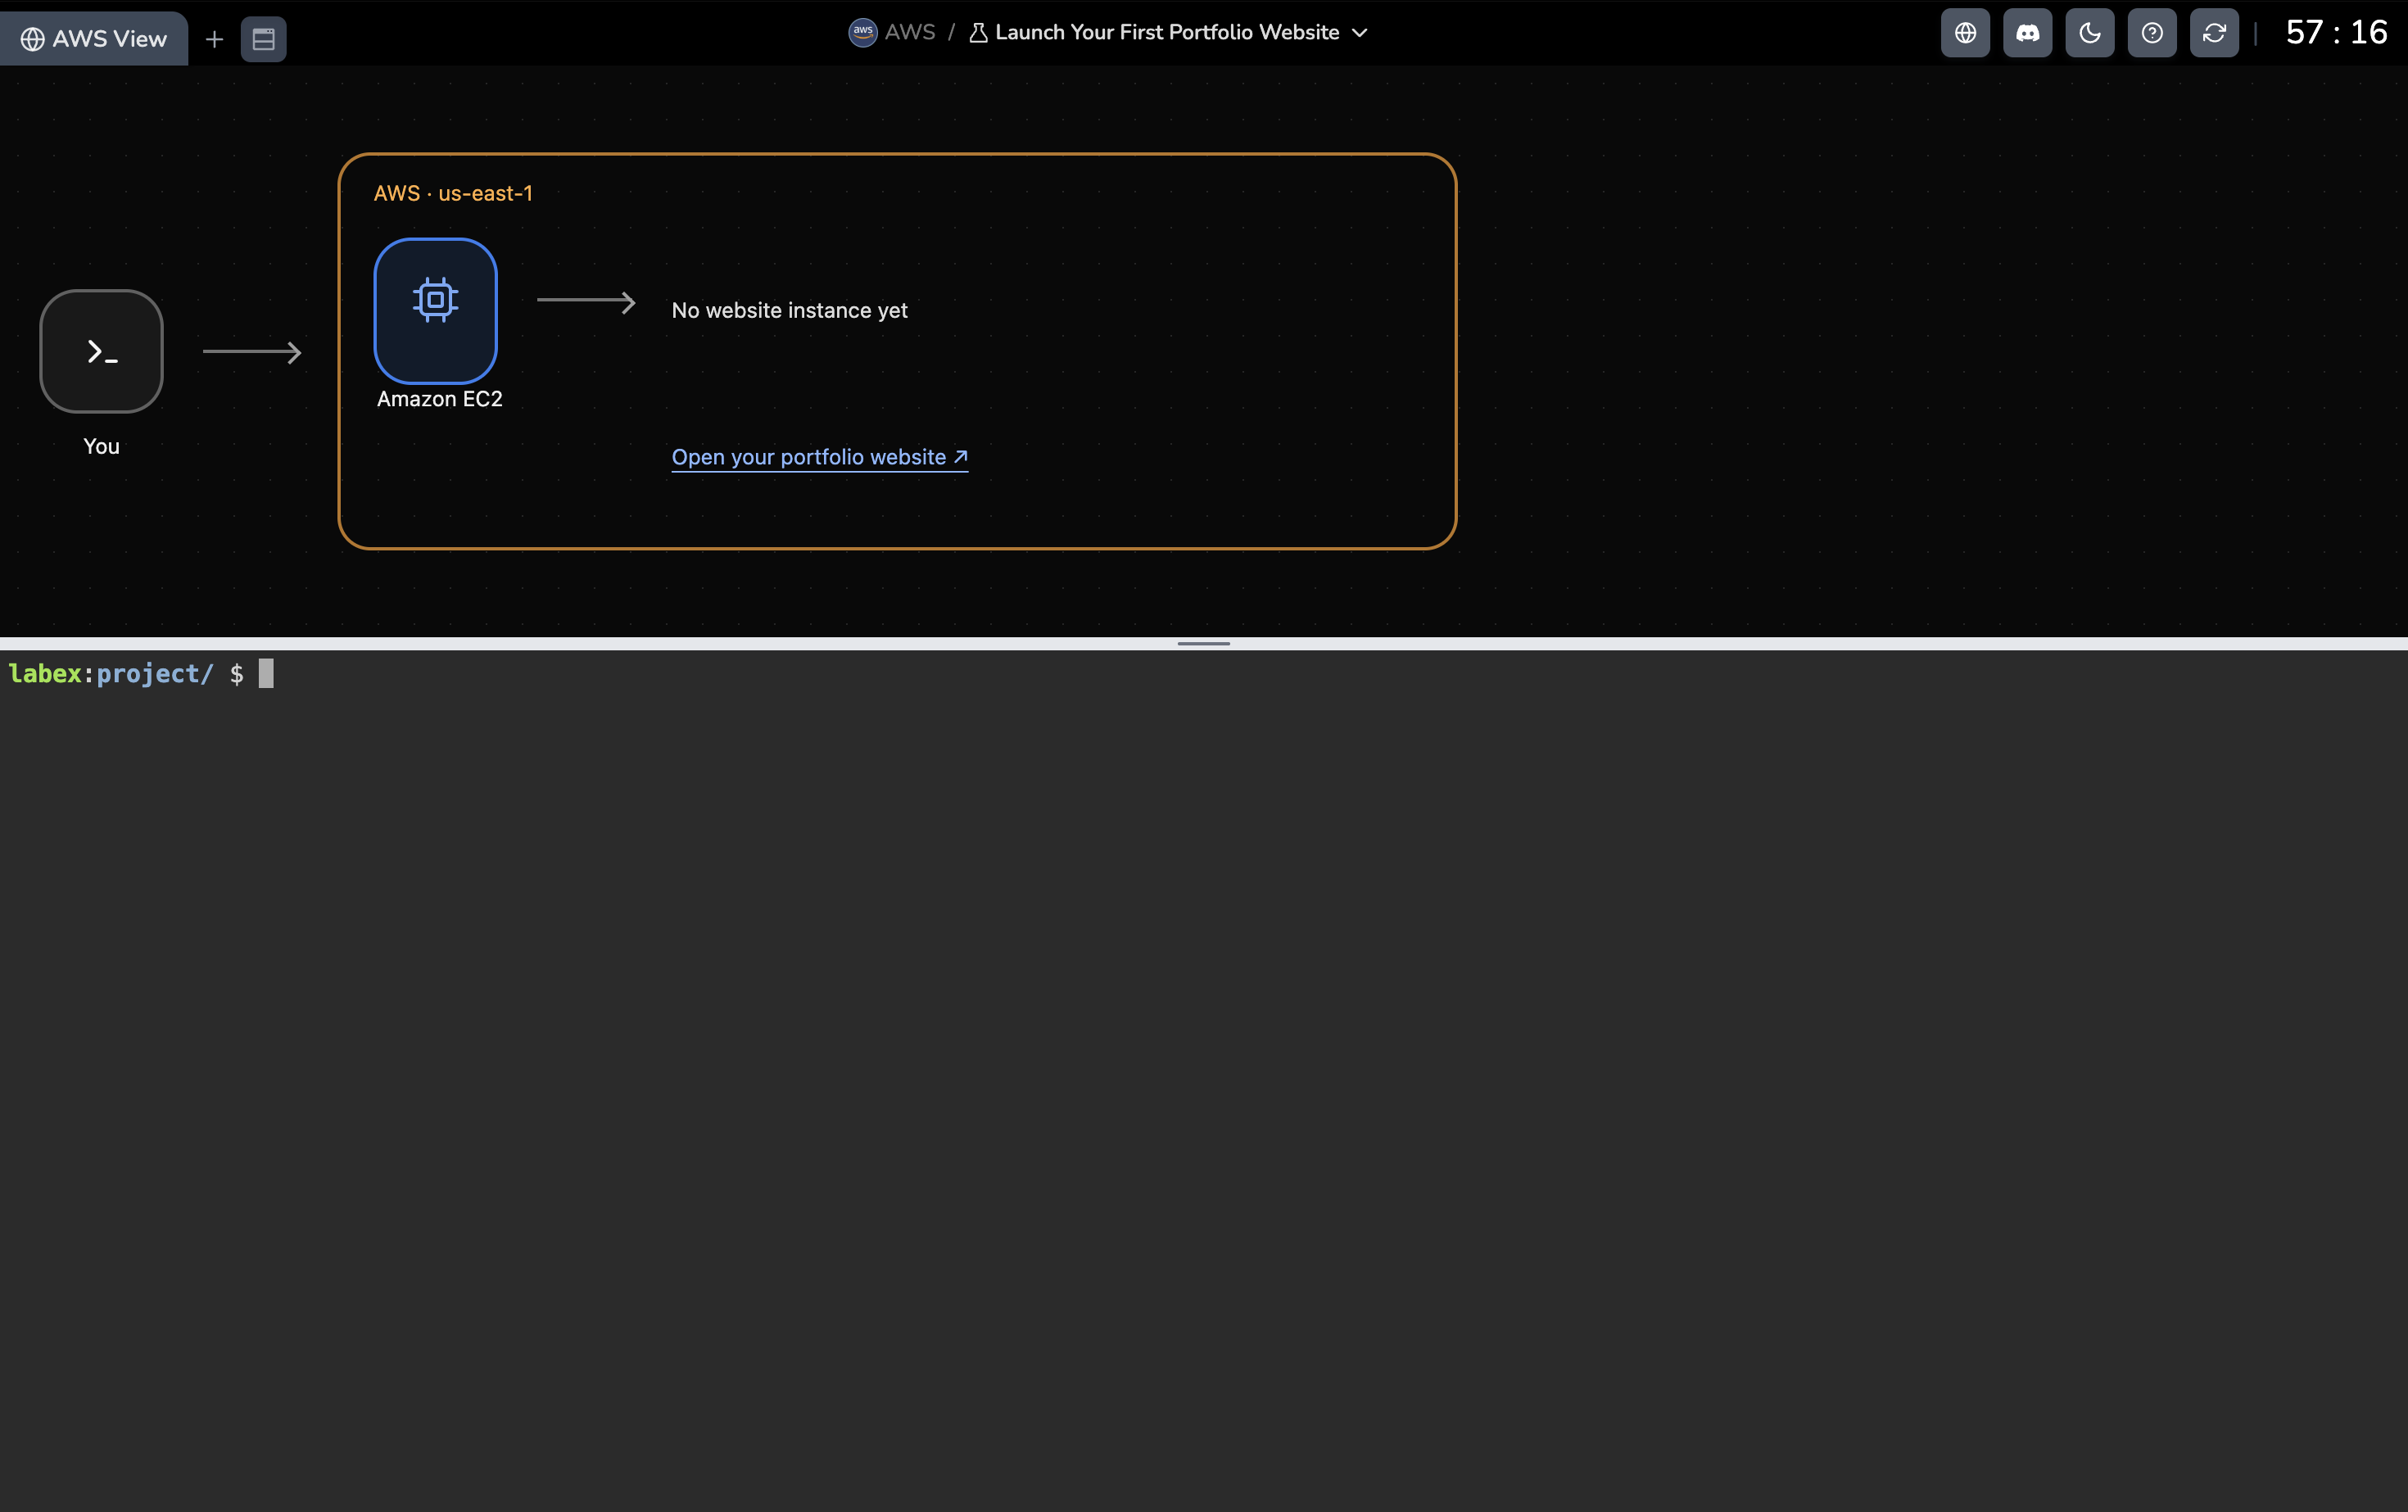
This screenshot shows this lab before launch: No website instance yet means that you have not created the website server. After the launch command, an EC2 card will appear here. Use the lower Terminal to enter commands; the upper AWS View displays their results.
Click inside the lower Terminal, beside a prompt such as labex:project/ $. The prompt means the Terminal is ready; do not type the prompt itself. Paste only the command, press Enter, and wait for the prompt to return before running the next command. An icon labeled Terminal in a resource diagram is not an input box. AWS View displays the resources operated on by these same commands; it is the lab’s resource view, separate from the official AWS Management Console.
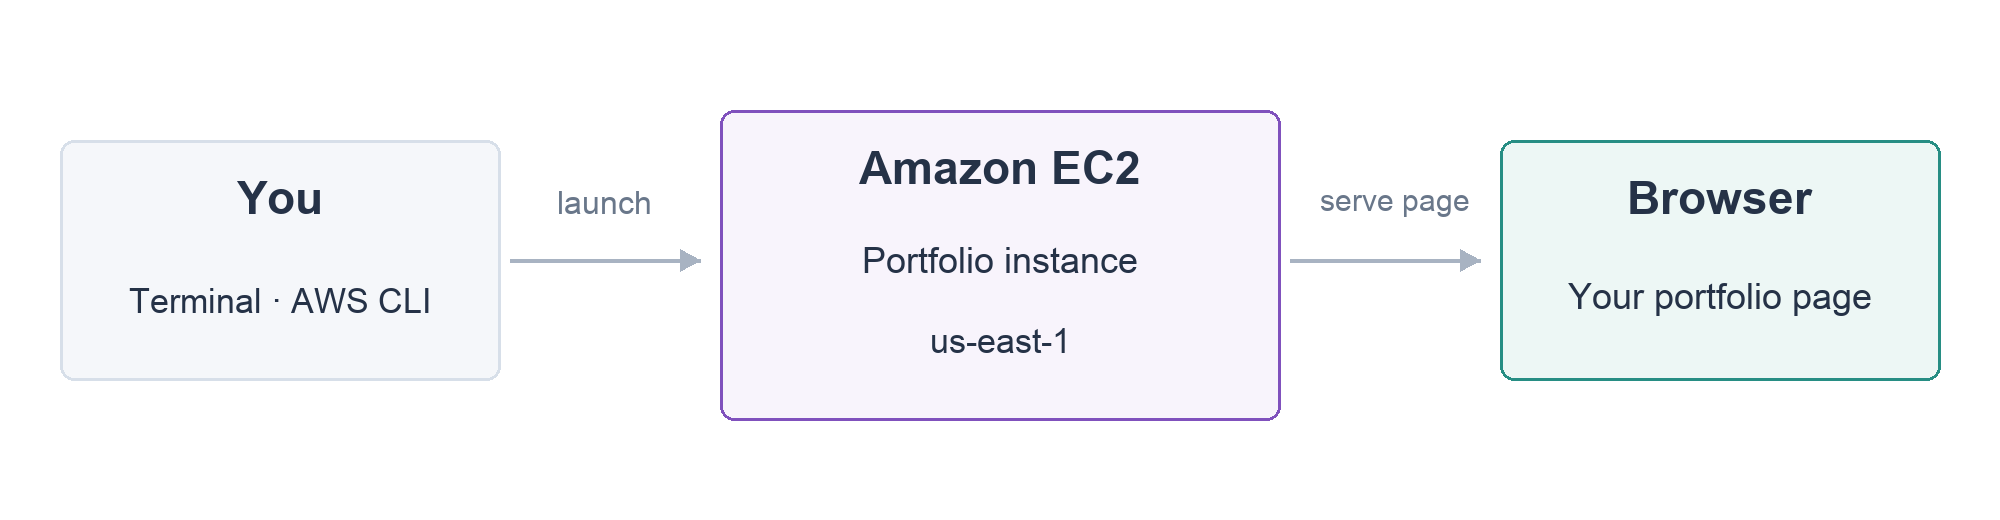
There are two computers to distinguish: the LabEx VM is where you run commands; the EC2 instance you are about to create runs the website. Amazon EC2 is an AWS service providing virtual servers called instances. Your browser will request the page from the website application on that instance.
Start in the prepared project folder. cd means change directory; a directory is a folder:
cd /home/labex/project
The file launch.json describes one small server using the prepared image and network. JSON is a text format for named settings. You do not need to write this file. The image already contains the portfolio application; the network already permits website traffic.
An AWS CLI command begins with aws, followed by a service and an operation. Here, ec2 run-instances starts a server. An option, beginning with --, supplies information to the operation. --cli-input-json file://launch.json reads the prepared settings from that file. Run:
aws ec2 run-instances --cli-input-json file://launch.json
The response describes the instance you just created. Look for InstanceId, a value starting with i-, and the instance State. These values identify the server and describe whether it is starting or running. IDs and addresses will differ from the examples.
Look at AWS View above Terminal. Its EC2 card should now contain portfolio-website. Allow it to show running, then click Open your portfolio website. A website tab opens with Alex Morgan, the large Make it memorable. title and three design projects: AURA, FORMA and ECHO. This is a page served by the instance you created, not a screenshot.
If the link was opened before the instance became ready, return to AWS View, wait for running, then refresh the website tab. Do not run the launch command again: that would create another server.
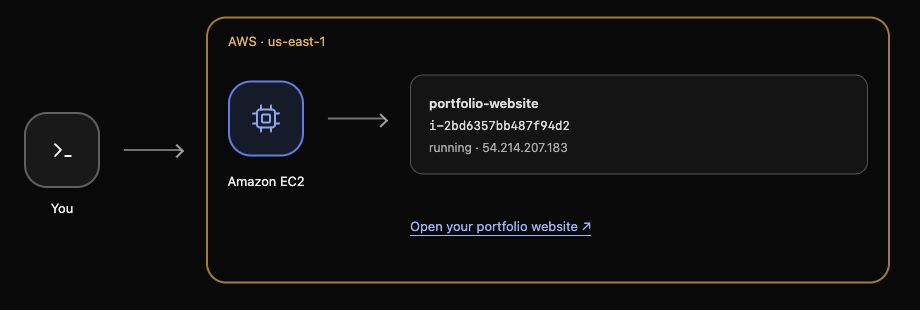

Your first result is a working website. The next step explains the server settings behind that result.
Understand the Server You Started
In this step, you will connect the website you saw to its instance settings and save its identifier for cleanup.
Recognize the Official AWS Console
AWS also provides the AWS Management Console, its official web interface. It is useful for exploring services, viewing resources and charts, and occasional changes through forms. The AWS CLI is useful for precise queries, repeatable operations and automation; its options and text output take practice. Engineers often use both.
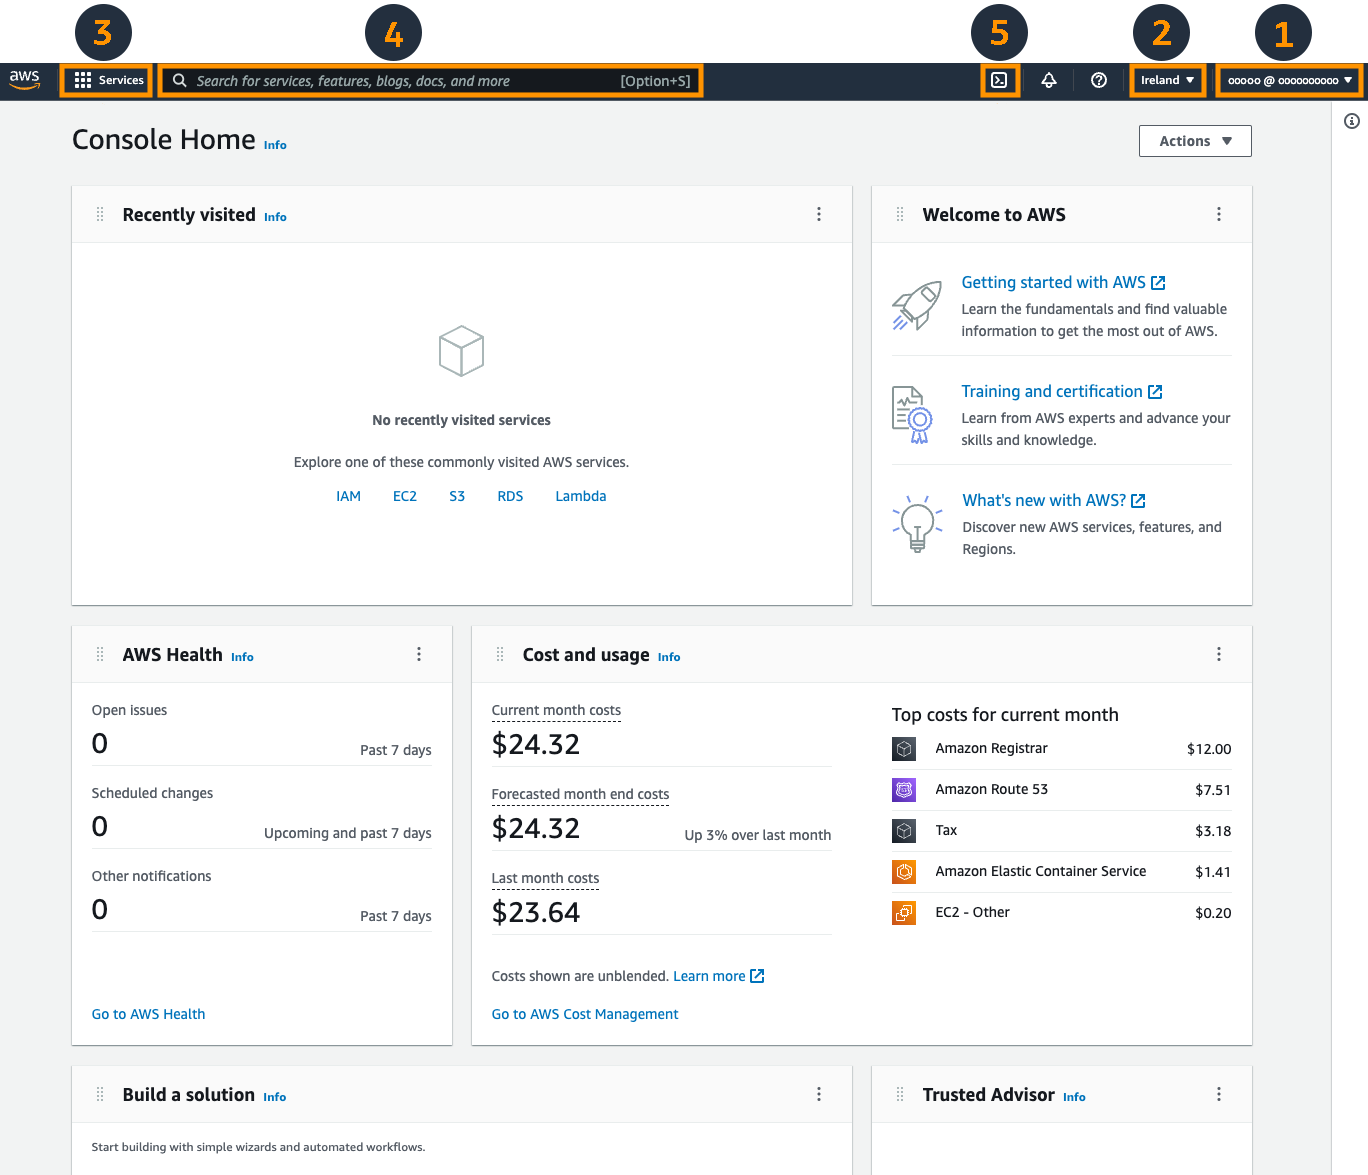
This is a reference image, not a page you need to open for this lab. Account details, Region and costs are example values; the layout may change. Continue using your prepared Terminal and AWS View, without signing in to a personal AWS account.
Return to Terminal. cat displays a text file. Inspect the launch settings:
cat launch.json
Focus on these fields:
| Field | Meaning for your website |
|---|---|
ImageId |
The prepared Amazon Machine Image (AMI): the operating system and initial application software |
InstanceType |
t3.micro, a small combination of compute and memory capacity |
MinCount / MaxCount |
Both are 1, so this request starts one server |
SubnetId / SecurityGroupIds |
The supplied network location and access rules; you will practice access rules later |
KeyName |
The prepared SSH login key; you will use the connection in the next lab |
Tags |
A readable name for finding the server in AWS View |
AWS places resources in a Region, a geographic service location. The prepared CLI connection uses us-east-1, also shown in AWS View. You do not need to choose or configure a Region in this lab.
Now save the instance ID. A shell variable remembers a value for later commands. $(...) runs the command inside the parentheses and saves its output. Here, describe-instances reads instance details; --query selects the first instance ID from the response; --output text returns that value without JSON formatting. This fresh lab has one instance.
INSTANCE_ID=$(aws ec2 describe-instances --query 'Reservations[0].Instances[0].InstanceId' --output text)
echo "$INSTANCE_ID"
echo displays the saved value. Check that it matches the i-... identifier in AWS View. Quotation marks keep a variable's value together when it is used in a command. The variable stays in this Terminal session; reopening Terminal may require saving it again.
The CLI provides waiters, commands that wait for a particular resource state. The following selects only your instance and waits for running:
aws ec2 wait instance-running --instance-ids "$INSTANCE_ID"
It returns to the prompt without output when the condition is met. running describes the server's state; the successful portfolio page separately proves that the website is responding.
You have now related three things: the instance created by the CLI, the resource shown in AWS View and the page served to your browser. The website reads its profile from a file on the server; the next lab will show you how to publish your own profile.
How AWS Services Help an Application
You have already seen one service solve a concrete need: EC2 runs your website. Other services handle other parts of an application. This course will connect S3, IAM and CloudWatch to the same portfolio; later courses explore the wider service families below. You do not need to memorize these names or configure them now.
| Application need | Services | What they help you do |
|---|---|---|
| Files and artwork | S3 | Store and retrieve images, documents and other assets. |
| Access | IAM | Control who can perform which actions on resources. |
| Servers and networks | VPC, EC2, EBS | Connect resources, run applications and attach disk storage. |
| Traffic and capacity | Elastic Load Balancing, Auto Scaling | Distribute requests and adjust server capacity. |
| Application data | RDS, DynamoDB | Store data in relational tables or by keys. |
| Code, APIs and users | Lambda, API Gateway, Cognito | Run functions, expose HTTP endpoints and add sign-in. |
| Messages and workflows | SQS, SNS, EventBridge, Step Functions | Queue work, send notifications, route events and coordinate tasks. |
| Protection and operation | KMS, Secrets Manager, Parameter Store, WAF, CloudWatch, CloudTrail, CloudFormation | Protect data and settings, filter requests, observe and audit activity, and define infrastructure in templates. |
Remove Your Website Server
In this step, you will terminate only the server you created and confirm that it no longer serves your website.
Cloud resources have a lifecycle. On a personal AWS account, running instances and other retained resources can incur charges. Here you will practice removing the owned server when your work is complete. Closing a browser tab does not terminate a server.
Terminate removes an instance permanently. Stop keeps an instance for later use. For this disposable website, use termination. The saved ID selects your server precisely:
aws ec2 terminate-instances --instance-ids "$INSTANCE_ID"
The response shows the state changing toward terminated. Wait for that state:
aws ec2 wait instance-terminated --instance-ids "$INSTANCE_ID"
Look at AWS View. Your instance should show terminated. A terminated record may remain visible; it does not mean the server is still running. Refresh the portfolio tab: it should now report that your website is not running.
Leave the prepared network, image and SSH key in place. They are supplied fixtures. The next lab starts independently with a fresh website server, so it does not depend on retaining this instance.
Choose Your Next Learning Direction
Start with AWS Foundations for Beginners → AWS Resource Management for Beginners → AWS S3 for Beginners → AWS IAM for Beginners. This first course builds confidence through a website. Resource Management then explains resource identities, Regions, finding resources and organizing them with tags; S3 and IAM deepen storage and permission skills. This is the intended learning order; the online path may still show the earlier course arrangement.
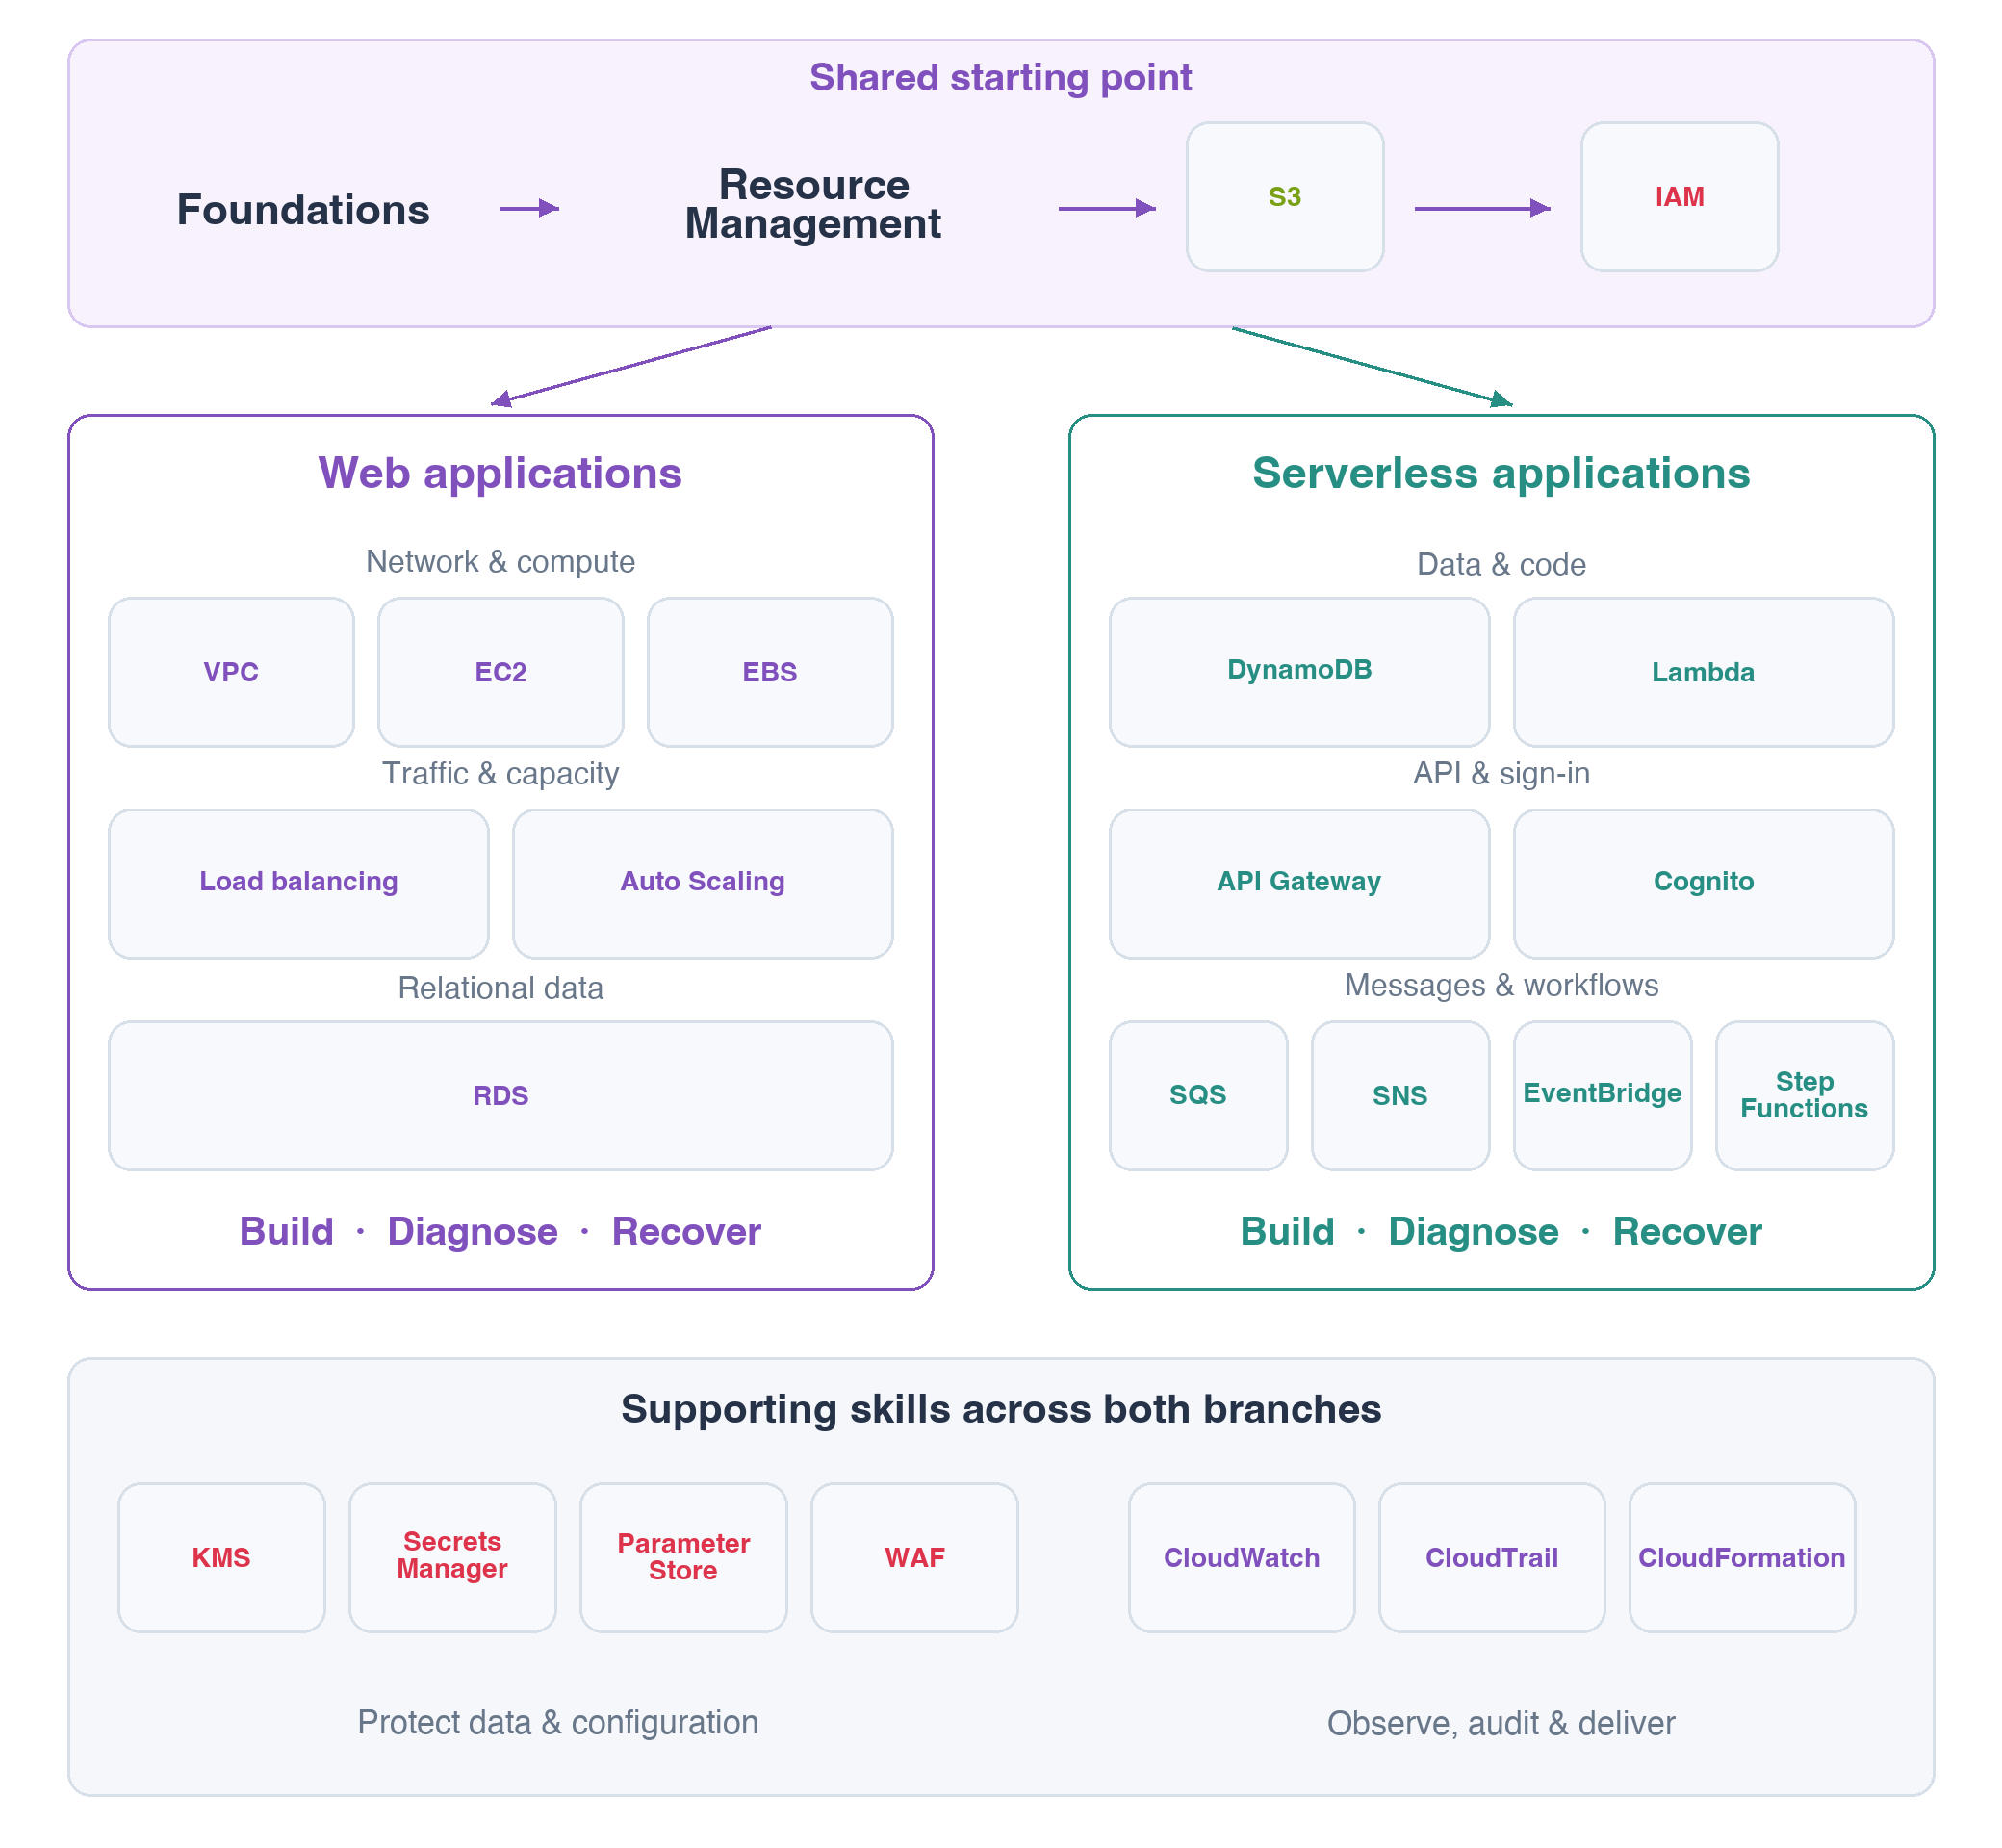
After these shared foundations, choose a direction: Web applications combines networks, servers and relational data; Serverless applications uses functions and APIs without managing servers yourself. Security and monitoring support both branches. You can begin the Serverless API project before completing the later messaging and workflow courses. You do not have to finish every branch; delivery, containers, data and AI can come later.
Before finishing, find the shared starting point and one branch that interests you. This is orientation, not a service-name quiz, and it requires no extra resource creation. Each later lab starts in a fresh environment: carry forward your knowledge, not this server.
Summary
You used Terminal to launch an EC2 instance, found it in AWS View and opened its actual portfolio page. You related an image, instance type, Region and prepared network to the running website, then terminated your instance and confirmed that the page was no longer served.
Next, Publish Your Personal Homepage will supply a fresh website and guide you through publishing your own profile.
Official references: EC2 instances, AWS CLI command structure, and instance termination.