Introduction
An upload application runs on two servers. Each server currently stores files on its own local disk, so a customer can upload through one server and receive “not found” from the other. Give both servers a shared file interface using Amazon Elastic File System (EFS).
Complete AWS VPC for Beginners and AWS EC2 and EBS for Beginners first. This independent environment supplies the upload application, three application hosts and their network. Use Terminal for AWS CLI and SSH commands, and AWS View to compare actual upload responses. The CLI is already configured; no personal AWS account or resources from an earlier lab are required. This exercise focuses on shared files and connectivity, without production performance or availability testing.
Certification Relevance
| Certification | Exam task | Practice |
|---|---|---|
| Cloud Practitioner (CLF-C02) | Task 3.6 | Identify EFS as a shared file service and distinguish a mounted file interface from separate local upload directories. |
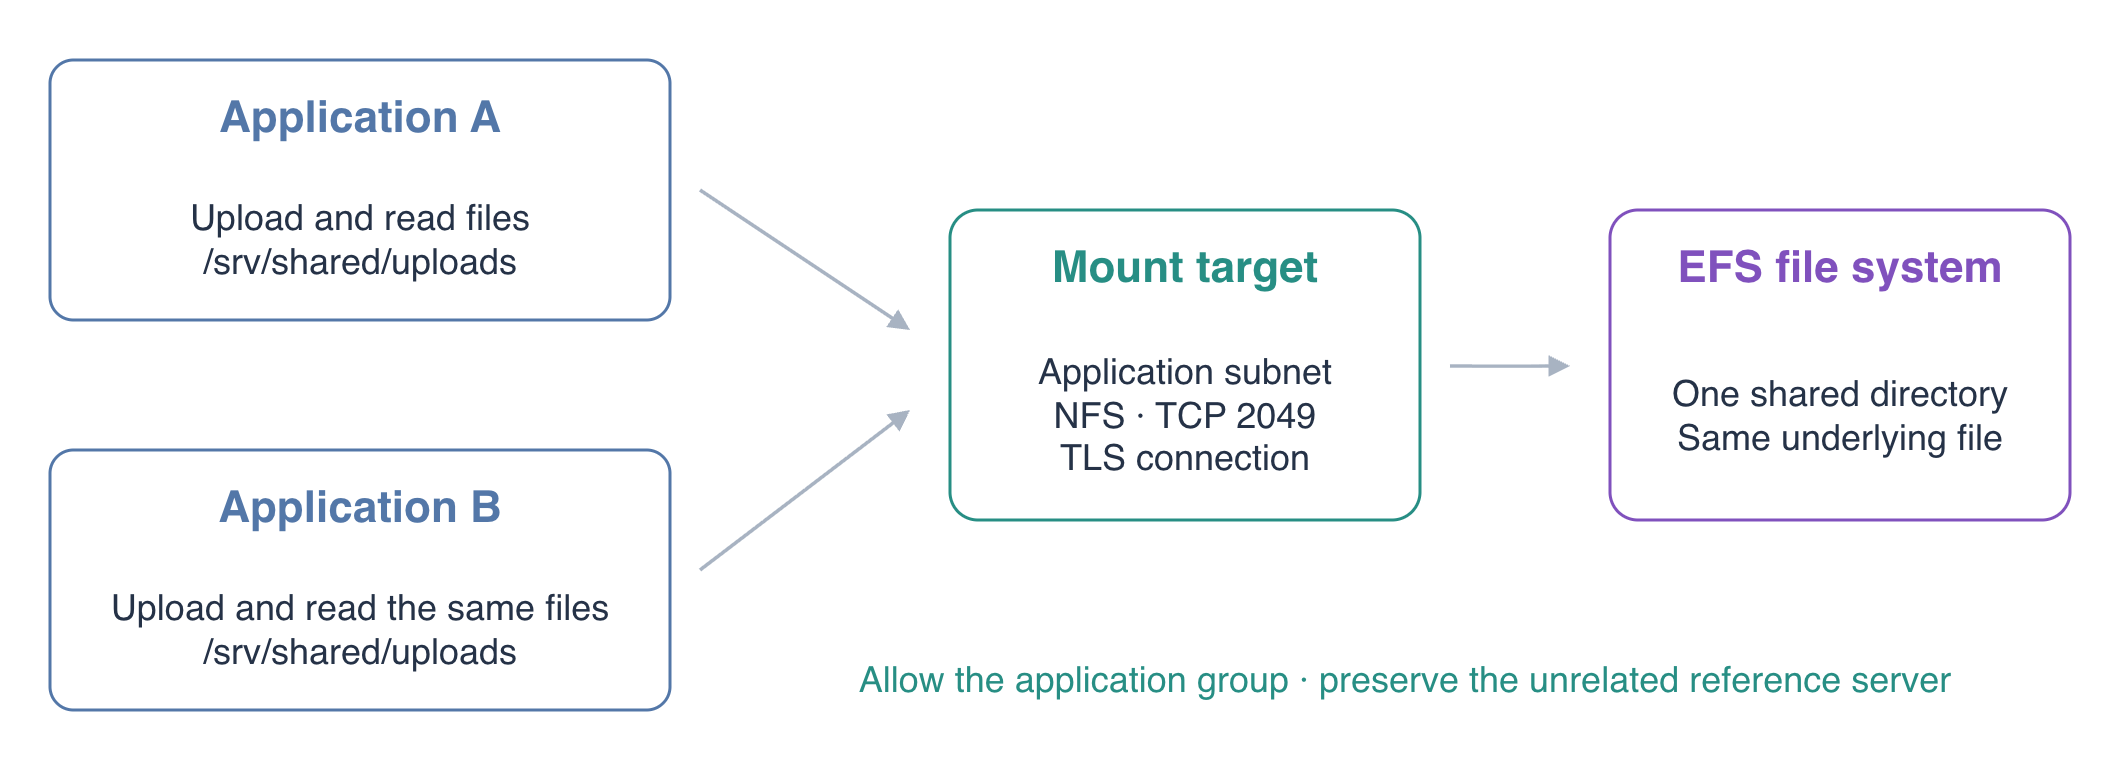
Conceptual overview; actual identifiers appear in your fresh environment.
Create Storage for the Upload Application
In this step, observe the local upload problem and create your shared file system.
Work in /home/labex/project. Confirm the configured identity without printing credentials:
cd /home/labex/project
aws sts \
  get-caller-identity
The user ARN ends in labex-fs01-operator. resources.json identifies the supplied subnet and the application security group. Load these identifiers so later commands use your environment's real resources:
SUBNET_ID=$(jq -r .subnet_id resources.json)
APP_GROUP_ID=$(jq -r .application_group_id resources.json)
VPC_ID=$(jq -r .vpc_id resources.json)
echo "$SUBNET_ID"
echo "$APP_GROUP_ID"
echo "$VPC_ID"
aws ec2 \
  describe-instances \
  --filters Name=tag:Name,Values=application-a,application-b \
  --query 'Reservations[].Instances[].{Name:Tags[?Key==`Name`].Value|[0],IP:PrivateIpAddress,State:State.Name}'
First observe the local-storage problem. HTTP PUT stores an upload; HTTP GET reads it. The addresses below reach the prepared application servers:
curl -i -X PUT --data-binary 'A local upload' \
  http://127.0.0.1:8081/uploads/local-example.txt
curl -i http://127.0.0.1:8082/uploads/local-example.txt
A returns 201 Created, while B returns 404 Not Found: its local directory contains a different set of files. You can also write and read the same filename using the two application cards in AWS View.
EFS supplies a shared file system: both applications access the same directories and files through NFS, the Network File System protocol. Create the file system first. The creation token identifies this create request; the Name tag makes the resource recognizable during inspection and cleanup. --encrypted enables the service's at-rest encryption setting. Transport encryption is configured separately when you mount it.
FS_ID=$(aws efs \
  create-file-system \
  --creation-token fs01-shared-uploads \
  --encrypted \
  --tags Key=Name,Value=fs01-shared-uploads \
  --query FileSystemId --output text)
echo "$FS_ID"
aws efs \
  describe-file-systems \
  --file-system-id "$FS_ID" \
  --query 'FileSystems[].{ID:FileSystemId,State:LifeCycleState,Encrypted:Encrypted}'
Wait for available before continuing. This confirms that the service resource exists; applications still need a reachable mount target and an actual mount.
Connect the File System to the Application Subnet
In this step, supply a reachable NFS endpoint with access restricted to the application servers.
A mount target provides the file system’s network endpoint inside a subnet. NFS uses TCP port 2049. Create a dedicated storage security group and allow that port from the supplied application security group. A source-group rule includes both application servers without opening NFS to every address. The unrelated reference server belongs to a different group and should remain excluded.
EFS_GROUP_ID=$(aws ec2 \
  create-security-group \
  --group-name fs01-efs-access \
  --description 'NFS from the upload application servers' \
  --vpc-id "$VPC_ID" \
  --query GroupId --output text)
echo "$EFS_GROUP_ID"
aws ec2 \
  authorize-security-group-ingress \
  --group-id "$EFS_GROUP_ID" \
  --ip-permissions "IpProtocol=tcp,FromPort=2049,ToPort=2049,UserIdGroupPairs=[{GroupId=$APP_GROUP_ID}]"
Place the mount target in the prepared application subnet and attach the new group:
MOUNT_TARGET_ID=$(aws efs \
  create-mount-target \
  --file-system-id "$FS_ID" \
  --subnet-id "$SUBNET_ID" \
  --security-groups "$EFS_GROUP_ID" \
  --query MountTargetId --output text)
echo "$MOUNT_TARGET_ID"
aws efs \
  describe-mount-targets \
  --file-system-id "$FS_ID" \
  --query 'MountTargets[].{ID:MountTargetId,IP:IpAddress,State:LifeCycleState,AZ:AvailabilityZoneName}'
aws efs \
  describe-mount-target-security-groups \
  --mount-target-id "$MOUNT_TARGET_ID"
Wait for the mount target to become available. This lab places both applications in one availability zone, so one mount target serves the prepared topology. In a production regional deployment, plan mount targets for the availability zones that contain your clients.
Mount Both Applications and Observe Shared Files
In this step, connect both applications to EFS and test reciprocal uploads.
The supplied ssh_config connects to each prepared application host. A mount point is the local directory through which an application accesses the remote file system. Create /srv/shared and mount your EFS root there on each host:
ssh -F ssh_config application-a \
  "sudo mkdir -p /srv/shared && sudo mount -t efs -o tls,stunnel,lookupcache=positive ${FS_ID}:/ /srv/shared"
ssh -F ssh_config application-b \
  "sudo mkdir -p /srv/shared && sudo mount -t efs -o tls,stunnel,lookupcache=positive ${FS_ID}:/ /srv/shared"
The mount uses lookupcache=positive so a previously missing filename is checked again on the server when another application creates it. This keeps the short upload exercise observable; cache tuning for production workloads requires its own performance assessment. See the Linux NFS directory-cache options.
-t efs selects the official EFS mount helper. tls encrypts the connection, and stunnel selects its supported TLS transport. The ${FS_ID}:/ source selects the file system's root. The prepared hosts already contain the required client tools; you do not need to install them.
The new file system initially has a root-owned directory. Prepare an upload subdirectory for the application's labex user and point each application at it:
ssh -F ssh_config application-a \
  'sudo mkdir -p /srv/shared/uploads && sudo chown labex:labex /srv/shared/uploads'
ssh -F ssh_config application-a \
  'printf "{\"upload_directory\":\"/srv/shared/uploads\"}\n" | sudo tee /etc/uploads-app/config.json'
ssh -F ssh_config application-b \
  'printf "{\"upload_directory\":\"/srv/shared/uploads\"}\n" | sudo tee /etc/uploads-app/config.json'
The application reads its configuration on each request. No restart is needed. Inspect the actual mounts on both hosts:
ssh -F ssh_config application-a 'findmnt -t nfs4 /srv/shared'
ssh -F ssh_config application-b 'findmnt -t nfs4 /srv/shared'
Both show an NFS 4 mount at /srv/shared. With TLS, the kernel's source can appear as 127.0.0.1:/ because the mount helper forwards NFS through a local encrypted tunnel.
Now upload through A and read through B:
curl -i -X PUT --data-binary 'Shared upload version 1' \
  http://127.0.0.1:8081/uploads/shared.txt
curl -i http://127.0.0.1:8082/uploads/shared.txt
B returns 200 OK and Shared upload version 1. Update through B and read through A to prove sharing in both directions:
curl -i -X PUT --data-binary 'Shared upload version 2' \
  http://127.0.0.1:8082/uploads/shared.txt
curl -i http://127.0.0.1:8081/uploads/shared.txt
ssh -F ssh_config application-a 'stat -c "%i %u:%g" /srv/shared/uploads/shared.txt'
ssh -F ssh_config application-b 'stat -c "%i %u:%g" /srv/shared/uploads/shared.txt'
Both applications read version 2, and the two stat commands report the same file inode. EFS is supplying one shared file through independent mounts. You did not synchronize or copy two local upload directories. Compare the same upload in AWS View for a browser checkpoint.
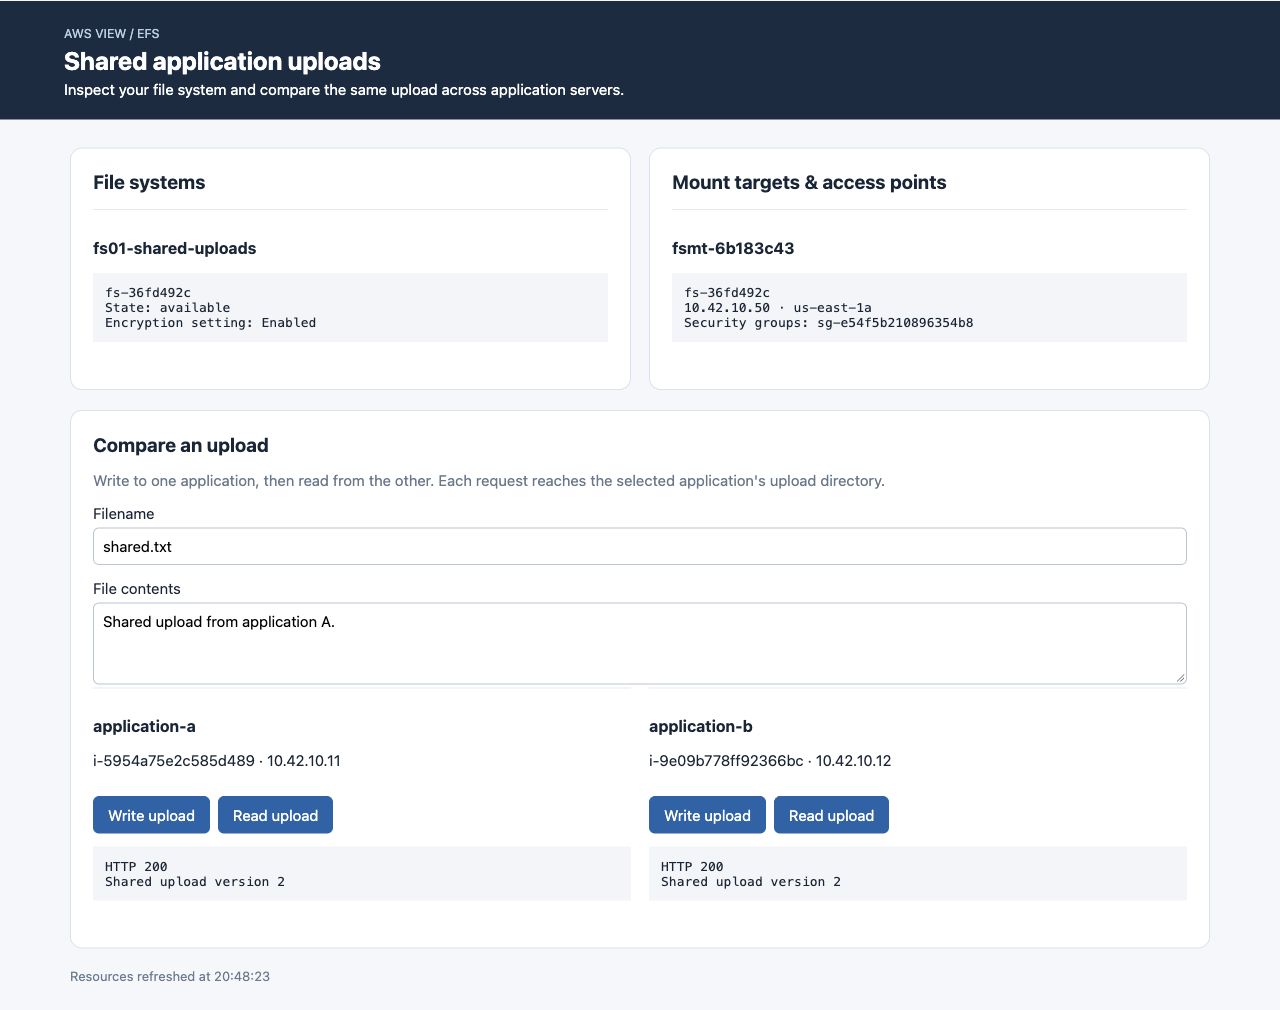
Both applications read the same updated upload. Resource identifiers vary in each fresh environment.
Unmount and Remove Your Storage
In this step, stop using the shared directory and remove only the storage resources you created.
Stop using the shared directory before deleting its network endpoint. Return each application to its supplied local upload directory, then unmount EFS:
ssh -F ssh_config application-a \
  'printf "{\"upload_directory\":\"/srv/uploads\"}\n" | sudo tee /etc/uploads-app/config.json'
ssh -F ssh_config application-b \
  'printf "{\"upload_directory\":\"/srv/uploads\"}\n" | sudo tee /etc/uploads-app/config.json'
ssh -F ssh_config application-a 'sudo umount /srv/shared'
ssh -F ssh_config application-b 'sudo umount /srv/shared'
If umount reports a busy directory, leave any shell that is using /srv/shared and retry. Confirm the mounts are gone:
ssh -F ssh_config application-a 'findmnt -t nfs4'
ssh -F ssh_config application-b 'findmnt -t nfs4'
No NFS mount rows should remain. findmnt returns status 1 when no matching mounts exist; that is expected here.
Delete the mount target before the file system, then remove only your dedicated storage security group:
aws efs \
  delete-mount-target --mount-target-id "$MOUNT_TARGET_ID"
aws efs \
  describe-mount-targets --file-system-id "$FS_ID"
Wait until MountTargets is empty. Then continue:
aws efs \
  delete-file-system --file-system-id "$FS_ID"
aws ec2 \
  delete-security-group --group-id "$EFS_GROUP_ID"
aws efs \
  describe-file-systems \
  --query 'FileSystems[?Name==`fs01-shared-uploads`].FileSystemId'
aws ec2 \
  describe-security-groups \
  --filters Name=group-name,Values=fs01-efs-access \
  --query 'SecurityGroups[].GroupId'
Both queries return empty lists. Successful service queries establish deletion; connection or authorization errors do not. Preserve the prepared application servers, their groups and subnet.
Run this step’s verification to confirm storage removal and preserved application fixtures. Every subsequent lab starts independently with its own prepared environment.
Summary
You connected two applications to one EFS file system using a mount target, restricted NFS access and TLS mounts. Reciprocal uploads and matching file identity demonstrated actual sharing. You then returned the applications to local storage, unmounted the clients and removed the owned storage resources in dependency order.
A shared file system solves the location problem; it does not by itself separate application directories or choose their POSIX identities. The next guided lab introduces EFS access points for those boundaries.
For further reading, see the AWS reference on EFS mount helper and TLS transport; Client and mount-target network rules.