Introduction
Your team has two application servers, but clients need one address for the service. In this lab, you will create an Application Load Balancer, connect its listener to a target group and register the two servers. Real HTTP responses will show which server handled each request.
You should understand EC2 instances, VPC subnets and security groups from the preceding courses. The environment supplies the network and running application servers, and the AWS CLI is configured. You will create the load balancing resources and remove them at the end.
Certification Relevance
This lab provides introductory hands-on practice for the following exam topics.
- Solutions Architect – Associate (SAA-C03) · Task 2.1: Application Load Balancer concepts and distributing requests across application backends.
- CloudOps Engineer – Associate (SOA-C03) · Task 2.2: Basic Elastic Load Balancing configuration and observing target availability.
Create the Application Load Balancer
In this step, you will create a single entry point for the two prepared application servers.
An Application Load Balancer (ALB) distributes HTTP or HTTPS requests to application backends. A Network Load Balancer (NLB) focuses on transport connections such as TCP and UDP; ALB is the suitable choice for this HTTP application. You will use ALB throughout this lab.
Start in the prepared workspace:
cd /home/labex/project
The file launch.env contains the identifiers of the supplied network. Read it, then use source to load its variable assignments into your current shell:
cat launch.env
source launch.env
SUBNET_ID and SECOND_SUBNET_ID identify subnets in two different Availability Zones. ALB configuration uses at least two such subnets. ALB_SECURITY_GROUP_ID identifies the prepared security group that permits HTTP listener traffic on port 80; the application servers have a separate group for their application port.
Create an internet-facing application load balancer named application-alb. Internet-facing describes its addressing scheme. --query selects just the resource ARN, and --output text makes that value convenient to reuse. The shell's $(...) syntax captures command output into LB_ARN:
LB_ARN=$(aws elbv2 \
  create-load-balancer \
  --name application-alb \
  --type application \
  --scheme internet-facing \
  --subnets "$SUBNET_ID" "$SECOND_SUBNET_ID" \
  --security-groups "$ALB_SECURITY_GROUP_ID" \
  --query 'LoadBalancers[0].LoadBalancerArn' \
  --output text)
An Amazon Resource Name (ARN) identifies an AWS resource. Inspect the load balancer using the ARN you just captured:
aws elbv2 \
  describe-load-balancers \
  --load-balancer-arns "$LB_ARN" \
  --query 'LoadBalancers[].{Name:LoadBalancerName,Type:Type,Scheme:Scheme,DNS:DNSName}'
Look for application-alb, type application and scheme internet-facing. The DNS name is the address clients will use. It will differ between environments. Creating the load balancer alone does not connect any application servers yet.
Click AWS View beside Terminal. The page reads the same resource state as your CLI and should now display application-alb. Its target group and target areas are still empty because you have not connected them.
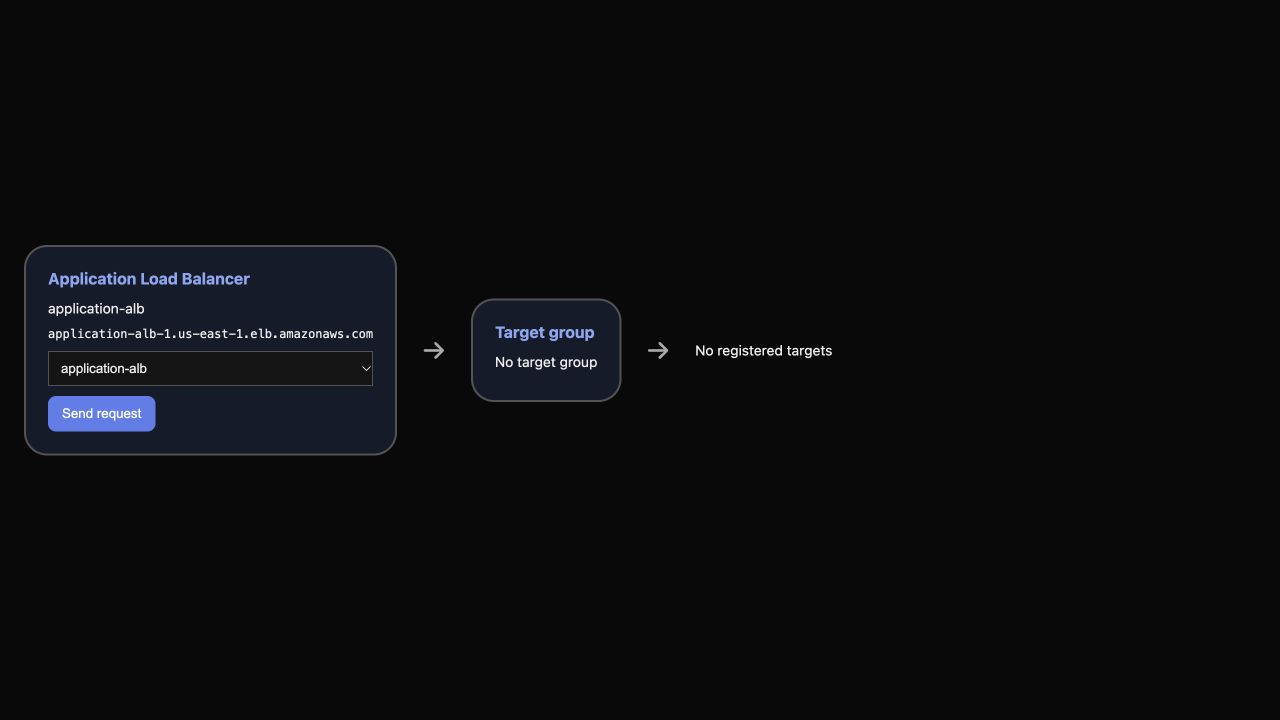
The screenshot shows this creation checkpoint. Its resource name matches the lab; the DNS name is an example value.
Connect a Listener to a Target Group
In this step, you will define where incoming HTTP requests go.
A target group contains the backends that can serve a particular application. Its port is the port used to contact those backends. A listener accepts client connections on the load balancer and uses an action to decide where to send them. In this application, clients use listener port 80, while the servers run the application on port 8081.
Create an instance target group in the supplied VPC. --target-type instance means you will register EC2 instance IDs. The health check path /health is the application's readiness endpoint:
TG_ARN=$(aws elbv2 \
  create-target-group \
  --name application-targets \
  --protocol HTTP \
  --port 8081 \
  --vpc-id "$VPC_ID" \
  --target-type instance \
  --health-check-path /health \
  --query 'TargetGroups[0].TargetGroupArn' \
  --output text)
Create the HTTP listener. Its default action forwards requests to TG_ARN. The CLI shorthand Type=forward,TargetGroupArn=... specifies that action:
LISTENER_ARN=$(aws elbv2 \
  create-listener \
  --load-balancer-arn "$LB_ARN" \
  --protocol HTTP \
  --port 80 \
  --default-actions "Type=forward,TargetGroupArn=$TG_ARN" \
  --query 'Listeners[0].ListenerArn' \
  --output text)
Inspect the resulting listener:
aws elbv2 \
  describe-listeners \
  --load-balancer-arn "$LB_ARN" \
  --query 'Listeners[].{Protocol:Protocol,Port:Port,Actions:DefaultActions}'
The output should show HTTP port 80 and a forward action referencing your target group. In AWS View, the target group now appears between the ALB and the backend area. It has no registered targets yet, so you still need to connect the servers.
Register and Test Both Application Servers
In this step, you will register two running servers and observe actual requests reaching both.
List the prepared application servers. The name filter selects their tags, and the query displays the useful connection fields:
aws ec2 \
  describe-instances \
  --filters 'Name=tag:Name,Values=app-a,app-b' \
  --query 'Reservations[].Instances[].{Instance:InstanceId,Name:Tags[?Key==`Name`].Value|[0],State:State.Name,PrivateIP:PrivateIpAddress}' \
  --output table
Both instances should be running. Capture their IDs separately by name; querying each name avoids depending on list order:
APP_A=$(aws ec2 \
  describe-instances \
  --filters 'Name=tag:Name,Values=app-a' \
  --query 'Reservations[0].Instances[0].InstanceId' \
  --output text)
APP_B=$(aws ec2 \
  describe-instances \
  --filters 'Name=tag:Name,Values=app-b' \
  --query 'Reservations[0].Instances[0].InstanceId' \
  --output text)
Registering targets connects these instance IDs to the target group. Without an explicit Port override, each target uses the group's application port 8081:
aws elbv2 \
  register-targets \
  --target-group-arn "$TG_ARN" \
  --targets "Id=$APP_A" "Id=$APP_B"
The ALB probes /health to determine target availability. Wait until its target health checks report healthy. A CLI waiter repeats read-only status queries until its condition is met or it times out:
aws elbv2 \
  wait target-in-service \
  --target-group-arn "$TG_ARN"
Inspect the registered target IDs, ports and health states:
aws elbv2 \
  describe-target-health \
  --target-group-arn "$TG_ARN" \
  --query 'TargetHealthDescriptions[].{Instance:Target.Id,Port:Target.Port,Health:TargetHealth.State}' \
  --output table
Both targets should show port 8081 and health healthy. Capture the load balancer's DNS name:
LB_DNS=$(aws elbv2 \
  describe-load-balancers \
  --load-balancer-arns "$LB_ARN" \
  --query 'LoadBalancers[0].DNSName' \
  --output text)
Use curl, an HTTP client, to request the application health endpoint. --config client.conf reads the supplied connection settings; -sS suppresses progress while keeping errors visible:
curl --config client.conf -sS "http://$LB_DNS/health"
A successful response resembles this example; the instance ID is an example value:
{"service":"Report server","message":"Application ready","instance_id":"i-..."}
Send six separate requests. The for loop repeats the same request, and echo places each response on its own line:
for request in 1 2 3 4 5 6; do
  curl --config client.conf -sS "http://$LB_DNS/health"
  echo
done
Look for both APP_A and APP_B in the responses. This demonstrates distribution across two backends; do not use the request count to infer performance or capacity. The default target-group algorithm is round robin. Request distribution in a production service can also be affected by connections and other configuration.
Open AWS View and confirm that both targets are healthy. Click Send request several times and read the instance_id in the displayed response. The request goes through the listener to the application; the two target cards are resource observations, while the response identifies the backend that actually served it.
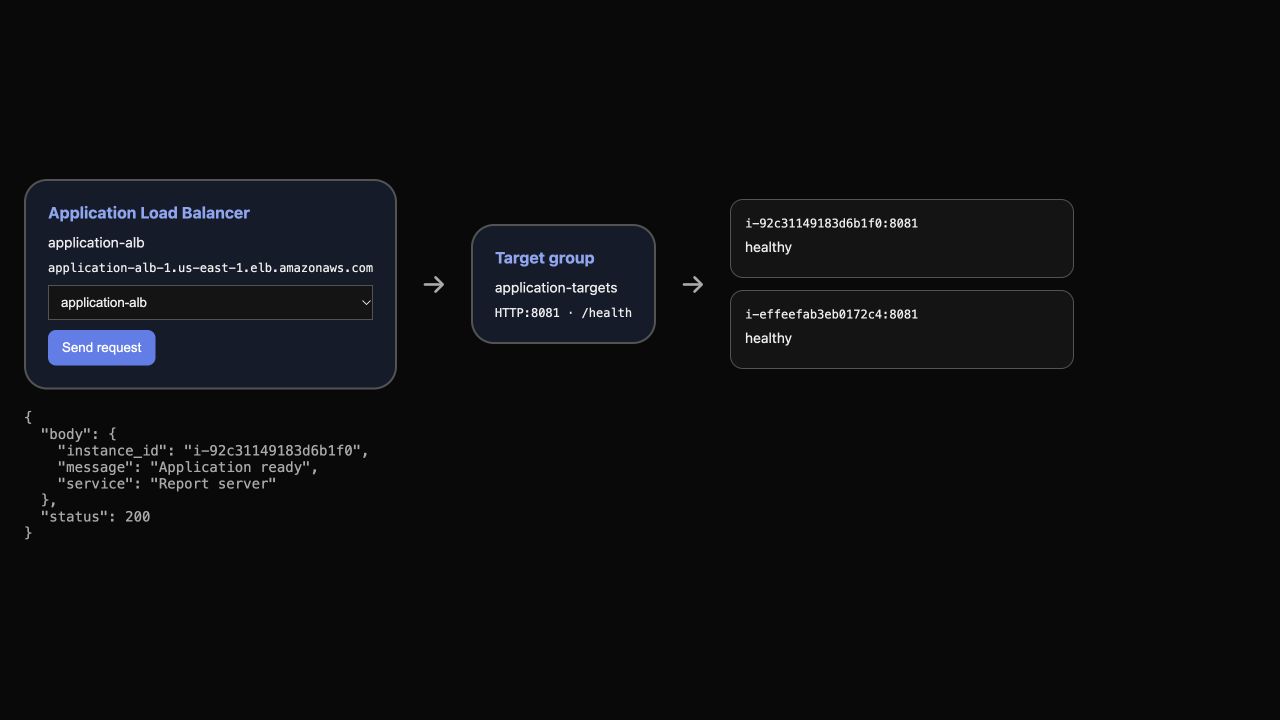
This example shows both targets healthy and a successful request. Your instance IDs will differ; compare your response with your own target IDs.
Remove the Load Balancing Resources
In this step, you will remove the resources you created while preserving the supplied application servers and network.
Delete the listener first. This removes the forwarding dependency on the target group:
aws elbv2 \
  delete-listener \
  --listener-arn "$LISTENER_ARN"
Delete your load balancer, then delete its target group:
aws elbv2 \
  delete-load-balancer \
  --load-balancer-arn "$LB_ARN"
aws elbv2 \
  delete-target-group \
  --target-group-arn "$TG_ARN"
Confirm both load balancing inventories are empty:
aws elbv2 \
  describe-load-balancers \
  --query 'LoadBalancers[].LoadBalancerName'
aws elbv2 \
  describe-target-groups \
  --query 'TargetGroups[].TargetGroupName'
Each query should return []. AWS View should show no load balancer and no target group. The supplied EC2 servers remain running; they are preparation resources for this lab and are not part of your cleanup task.
Summary
You created an Application Load Balancer, connected an HTTP listener to a target group and registered two EC2 application servers. You inspected target health and used real responses to identify both serving backends. Finally, you removed your load balancing resources while preserving the prepared servers and network.
The next lab examines how health checks detect a failing application, keep healthy targets serving traffic and admit a recovered target.