Introduction
Your application has two servers behind an Application Load Balancer. One server can fail even while its EC2 instance remains running. In this lab, you will configure health checks, make one application report a real failure and verify that the healthy server continues handling requests. You will then recover the failed application and remove the load balancing resources.
You should know ALB listeners, target groups and EC2 SSH connections. This fresh environment supplies the network, two running application servers, their registrations and an ALB listener. It starts independently of the previous lab, with AWS CLI configured and connection files provided.
Certification Relevance
This lab provides introductory hands-on practice for the following exam topics.
- Solutions Architect – Associate (SAA-C03) · Task 2.2: Recognizing how application health and load balancing support availability during a backend failure.
- CloudOps Engineer – Associate (SOA-C03) · Task 2.2: Configuring ELB health checks and diagnosing an unhealthy target.
Configure the Target Health Checks
In this step, you will inspect the supplied service and configure how ALB checks application readiness.
Start in the prepared workspace and load the supplied network variables:
cd /home/labex/project
source launch.env
Discover the supplied load balancer and target group by name. Capture their ARNs for subsequent commands, and the DNS name for HTTP requests:
LB_ARN=$(aws elbv2 \
  describe-load-balancers \
  --names application-alb \
  --query 'LoadBalancers[0].LoadBalancerArn' \
  --output text)

TG_ARN=$(aws elbv2 \
  describe-target-groups \
  --names application-targets \
  --query 'TargetGroups[0].TargetGroupArn' \
  --output text)

LB_DNS=$(aws elbv2 \
  describe-load-balancers \
  --load-balancer-arns "$LB_ARN" \
  --query 'LoadBalancers[0].DNSName' \
  --output text)
A health check probes each registered target independently of client requests. The path must identify an endpoint that reports whether the application can serve traffic. Inspect the current settings:
aws elbv2 \
  describe-target-groups \
  --target-group-arns "$TG_ARN" \
  --query 'TargetGroups[].{Path:HealthCheckPath,Interval:HealthCheckIntervalSeconds,Timeout:HealthCheckTimeoutSeconds,Healthy:HealthyThresholdCount,Unhealthy:UnhealthyThresholdCount,Matcher:Matcher}'
The supplied group checks /health every 30 seconds. Configure a five-second interval and a two-second timeout for this small exercise. Require two consecutive failed checks to exclude a target, and two successful checks to readmit an unhealthy target. The matcher accepts HTTP 200 as success:
aws elbv2 \
  modify-target-group \
  --target-group-arn "$TG_ARN" \
  --health-check-protocol HTTP \
  --health-check-path /health \
  --health-check-interval-seconds 5 \
  --health-check-timeout-seconds 2 \
  --healthy-threshold-count 2 \
  --unhealthy-threshold-count 2 \
  --matcher HttpCode=200 \
  --query 'TargetGroups[].{Path:HealthCheckPath,Interval:HealthCheckIntervalSeconds,Healthy:HealthyThresholdCount,Unhealthy:UnhealthyThresholdCount}'
The interval controls how often checks run; the timeout limits how long each probe waits. Thresholds help avoid reacting to one brief failure. Production values must reflect application startup and failure behavior; these short settings make this exercise observable.
Wait for both targets to become healthy, then inspect their actual states:
aws elbv2 \
  wait target-in-service \
  --target-group-arn "$TG_ARN"

aws elbv2 \
  describe-target-health \
  --target-group-arn "$TG_ARN" \
  --query 'TargetHealthDescriptions[].{Instance:Target.Id,Port:Target.Port,Health:TargetHealth.State}' \
  --output table
Open AWS View. Confirm two healthy targets, then click Send request to see a real HTTP 200 response. The health states and response establish the starting condition.
Observe a Real Application Failure
In this step, you will make app-a fail its health endpoint while leaving its EC2 instance running.
Capture the instance IDs by their supplied name tags, and the address needed for the SSH connection:
APP_A=$(aws ec2 \
  describe-instances \
  --filters Name=tag:Name,Values=app-a \
  --query 'Reservations[0].Instances[0].InstanceId' \
  --output text)

APP_B=$(aws ec2 \
  describe-instances \
  --filters Name=tag:Name,Values=app-b \
  --query 'Reservations[0].Instances[0].InstanceId' \
  --output text)

APP_A_IP=$(aws ec2 \
  describe-instances \
  --instance-ids "$APP_A" \
  --query 'Reservations[0].Instances[0].PublicIpAddress' \
  --output text)
The supplied application reads /etc/report-app/config.json for each request. Its healthy setting controls whether /health returns 200 or 503. Use SSH with the supplied key and connection settings. jq changes just this JSON field; a temporary file avoids overwriting the file while reading it, and install replaces it with readable permissions:
ssh -F ssh_config "ubuntu@$APP_A_IP" \
  'sudo jq ".healthy = false" /etc/report-app/config.json > /tmp/report-config.json && sudo install -m 644 /tmp/report-config.json /etc/report-app/config.json'
Check the application directly from inside that server. -o /dev/null discards the body, and -w prints the HTTP status:
ssh -F ssh_config "ubuntu@$APP_A_IP" \
  'curl -s -o /dev/null -w "%{http_code}\n" http://127.0.0.1:8081/health'
Expect 503. This is an application failure, not an EC2 stop. Allow time for two checks, then inspect the reason:
sleep 12

aws elbv2 \
  describe-target-health \
  --target-group-arn "$TG_ARN" \
  --query 'TargetHealthDescriptions[].{Instance:Target.Id,Health:TargetHealth.State,Reason:TargetHealth.Reason}' \
  --output table
APP_A should be unhealthy with Target.ResponseCodeMismatch, because 503 does not match 200. APP_B should remain healthy. Health checks run asynchronously; if the transition is still pending, wait briefly and repeat the query.
Verify the EC2 instances still run:
aws ec2 \
  describe-instances \
  --instance-ids "$APP_A" "$APP_B" \
  --query 'Reservations[].Instances[].{Instance:InstanceId,State:State.Name}' \
  --output table
Send six separate requests through the ALB:
for request in 1 2 3 4 5 6; do
  curl --config client.conf -sS "http://$LB_DNS/health"
  echo
done
Every response should identify APP_B. In AWS View, confirm one unhealthy target and one healthy target. Click Send request several times: successful responses should identify the healthy server. ALB excludes the failed target while a healthy target is available.
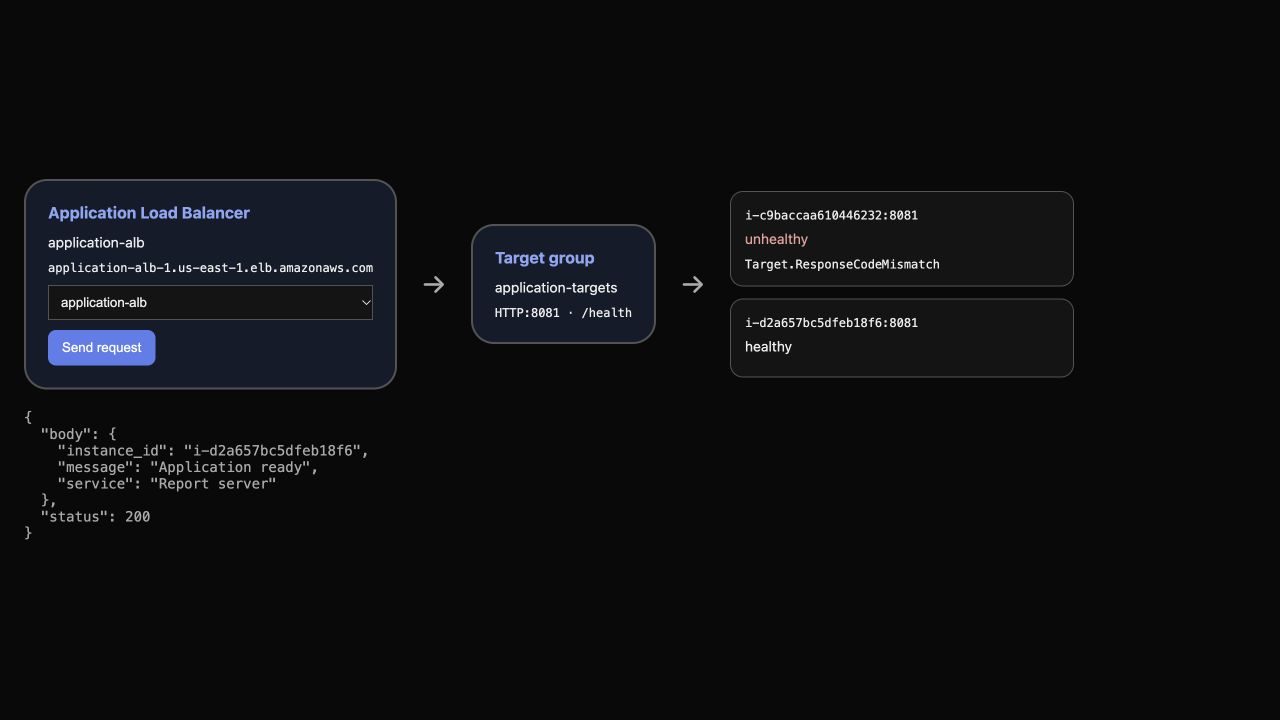
This example shows an actual HTTP 200 response from the healthy target while the other target reports Target.ResponseCodeMismatch. Your instance IDs will differ; compare the response with your own healthy target.
If every target becomes unhealthy, ALB can fail open and route to unhealthy targets. Keeping app-b healthy is essential to this exercise; do not interpret an all-unhealthy group as proof that ALB stops forwarding all requests.
Recover and Readmit the Target
In this step, you will restore app-a and observe it rejoin request handling after successful health checks.
Restore only the application's healthy field using the same safe file replacement:
ssh -F ssh_config "ubuntu@$APP_A_IP" \
  'sudo jq ".healthy = true" /etc/report-app/config.json > /tmp/report-config.json && sudo install -m 644 /tmp/report-config.json /etc/report-app/config.json'
Confirm the direct health endpoint now returns 200:
ssh -F ssh_config "ubuntu@$APP_A_IP" \
  'curl -s -o /dev/null -w "%{http_code}\n" http://127.0.0.1:8081/health'
The application has recovered, but the ALB must still observe the configured consecutive successful checks. Wait for its health state, then inspect both targets:
aws elbv2 \
  wait target-in-service \
  --target-group-arn "$TG_ARN"

aws elbv2 \
  describe-target-health \
  --target-group-arn "$TG_ARN" \
  --query 'TargetHealthDescriptions[].{Instance:Target.Id,Health:TargetHealth.State}' \
  --output table
Both targets should be healthy. Send six requests again:
for request in 1 2 3 4 5 6; do
  curl --config client.conf -sS "http://$LB_DNS/health"
  echo
done
Look for both instance IDs. In AWS View, confirm both healthy cards and use Send request to observe both serving backends. You repaired the application and allowed its checks to succeed; you did not replace or deregister the instance.
Remove the Load Balancing Resources
In this step, you will remove the supplied load balancing configuration while preserving the recovered application servers and network.
Capture the listener ARN, remove the listener first and then remove the ALB and target group:
LISTENER_ARN=$(aws elbv2 \
  describe-listeners \
  --load-balancer-arn "$LB_ARN" \
  --query 'Listeners[0].ListenerArn' \
  --output text)

aws elbv2 \
  delete-listener \
  --listener-arn "$LISTENER_ARN"

aws elbv2 \
  delete-load-balancer \
  --load-balancer-arn "$LB_ARN"

aws elbv2 \
  delete-target-group \
  --target-group-arn "$TG_ARN"
Confirm both resource lists are empty:
aws elbv2 \
  describe-load-balancers \
  --query 'LoadBalancers[].LoadBalancerName'

aws elbv2 \
  describe-target-groups \
  --query 'TargetGroups[].TargetGroupName'
Expect [] for both queries and empty load balancing areas in AWS View. Leave the supplied EC2 servers and network in place.
Summary
You configured ALB health checks, caused a real application failure and distinguished it from a stopped EC2 instance. You observed requests continue on the healthy server, recovered the failing application and confirmed both backends served traffic again. Finally, you removed the load balancing resources while preserving the supplied servers and network.
The next lab uses an Auto Scaling group to replace failed instances instead of repairing an existing server manually.