Introduction
A parcel delivery application needs separate address ranges for its public-facing service and internal workers. You will create a VPC, place two non-overlapping subnets in different Availability Zones, and inspect the resulting address plan in AWS View.
You should already be comfortable running AWS CLI commands and reading resource IDs. The CLI is configured for this fresh environment. You will finish by removing only the resources you created.
Certification Relevance
This lab provides hands-on practice for the following exam topics.
- Cloud Practitioner (CLF-C02) · Tasks 3.2 and 3.5: VPC and subnet components, and the relationship between a Region and Availability Zones.
- Solutions Architect – Associate (SAA-C03) · Task 3.4: Basic subnet-tier placement and non-overlapping IP address planning.
- CloudOps Engineer – Associate (SOA-C03) · Task 5.1: Basic VPC and subnet configuration.
Create the Delivery VPC
In this step, you will choose the outer address range for the application and create its VPC.
A Virtual Private Cloud (VPC) is an isolated network for resources in one AWS Region. Its CIDR block defines the addresses that its subnets can use. IPv4 CIDR notation combines a starting address and a prefix length: 10.20.0.0/16 contains addresses from 10.20.0.0 through 10.20.255.255. A smaller prefix number leaves more bits for addresses, so a /16 is larger than a /24.
Use the prepared Terminal for commands and click the AWS View tab beside it. The view reads the same resource state as the CLI and shows the network resources you create. Keep both available as you work.
Begin in your workspace:
cd /home/labex/project
Read the existing VPC inventory before changing anything. --query selects the ID and CIDR fields, and --output table makes the result easier to compare:
aws ec2 describe-vpcs --query 'Vpcs[].{ID:VpcId,CIDR:CidrBlock}' --output table
A reference network uses 10.99.0.0/16. Other pre-existing VPCs may also appear. Leave those networks intact; you will create and later remove your own 10.20.0.0/16 network.
The EC2 command group includes VPC networking operations. --cidr-block sets the address range. --tag-specifications adds the Name and Project labels when the resource is created. The quoted value keeps its brackets and commas together as one argument.
The shell expression $(...) runs a command and captures its output. Assigning that output to VPC_ID saves the generated VPC ID for later commands. --query 'Vpc.VpcId' --output text returns just that ID:
VPC_ID=$(aws ec2 create-vpc \
  --cidr-block 10.20.0.0/16 \
  --tag-specifications 'ResourceType=vpc,Tags=[{Key=Name,Value=delivery-network},{Key=Project,Value=parcel}]' \
  --query 'Vpc.VpcId' \
  --output text)
A captured command does not print its result. Read the resource back using the saved ID. "$VPC_ID" substitutes that value as one argument:
aws ec2 describe-vpcs \
  --vpc-ids "$VPC_ID" \
  --query 'Vpcs[].{ID:VpcId,CIDR:CidrBlock,State:State}' \
  --output table
The CIDR is 10.20.0.0/16 and the state is available. In AWS View, delivery-network now appears with the same CIDR and no application subnets. Keep this Terminal open so the saved IDs remain available.
Add the Public-Facing Subnet
In this step, you will allocate a smaller address range inside the VPC and place it in an Availability Zone.
A subnet is a portion of a VPC's address range. Each subnet belongs to exactly one Availability Zone (AZ) in that Region; the VPC itself spans the Region. An AZ name such as us-east-1a identifies where a subnet's resources will be placed.
For the future public-facing service, reserve 10.20.1.0/24. This covers 10.20.1.0 through 10.20.1.255 and fits inside 10.20.0.0/16. AWS reserves the first four and last address in an ordinary IPv4 subnet, leaving 251 assignable addresses in this /24. You do not assign those reserved addresses to workloads.
Inspect the available zone names. The region was configured when the environment started:
aws ec2 describe-availability-zones \
  --query 'AvailabilityZones[].{Zone:ZoneName,State:State}' \
  --output table
You will use us-east-1a for this subnet and us-east-1b for the next one. --vpc-id chooses the parent network; --availability-zone chooses the placement. Save the new subnet ID for cleanup:
PUBLIC_SUBNET_ID=$(aws ec2 create-subnet \
  --vpc-id "$VPC_ID" \
  --cidr-block 10.20.1.0/24 \
  --availability-zone us-east-1a \
  --tag-specifications 'ResourceType=subnet,Tags=[{Key=Name,Value=delivery-public},{Key=Project,Value=parcel}]' \
  --query 'Subnet.SubnetId' \
  --output text)
Read its parent, range and zone back:
aws ec2 describe-subnets \
  --subnet-ids "$PUBLIC_SUBNET_ID" \
  --query 'Subnets[].{ID:SubnetId,VPC:VpcId,CIDR:CidrBlock,Zone:AvailabilityZone}' \
  --output table
The VPC ID matches your saved ID, the range is 10.20.1.0/24, and the zone is us-east-1a. AWS View places this subnet inside delivery-network.
The name delivery-public describes its intended use. A name alone does not make a subnet public: it still needs an Internet gateway route, which you will configure in the next lab.
Add a Separate Worker Subnet
In this step, you will give the internal workers their own non-overlapping subnet and compare the completed plan.
Two subnets in the same VPC cannot overlap. Giving the workers 10.20.2.0/24 keeps their address range separate from 10.20.1.0/24. Both ranges remain inside the VPC's /16.
Place this subnet in us-east-1b so you can see that one VPC contains subnets in different Availability Zones. This demonstrates placement; you have not yet deployed a redundant application across the zones.
PRIVATE_SUBNET_ID=$(aws ec2 create-subnet \
  --vpc-id "$VPC_ID" \
  --cidr-block 10.20.2.0/24 \
  --availability-zone us-east-1b \
  --tag-specifications 'ResourceType=subnet,Tags=[{Key=Name,Value=delivery-private},{Key=Project,Value=parcel}]' \
  --query 'Subnet.SubnetId' \
  --output text)
Use a server-side filter to select only subnets inside your VPC. In Name=vpc-id,Values=..., Name identifies the filter and Values contains the matching VPC ID:
aws ec2 describe-subnets \
  --filters "Name=vpc-id,Values=$VPC_ID" \
  --query 'Subnets[].{ID:SubnetId,CIDR:CidrBlock,Zone:AvailabilityZone}' \
  --output table
The two rows show the following plan. Generated IDs and row order can vary:
| Purpose | CIDR | Availability Zone |
|---|---|---|
| Public-facing service | 10.20.1.0/24 |
us-east-1a |
| Internal workers | 10.20.2.0/24 |
us-east-1b |
To observe the overlap boundary, try adding 10.20.1.128/25. This smaller range is already inside delivery-public, so it cannot become another subnet in this VPC:
aws ec2 create-subnet \
  --vpc-id "$VPC_ID" \
  --cidr-block 10.20.1.128/25 \
  --availability-zone us-east-1a
The expected error contains InvalidSubnet.Conflict. No third subnet is created. Keep the two valid /24 ranges you created above.
Compare these same ranges and zones in AWS View. Neither subnet has an Internet route yet. Their distinct address ranges give you separate places to apply routing and access rules in the following labs.
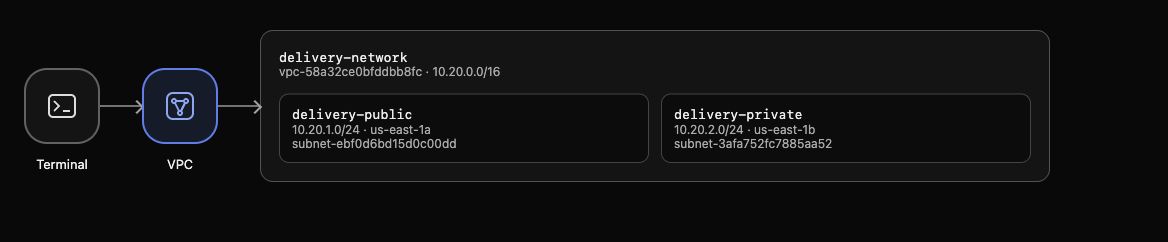
Example result: both subnet CIDRs fit inside the VPC range; each subnet shows its own Availability Zone. Resource IDs vary in your environment.
Remove the Practice Network
In this step, you will remove your two subnets and VPC while preserving the existing reference network.
Resources have dependencies: a VPC cannot be removed while it still contains your subnets. Delete only the subnet IDs you saved. A successful delete command produces no output:
aws ec2 delete-subnet --subnet-id "$PUBLIC_SUBNET_ID"
aws ec2 delete-subnet --subnet-id "$PRIVATE_SUBNET_ID"
Now remove your empty VPC:
aws ec2 delete-vpc --vpc-id "$VPC_ID"
Read the complete VPC inventory again rather than relying on an editable tag to prove deletion:
aws ec2 describe-vpcs --query 'Vpcs[].{ID:VpcId,CIDR:CidrBlock}' --output table
There is no 10.20.0.0/16 VPC. The 10.99.0.0/16 reference and any other pre-existing networks remain. A failed inventory query does not prove cleanup. AWS View now shows no application VPC.
Run this step's completion check.
The next lab starts in a fresh environment with its own prepared application. It will teach how an Internet gateway, route and public address allow an external request to reach that application.
Summary
You created a VPC address range, divided it into two non-overlapping application subnets, and placed each subnet in an Availability Zone. You checked the parent relationships with the CLI and AWS View, then removed only your practice network.
Continue with Connect a Public Subnet to the Internet to turn an address plan into a working application path.