Introduction
Fieldlight Studio has three garden photographs to share. The originals are ready, but large originals are inconvenient for a quick review. You will use a prepared image tool to create small previews and a contact sheet: one image that shows the whole collection at a glance.
The tool is installed on one connected Jenkins agent. Your first job is to choose the agent that can actually do the work. Then you will respond to a smaller delivery requirement, retain both successful versions, and keep the original photographs safe.
Prerequisites are Jenkins page navigation and recognition of a short Declarative Pipeline. No Java programming, photo-editing commands, Docker administration or agent installation is required. The supplied programs and agent connections are prepared. The two agents are separate containers on one training VM: their filesystems are independent, but they share its kernel. This is not a cloud fleet. Fieldlight is fictional, and the photographs are AI-generated study materials. The duration is an author estimate, not a measured beginner time.
Match the Work to Its Agent
In this step, you will inspect the originals, observe an expected missing-tool failure, and schedule the work on the image-capable agent. Start in Photo Desk.
The Garden Stories collection shows lavender, a garden path and a watering can. Open each photograph, inspect its full original, and use the browser's Back action to return to the desk. Choose Download original for the lavender photograph and keep it for comparison. The originals are 1536 pixels wide and must remain unchanged. The desk initially says No completed collection yet.
Switch to Jenkins. Jenkins' controller holds job configuration and coordinates builds. An agent is a connected process that performs build work. A node is its configured entry in Jenkins. An executor is one available work slot on that node. Here each agent has one executor, so it can perform one allocated block of work at a time.
From the dashboard, choose Manage Jenkins, then Nodes. Inspect image-studio and pack-studio in turn. Both are connected. Their capability labels are photo-imaging and photo-packing; both also have linux. A label is a scheduling condition, not a software installer. The image tool exists only on image-studio; the packaging tool exists only on pack-studio. These are actual separate agent processes and containers.
Return to the dashboard using the Jenkins logo at the upper left, then open preview-photos. Choose Configure, then the Pipeline section. The Script editor contains the prepared job. Read its structure before changing anything:
agent noneat the top means the whole Pipeline does not reserve one agent. The stage chooses its own agent.stage('Prepare photos')names the work. Itsagent { label 'photo-packing' }currently requests the packing capability.stepscontains operations.shruns the quoted command in the selected agent's shell. The supplied/opt/fieldlight/prepare-photosprogram creates previews;--width 480requests a width of 480 pixels and preserves the original aspect ratio. Single quotes keep that command as one Groovy string.deleteDir()clears this job's allocated workspace, the temporary directory where its build files live. The first call starts clean. Thepostsection'salwayscall clears the workspace after the stage, including after a failure. It does not remove the originals under/opt/fieldlight/originals.archiveArtifactsretains matching files in Jenkins before cleanup. Inprepared/**,**includes files in nested directories.fingerprint: truerecords their file identities for traceability; it is not a client approval or a signature.
Return to the job page without editing the script. Choose Build Now once. Open the new numbered build in Build History, then choose Console Output. Wait for it to finish. This first failure is expected: the console identifies pack-studio, then reports that /opt/fieldlight/prepare-photos was not found, and finishes with FAILURE. The requested agent is connected, but it lacks this role's tool. This is different from waiting indefinitely for an offline or unmatched agent.
Return to preview-photos, choose Configure, and open Pipeline again. Change only the stage's label from photo-packing to photo-imaging. For a complete copyable version, click inside Script, select all with Ctrl+A on Windows/Linux or Command+A on macOS, and replace the contents with:
pipeline {
    agent none
    stages {
        stage('Prepare photos') {
            agent { label 'photo-imaging' }
            steps {
                deleteDir()
                sh '/opt/fieldlight/prepare-photos --width 480'
                archiveArtifacts artifacts: 'prepared/**', fingerprint: true
            }
            post {
                always { deleteDir() }
            }
        }
    }
}
Keep the tool command, originals, archiving and both cleanup calls. Choose Save, then Build Now. Open the new build's Console Output and wait for Finished: SUCCESS. It should name image-studio, report 3 previews at 480 pixels wide, then show Archiving artifacts, Recording fingerprints and the final deleteDir. This is evidence of real work on the capable agent, not just a renamed message.
If you see a Groovy syntax error, return to Configure, restore the complete script above, save and run a new build. If a misspelled label leaves a build queued, cancel that queued item with its cancel icon, choose Yes in the confirmation dialog, correct the label and build again. A command spelling error appears in the console as a missing command; restore the supplied path rather than installing another tool. Keep the original failed build and all later history. Ordinary mistakes can be corrected with another saved script and build; do not reset the VM.
Switch to Photo Desk and refresh. Choose Open prepared collection. The three small previews must show the same garden subjects as the originals. Choose Open contact sheet to see all three together; use browser Back to return. Open Caption table and Image details, returning with Back after each. captions.csv is a plain-text comma-separated values table: the first row names its columns, and each following row describes one image. It relates each caption to its images/ file and records width 480 and height 320; preparation.json identifies garden and width 480.
Return to Jenkins and open the successful build's page. Under Build Artifacts, individual PNG filename links open the images in your browser. For a complete download, choose the Build Artifacts heading, then (all files in zip) on the file-browser page. Save archive.zip in a folder for your 480-pixel version and extract the entire ZIP there. Its six files are under archive/prepared/, including the images/ subdirectory. Open archive/prepared/images/garden-01.png and archive/prepared/contact-sheet.png in your browser or image viewer, and read archive/prepared/captions.csv in a text editor. Their visible content must match the collection. The lavender preview is 480 × 320 pixels, while the downloaded original remains 1536 × 1024. Keep this successful build's number and complete extracted folder for the next step. These retained files remain available after the workspace was cleared.
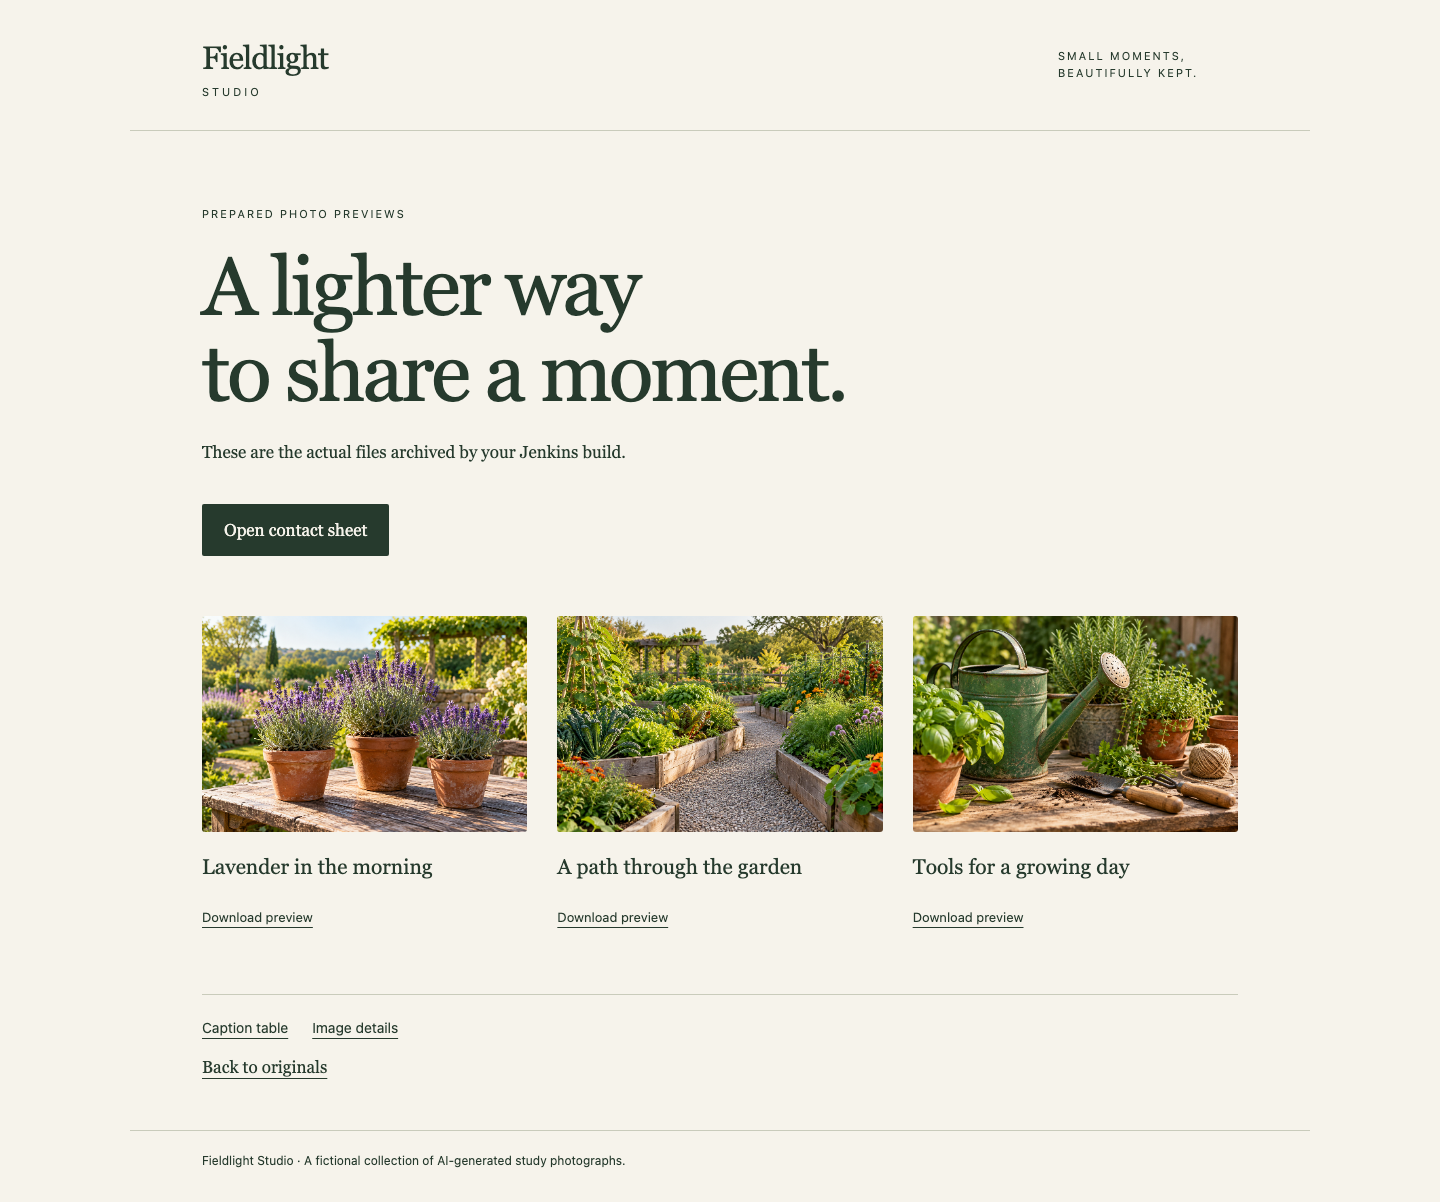
The prepared collection shows the same lavender, garden path and watering-can subjects as the originals. Use the contact sheet and file links to inspect the actual retained output.
Deliver a Smaller Preview Set
In this step, you will meet a 320-pixel delivery request and retain the earlier 480-pixel set for comparison. Start in Photo Desk and return to the originals with Back to originals. Confirm that all three full originals remain available.
The client now needs previews exactly 320 pixels wide. The supplied program accepts that requirement through its existing --width option; you do not edit or replace the image program. Switch to Jenkins, return to preview-photos, and choose Configure → Pipeline. Change --width 480 to --width 320 in the sh command. The complete script should now be:
pipeline {
    agent none
    stages {
        stage('Prepare photos') {
            agent { label 'photo-imaging' }
            steps {
                deleteDir()
                sh '/opt/fieldlight/prepare-photos --width 320'
                archiveArtifacts artifacts: 'prepared/**', fingerprint: true
            }
            post {
                always { deleteDir() }
            }
        }
    }
}
Choose Save, then Build Now. Wait for the new build to finish with SUCCESS. In Console Output, confirm that image-studio performed the work, the program reported 320 pixels wide, and archiving and cleanup ran. If the console still says 480, check that you saved the changed script and opened the new build rather than the earlier one.
On this build's page, choose Build Artifacts, then (all files in zip). Save and fully extract this new archive.zip into a different folder from your 480-pixel version. Open the files under its archive/prepared/ directory. All three preview images should now be 320 × 213 pixels. The 213-pixel height is the rounded result of preserving the 1536 × 1024 original's aspect ratio. The contact sheet still contains all three subjects in the same order; it is a separate overview, not a fourth resized original. In captions.csv, each image's filename, caption and dimensions must agree. preparation.json must identify garden and width 320.
Switch to Photo Desk, refresh and choose Open prepared collection. Inspect all three new previews, the contact sheet and both metadata files. Return to the originals and confirm their full-size content is unchanged. Then switch to Jenkins, open the earlier successful build number you noted, and download its complete ZIP again through Build Artifacts → (all files in zip). Extract it into another new folder: its lavender preview must still be 480 × 320 pixels. Creating a new version should not rewrite an old archive.
If a download has an unexpected size or subject, check the build number and the saved width option, then correct the script and run a new build. Preserve the original photographs, supplied tools, connected agents, capability labels and complete build history. Do not copy files between agent filesystems, remove cleanup or substitute an archive from another run. Finish with the saved script actually built successfully. You have a smaller usable set, an intact earlier version and unchanged originals.
Summary
You matched a real image-processing capability to its Jenkins agent label, interpreted an expected missing-tool failure and produced usable previews. Changing the width option created a smaller delivery without changing the originals or the earlier archive. Native artifacts outlived the cleared workspace; the next independent lab uses two separate workspaces and a temporary same-run handoff.