

Introduction
In this lab, you will learn how to create and apply colorizing rules in Wireshark, a powerful network protocol analyzer. These rules enable you to visually differentiate various types of network traffic according to specific criteria, facilitating the identification and analysis of network activities that matter to you.
By the end of this lab, you will gain a better understanding of leveraging Wireshark's colorizing features. This will enhance your network analysis skills and support your cybersecurity investigations.
Explore and Export Coloring Rules
In this step, we'll start by exploring the existing colorizing rules in Wireshark. Colorizing rules in Wireshark are used to highlight different types of network packets based on specific criteria. This helps in quickly identifying and analyzing important information in the captured network traffic. You'll also learn how to view these rules and export them for future use.
First, you need to open Wireshark on your Linux machine. To do this, open the terminal and run the following command. This command will launch the Wireshark application, which you'll use to work with the colorizing rules.
wiresharkOnce Wireshark is open, you'll need to access the coloring rules. Go to the
Viewmenu at the top of the Wireshark window, then selectColoring Rules.... This will open theWireshark Coloring Rules Defaultdialog. This dialog is where you can manage all the colorizing rules in Wireshark.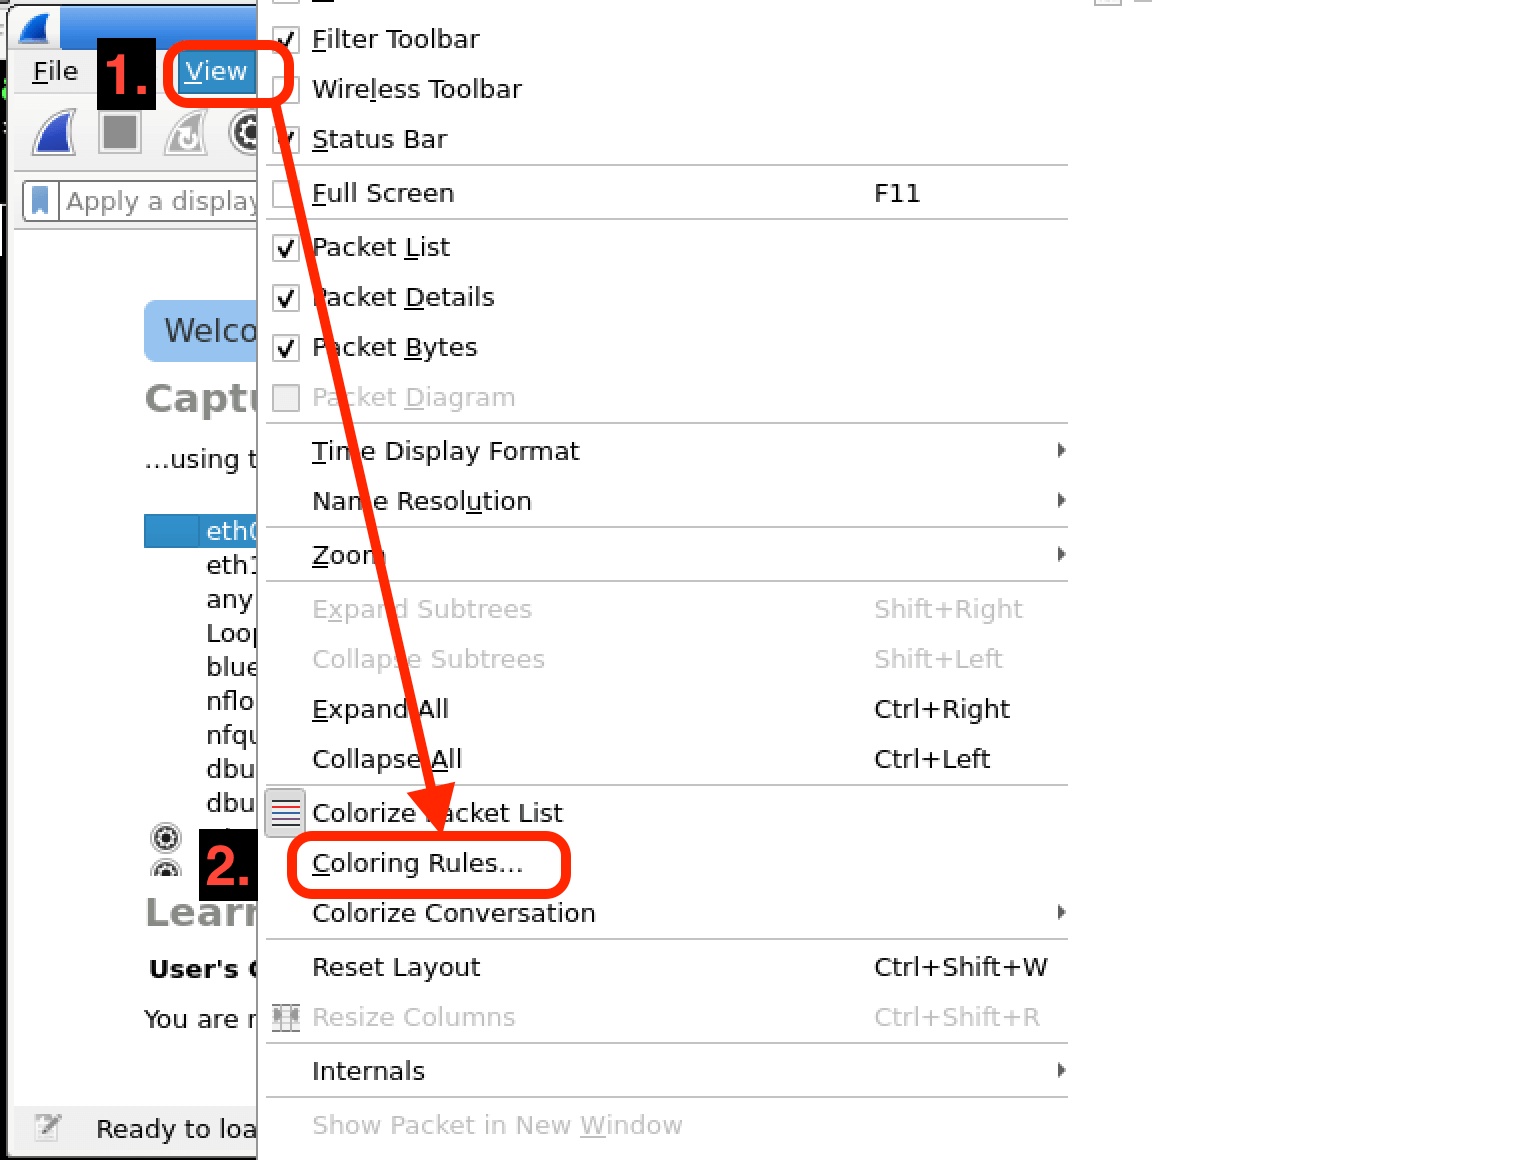
In the
Wireshark Coloring Rules Defaultdialog, you'll see a list of existing colorizing rules. Each rule has a specific condition and a corresponding color. These rules are applied to the captured packets in the order they appear in the list. Take a moment to look through the rules and read their descriptions. Understanding these rules will give you an idea of how Wireshark can help you analyze network traffic more effectively.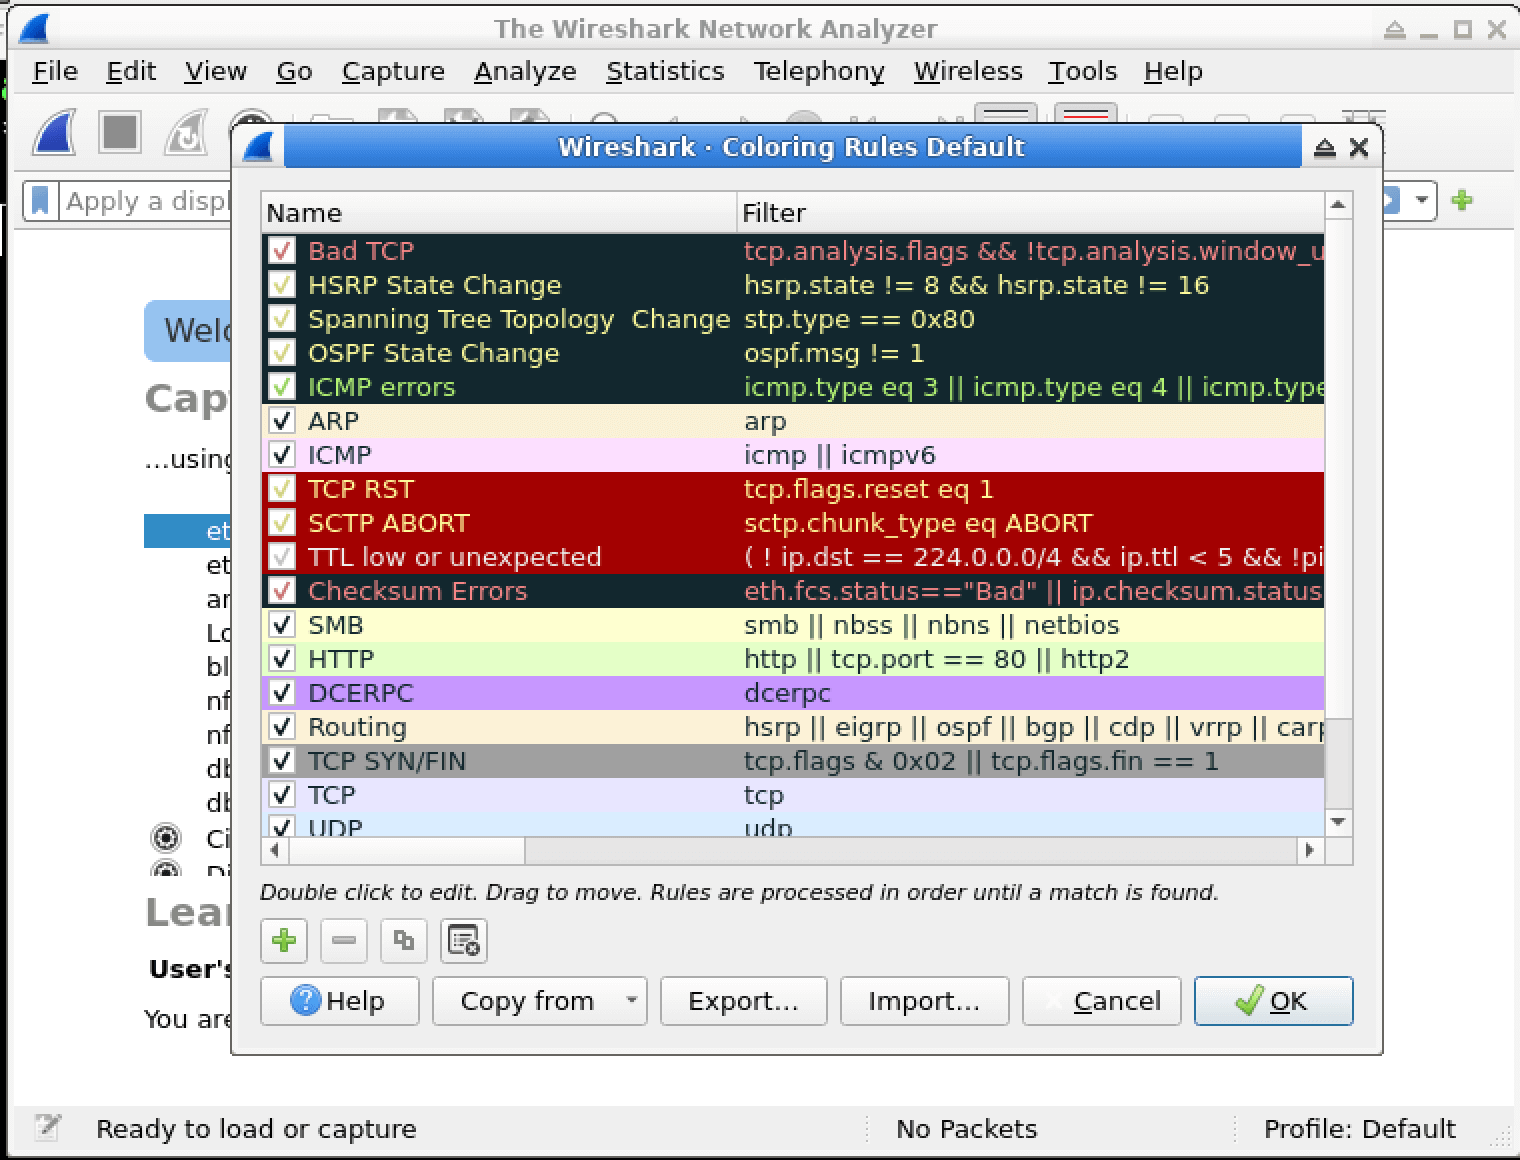
You might want to temporarily turn off or on a specific rule without deleting it. You can do this by selecting the rule in the list and clicking the
checkboxnext to it. If the checkbox is checked, the rule is enabled; if it's unchecked, the rule is disabled. This is useful when you want to test the impact of a particular rule on the packet coloring.Now, let's say you want to save the current set of colorizing rules for later use or to share with others. To export these rules, click the
Export...button in theWireshark Coloring Rules Defaultdialog.After clicking the
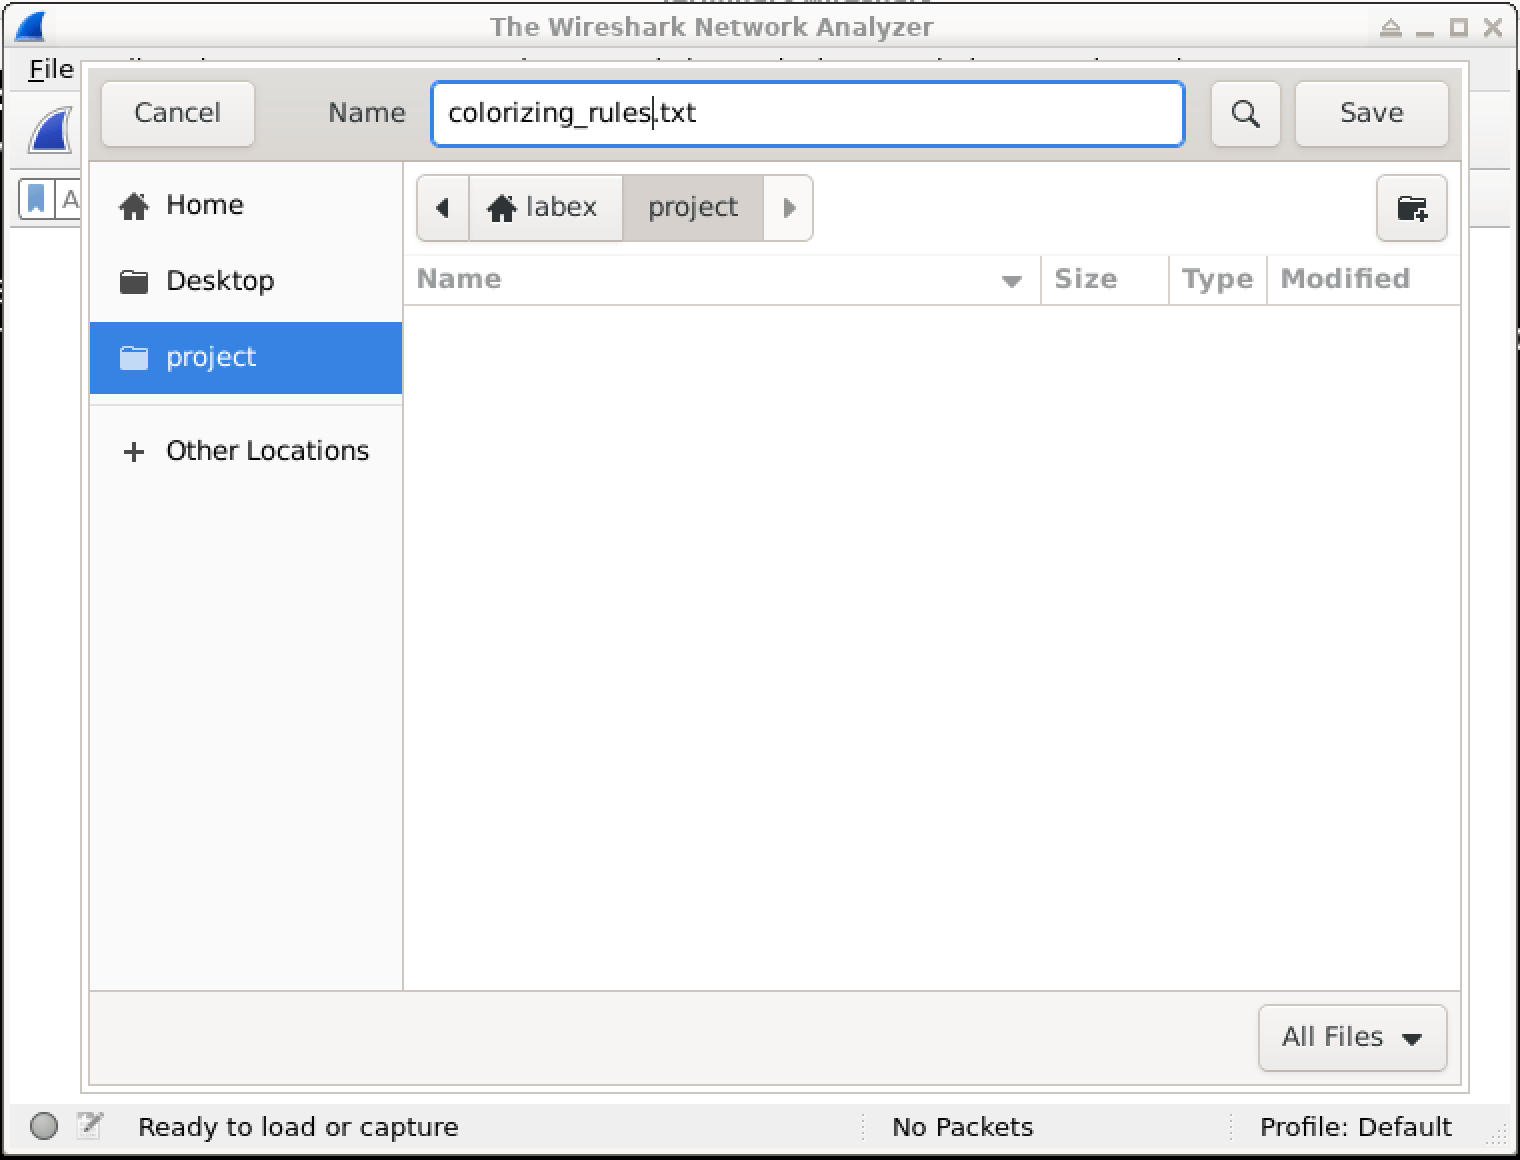
Export...button, a file dialog will appear. You need to choose a location to save the colorizing rules file. Navigate to the/home/labex/projectdirectory. It's a good practice to give the file a descriptive name, such ascolorizing_rules.txt, so you can easily identify it later.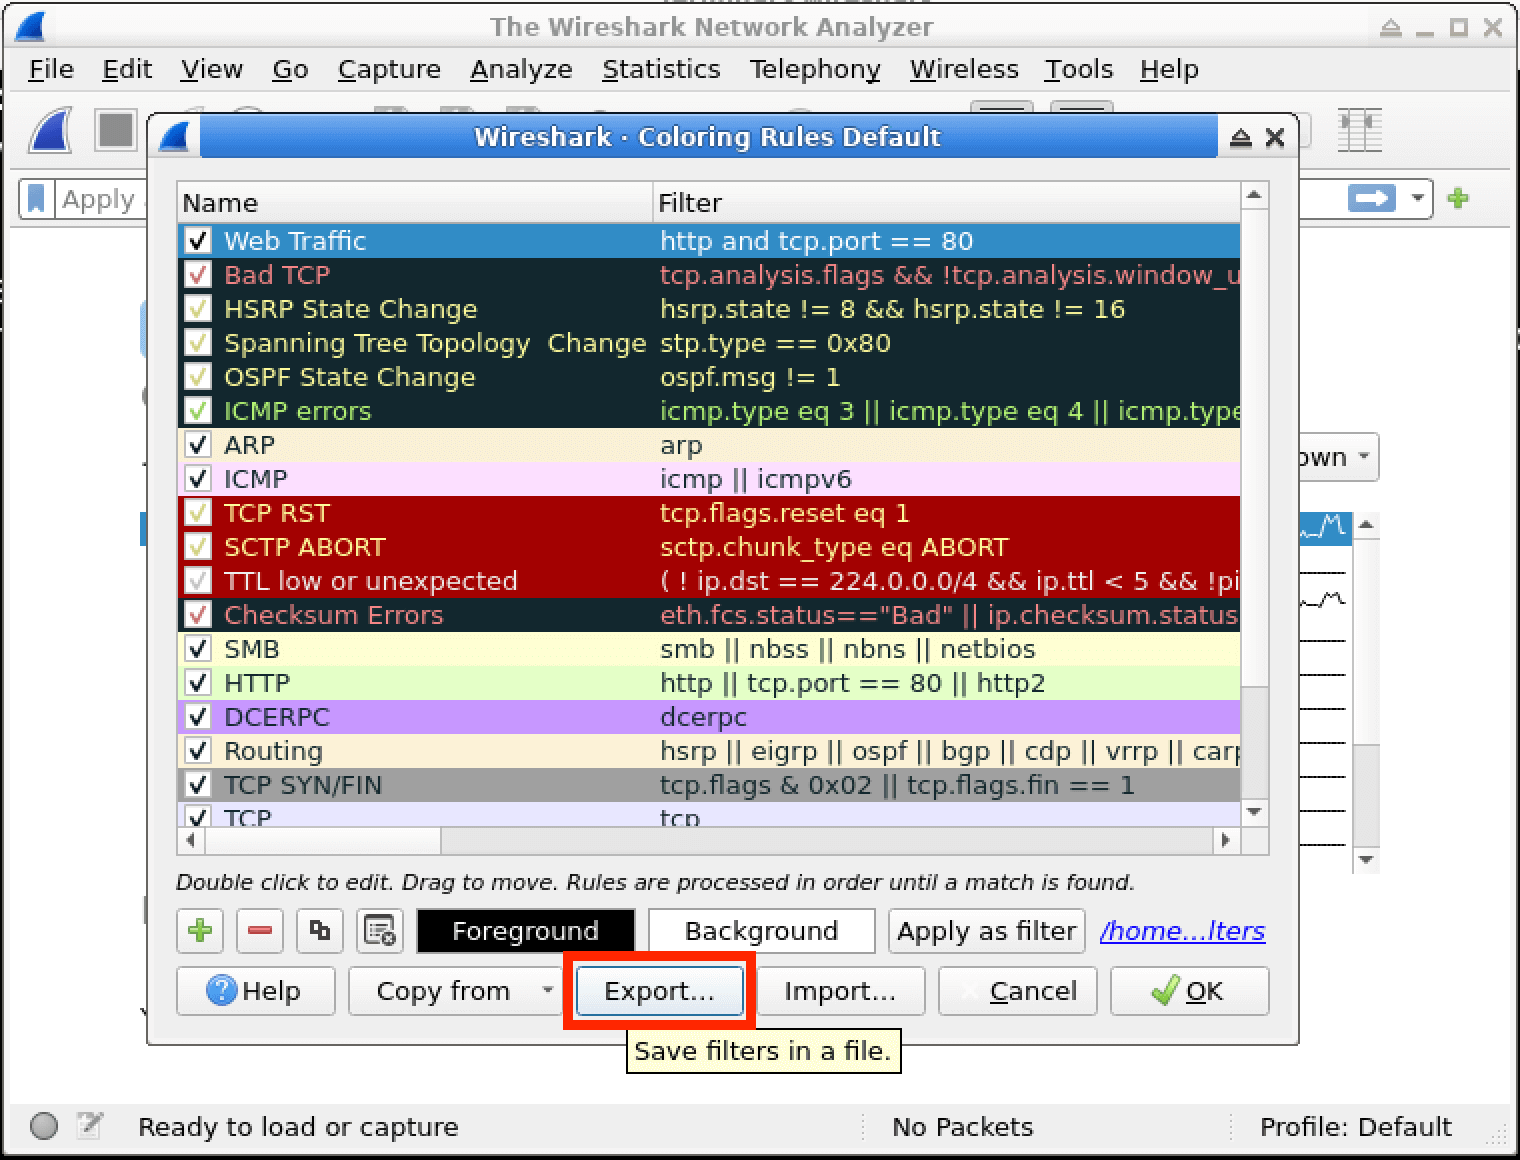
Once you've selected the location and named the file, click
OKto close theWireshark Coloring Rules Defaultdialog. You've now successfully exported the colorizing rules.
Create a New Colorizing Rule
In this step, we'll learn how to create a new colorizing rule in Wireshark. Colorizing rules are a powerful feature that allows you to highlight specific network traffic, making it easier to spot and analyze important packets. By creating a custom rule, you can quickly identify the types of network traffic that matter most to you.
First, open the
Wireshark Coloring Rules Defaultdialog. In Wireshark, go toView>Coloring Rules.... This dialog is where you can manage all your coloring rules, including creating, editing, and deleting them.To create a new colorizing rule, click the
+button. This action adds a blank rule entry to the list of existing rules.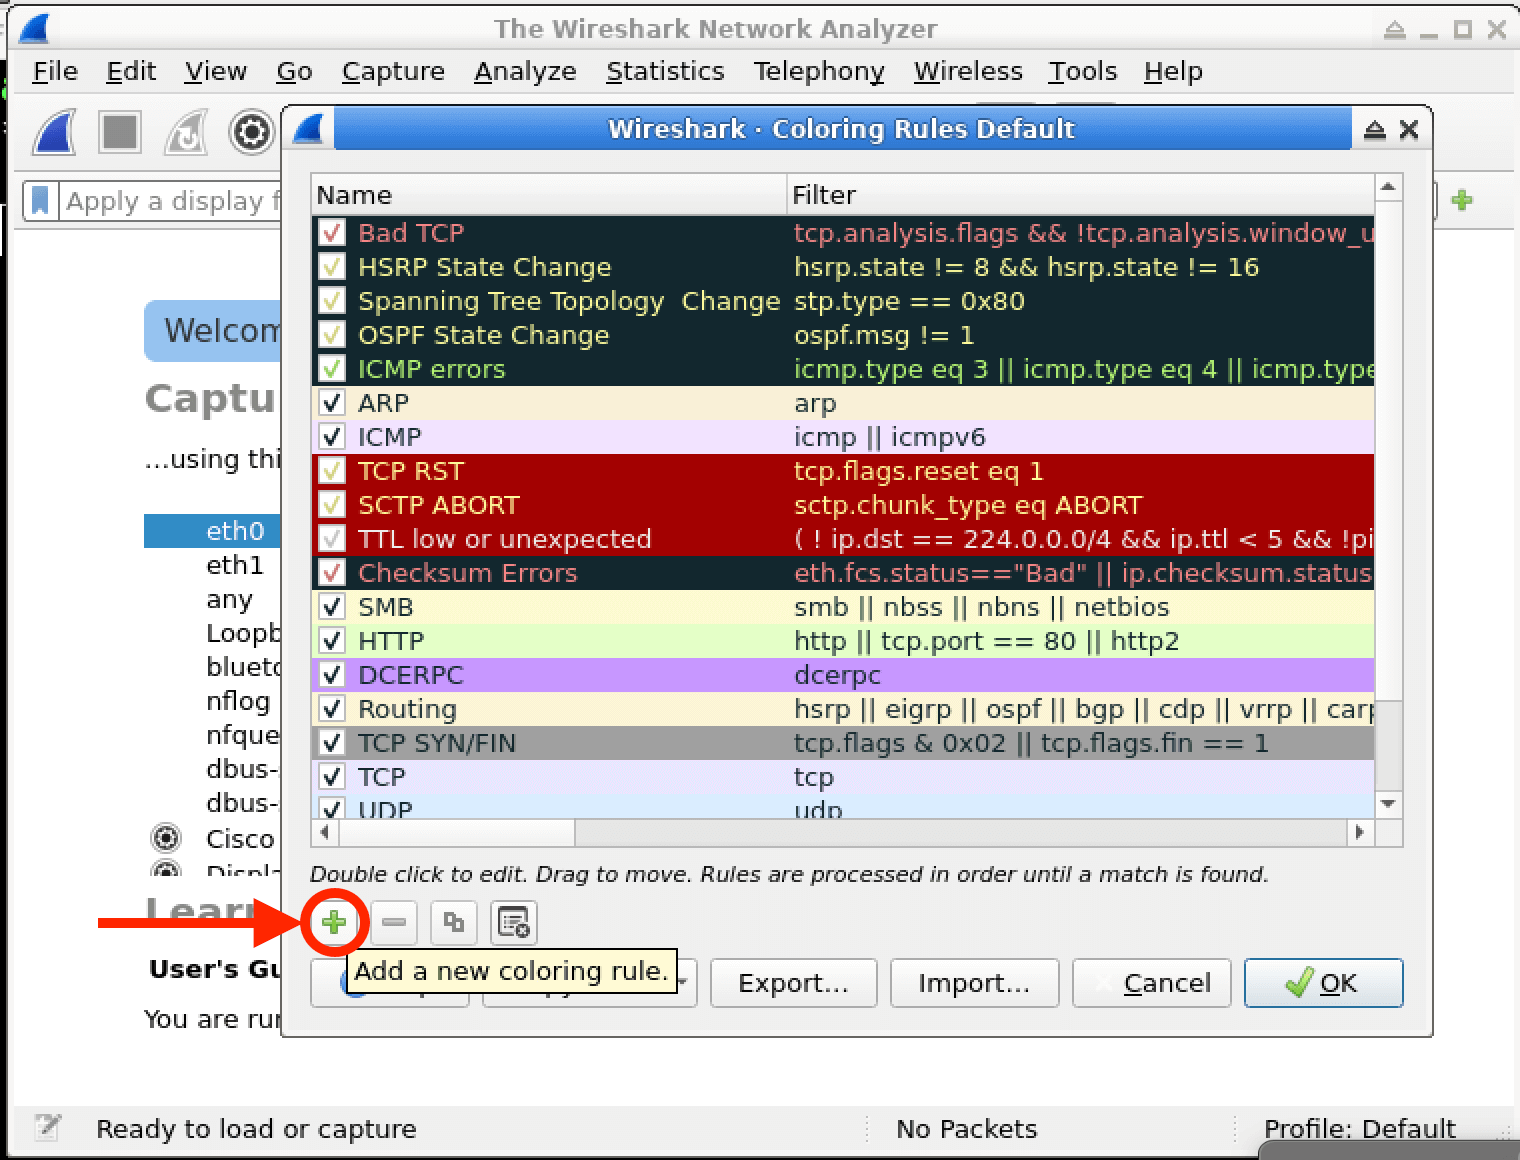
Once you've added a new rule, a new entry called
New coloring rulewill appear at the top of the Coloring Rules dialog box. Double - click on this entry to edit the rule name. For example, if you want to highlight HTTP traffic, you can name the ruleHTTP Traffic. In theFilterfield, you need to enter a filter expression. This expression tells Wireshark which packets should be highlighted by this rule. For HTTP traffic, you would enterhttp.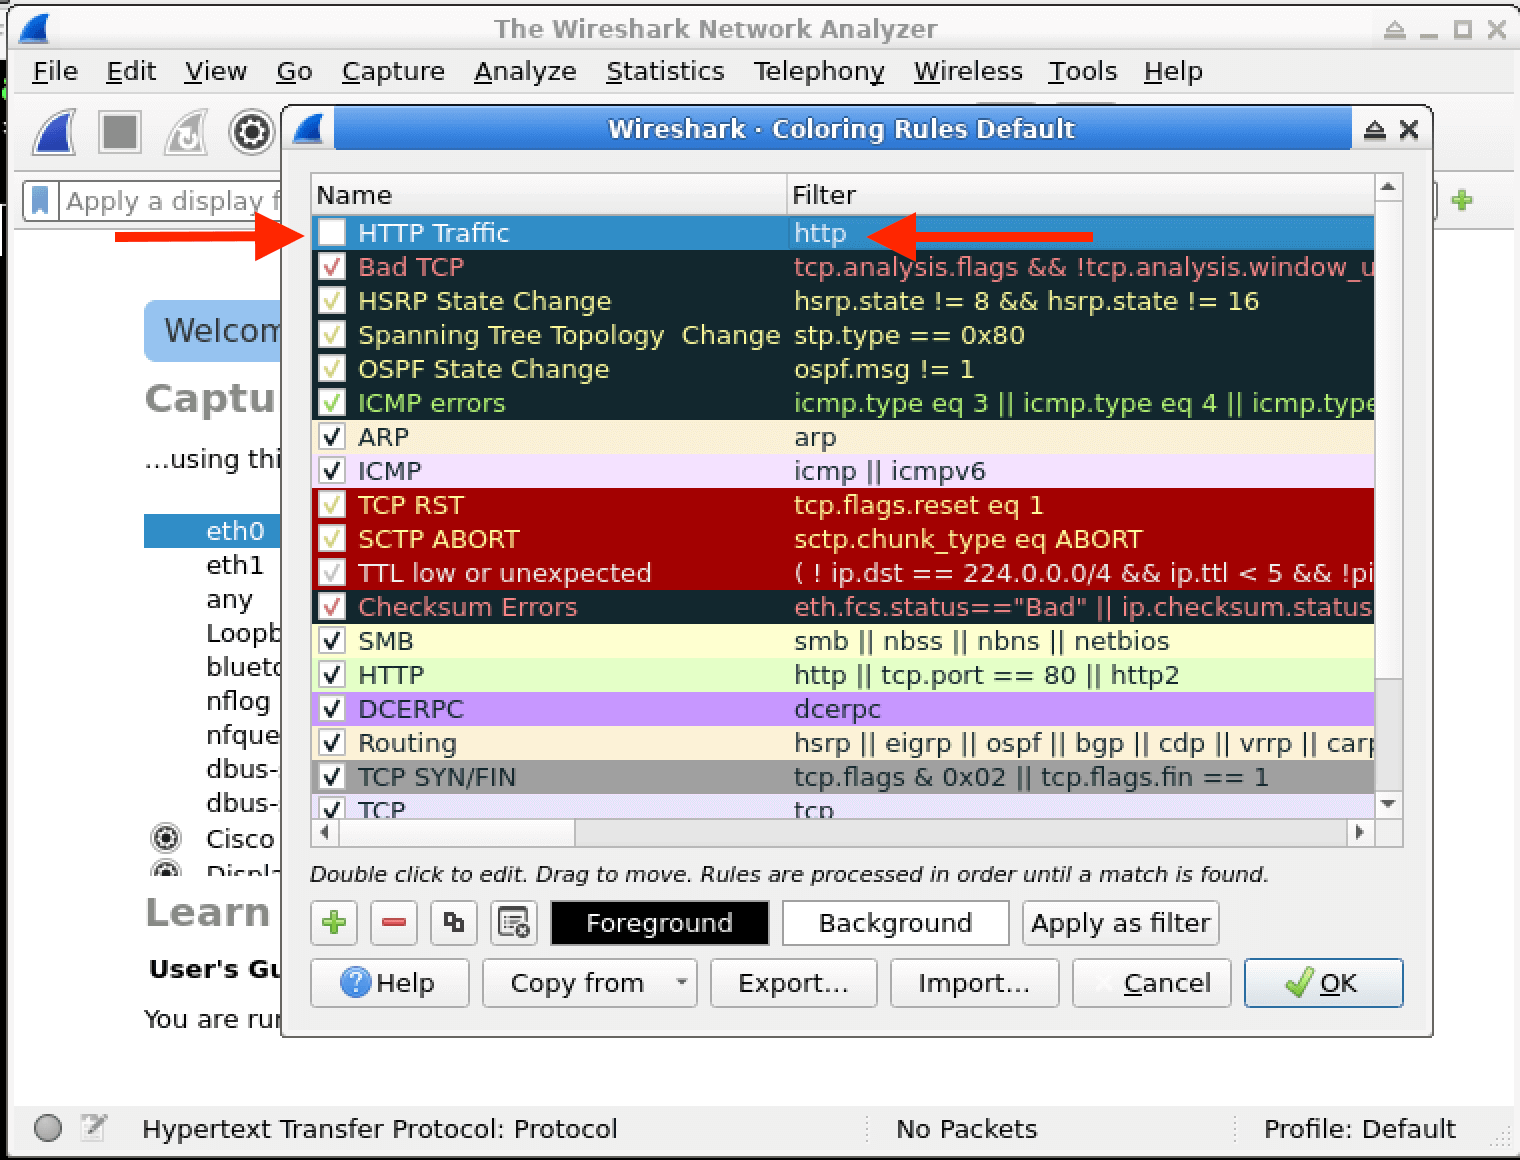
Now, let's talk about the coloring options. There are two important buttons here: the
foregroundandbackgroundbuttons.The
foregroundbutton is used to choose the color that will be used to highlight the text of the packets that match the rule. For example, if you want the text of the HTTP packets to be red, you can select red using this button.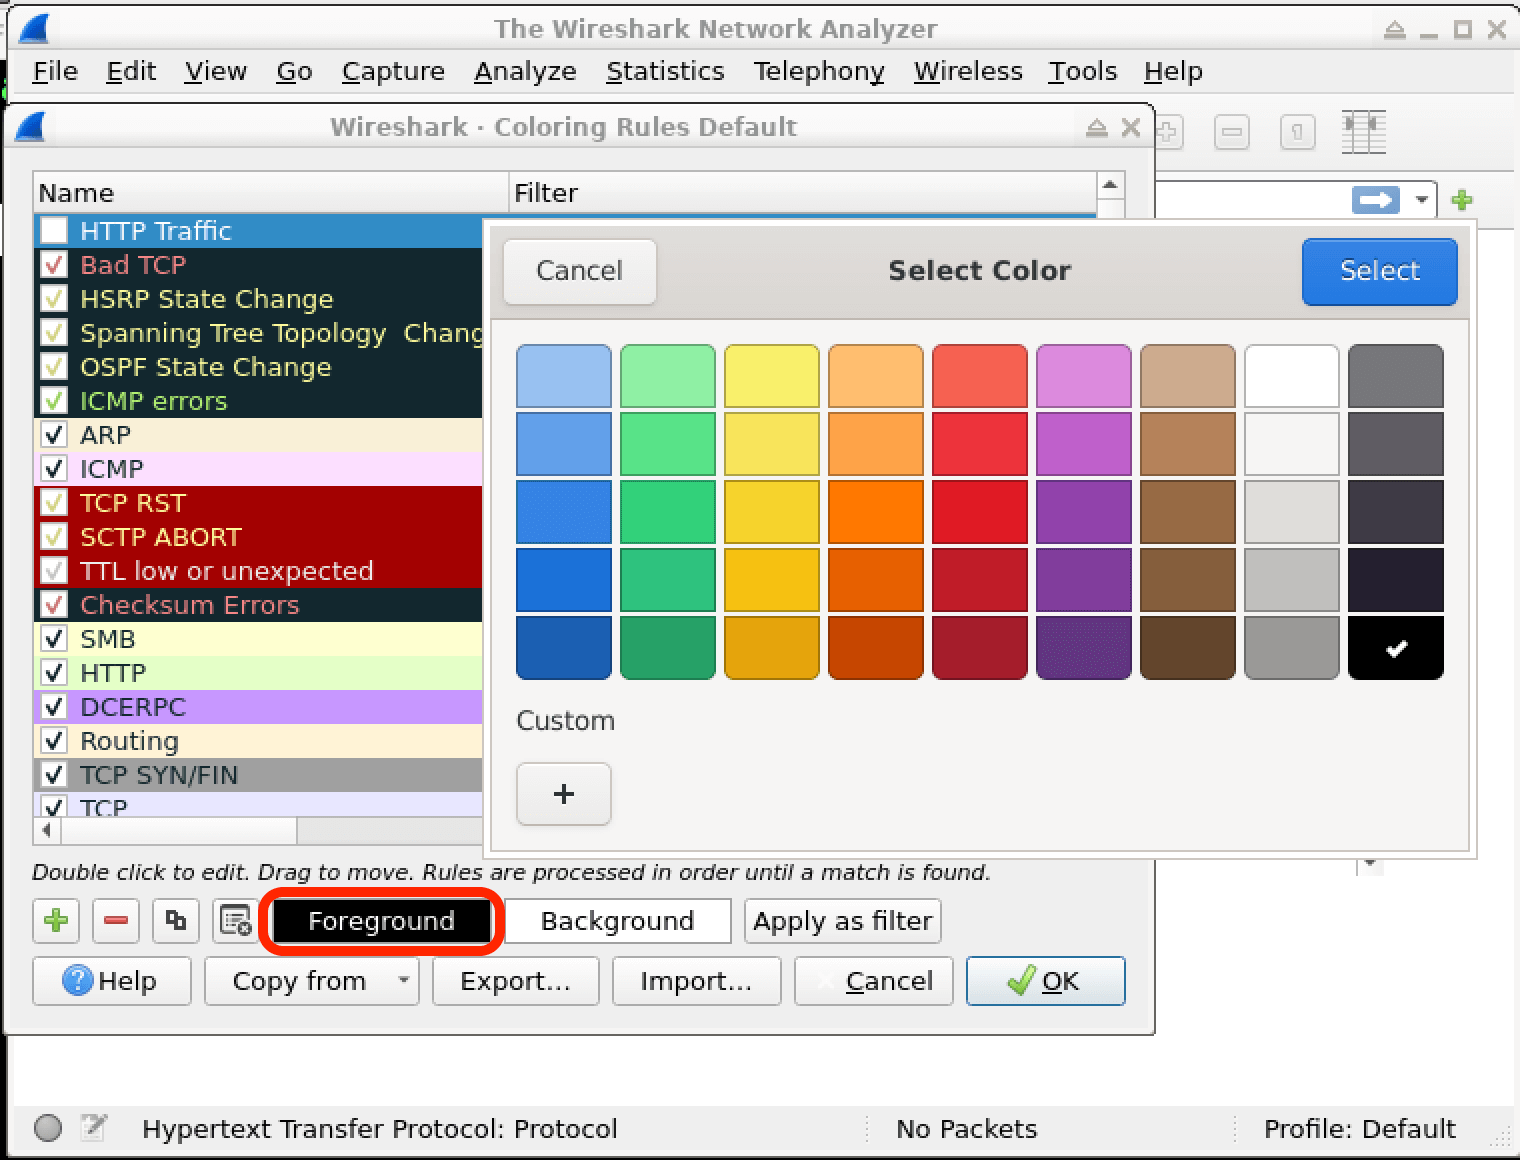
The
backgroundbutton allows you to choose the background color for the highlighted packets. You can use this to make the packets stand out even more. For instance, you could set the background color to yellow.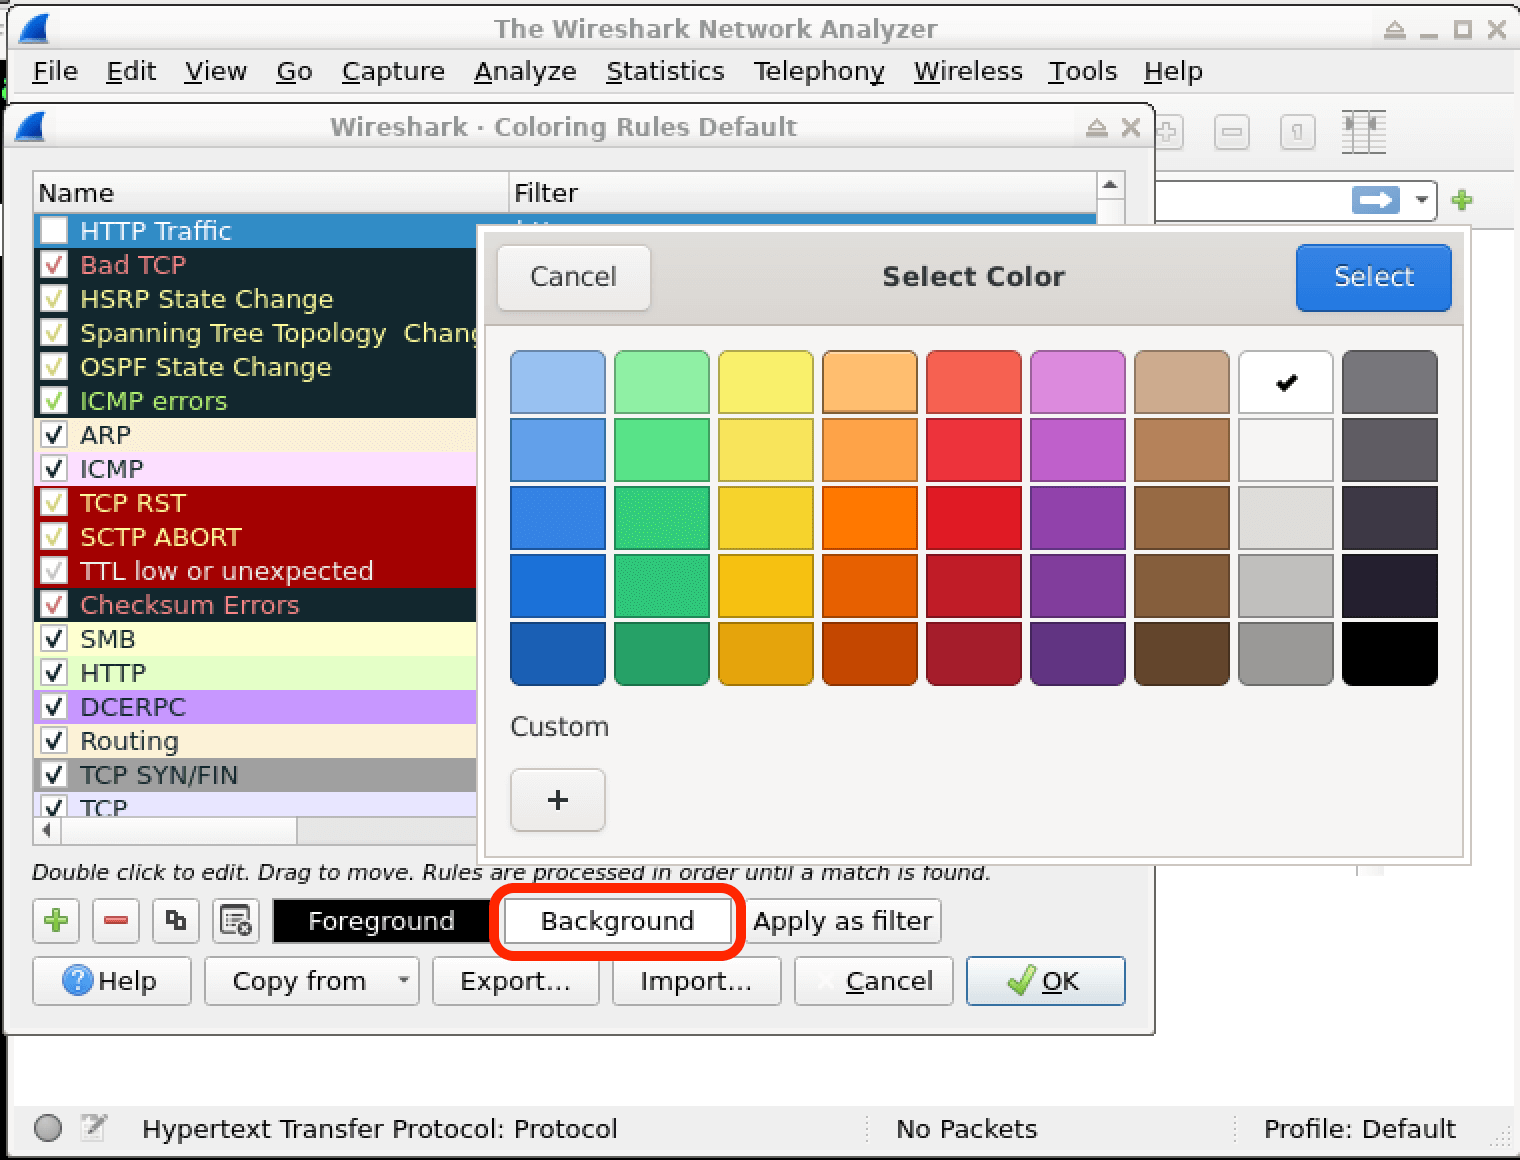
Optionally, you can adjust the rule's priority. Rules in Wireshark are applied based on their order in the list. Higher - priority rules take precedence over lower - priority rules. To change the priority, simply
dragthe rule up or down in the list.After setting up the rule, you need to enable it. Click the
checkboxnext to the rule to enable the newly created coloring rule. Then, clickOKto save the new coloring rule. This will apply the rule to your packet captures.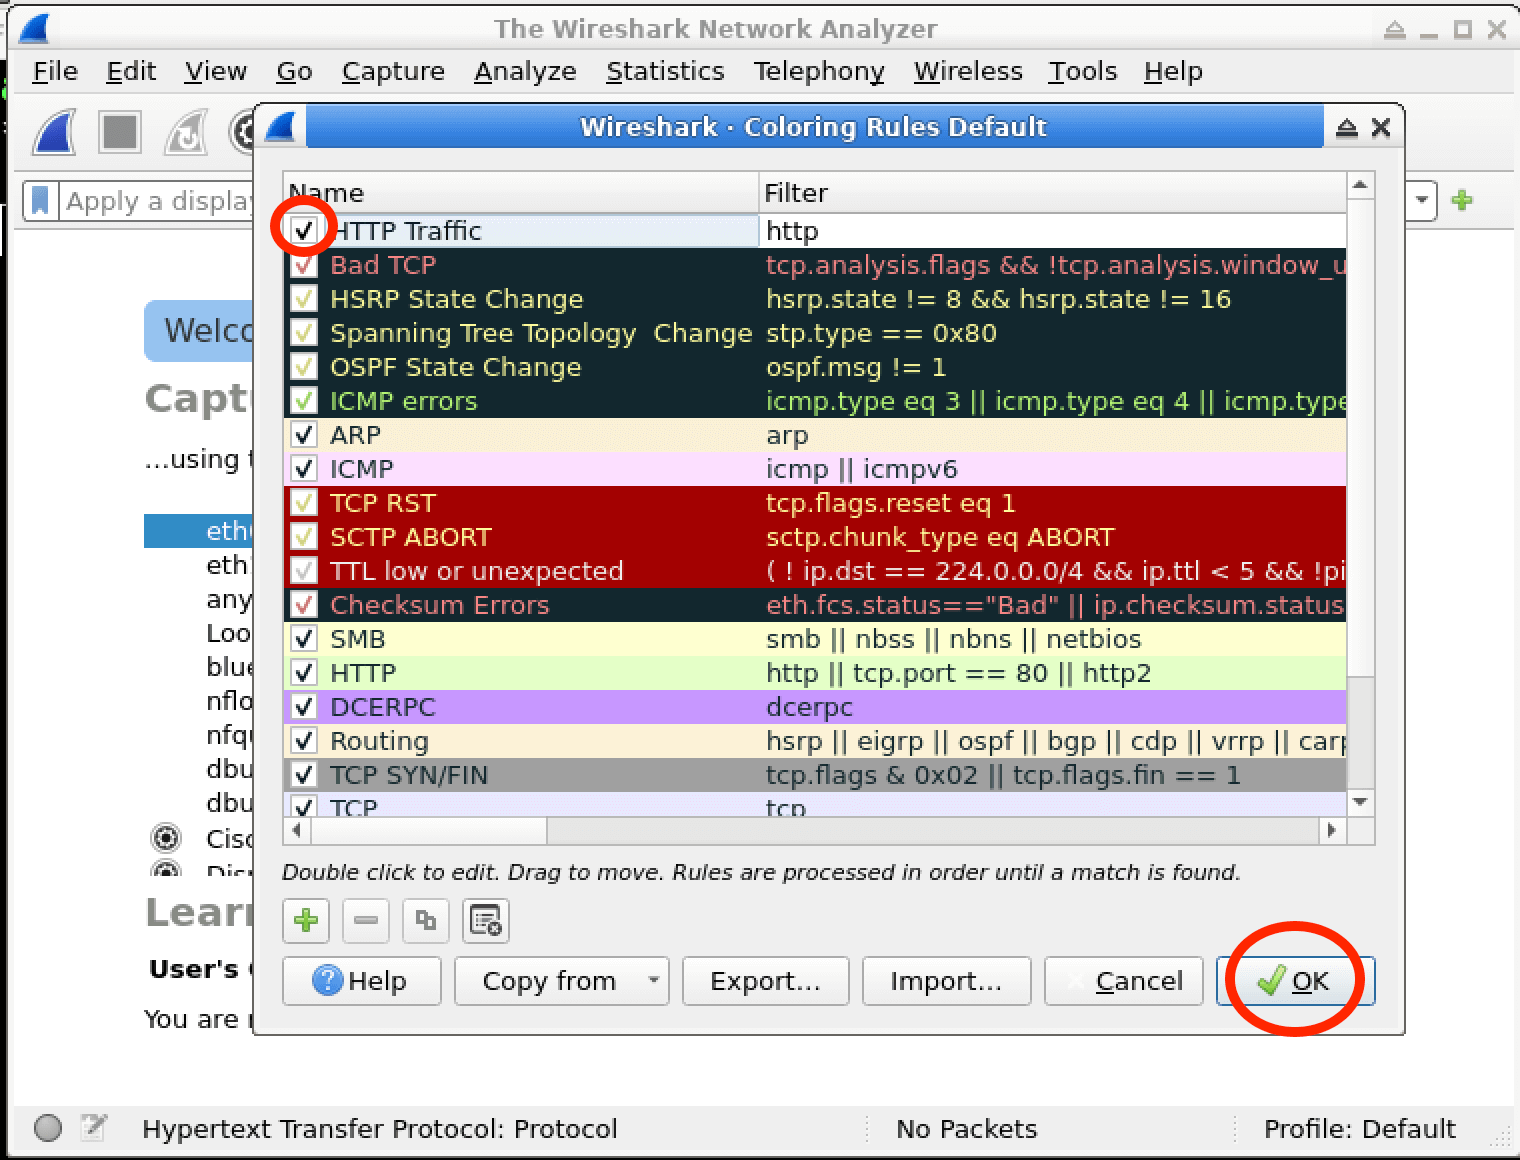
When you open a capture file or start a live capture in Wireshark, you should now see the network packets that match the filter expression displayed with the colors you selected for the rule. This makes it much easier to identify and analyze the specific traffic you're interested in.
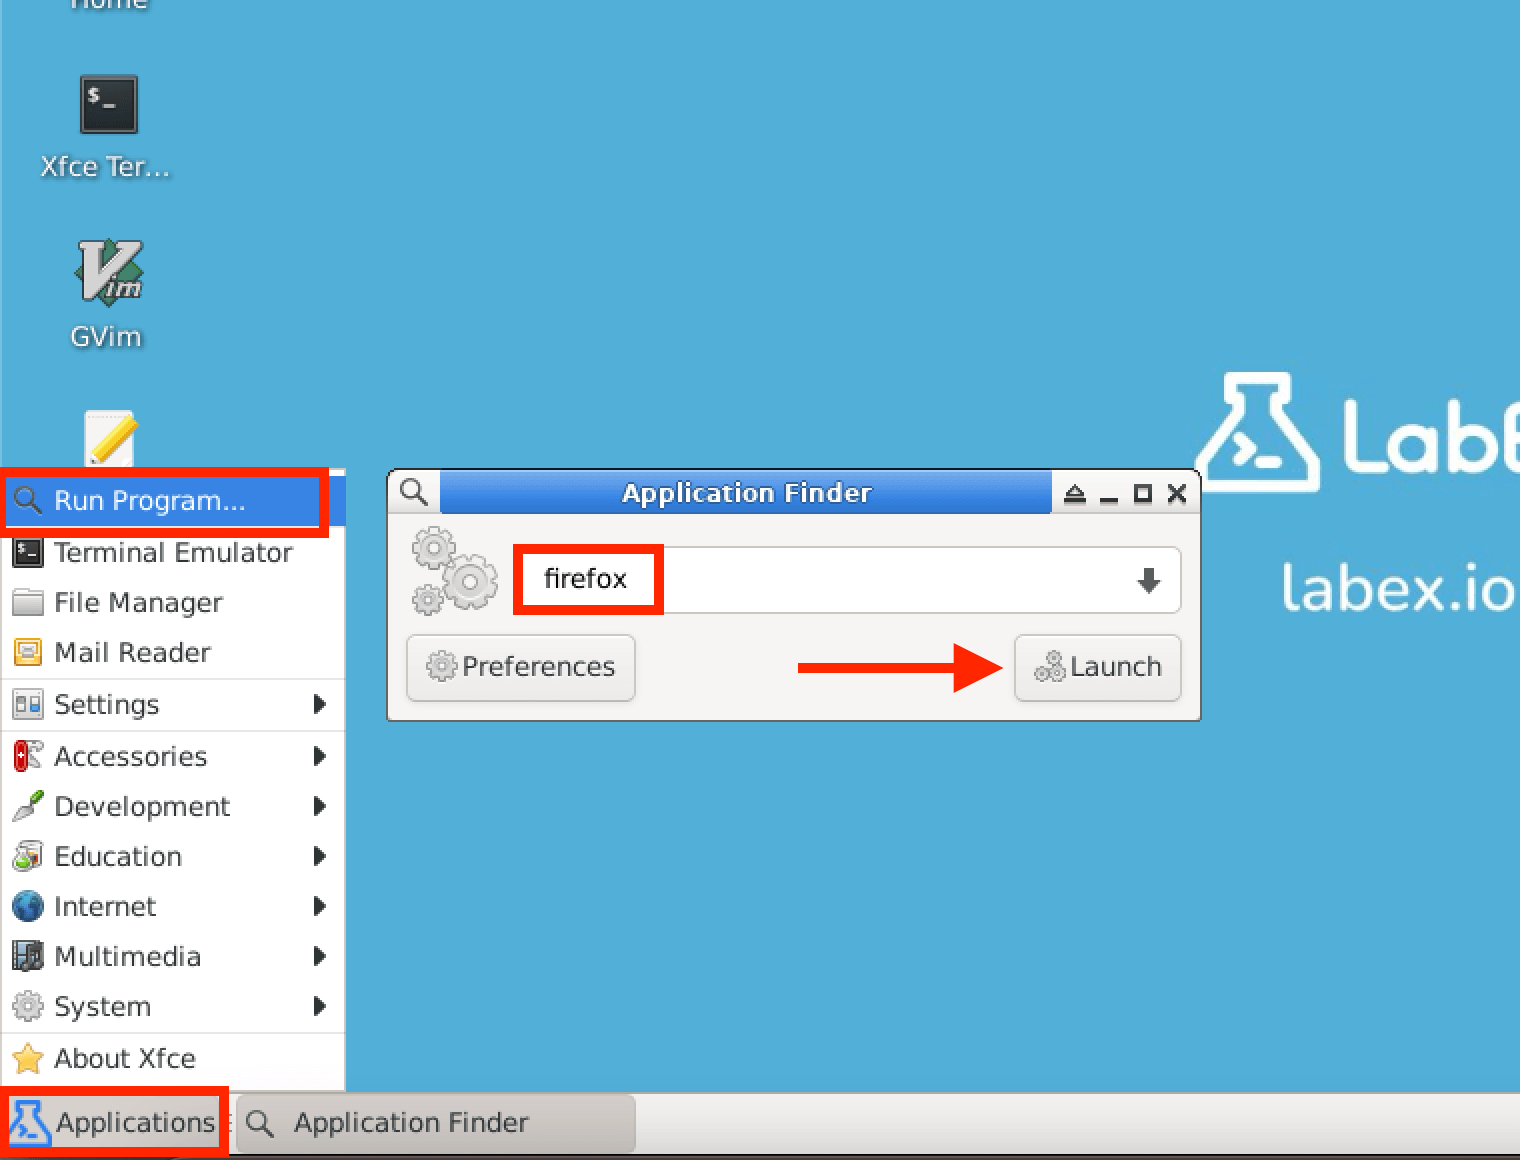
PS: If you want to generate some HTTP traffic to test your rule, you can start the browser. Click on Run Program... from the Applications button in the lower left corner and type Firefox.
Modify an Existing Colorizing Rule
In this step, you'll learn how to modify an existing colorizing rule in Wireshark. Colorizing rules in Wireshark are used to highlight network packets based on specific criteria, which helps you quickly identify and analyze different types of traffic. By modifying these rules, you can customize how packets are displayed, making it easier to focus on the information you need for cybersecurity analysis.
First, open Wireshark. In Wireshark, go to the
Viewmenu at the top of the window. Then, selectColoring Rules...from the dropdown menu. This action will open theWireshark Coloring Rules Defaultdialog. This dialog is where you can manage all the colorizing rules in Wireshark.In the
Wireshark Coloring Rules Defaultdialog, you'll see a list of existing colorizing rules. Each rule has a name, a filter expression, and a color associated with it. Select the colorizing rule you want to modify from this list. You can click on the rule to highlight it.Once you've selected the rule you want to modify, there are two main ways to make changes. You can
double-clickon the rule. When you do this, a new window will open where you can modify the rule's name, the filter expression that determines which packets the rule applies to, and the color used to highlight the matching packets. Additionally, you can change the priority of the rule. Priority determines which rule takes precedence if multiple rules match a single packet. You can change the priority bydraggingthe rule up or down in the list. Rules higher in the list have higher priority.Now, let's make some specific changes to the rule. You need to modify the rule's name and the filter expression as required. For example, change the rule's name from
HTTP TraffictoWeb Traffic. This new name more accurately reflects the type of traffic we're interested in. Also, change the filter expression fromhttptohttp and tcp.port == 80. The original filterhttpwould highlight all HTTP traffic, but by addingtcp.port == 80, we're specifically looking for HTTP traffic on port 80, which is the standard port for unencrypted web traffic.rule's name:
HTTP Traffic->Web Trafficfilter expression:http->http and tcp.port == 80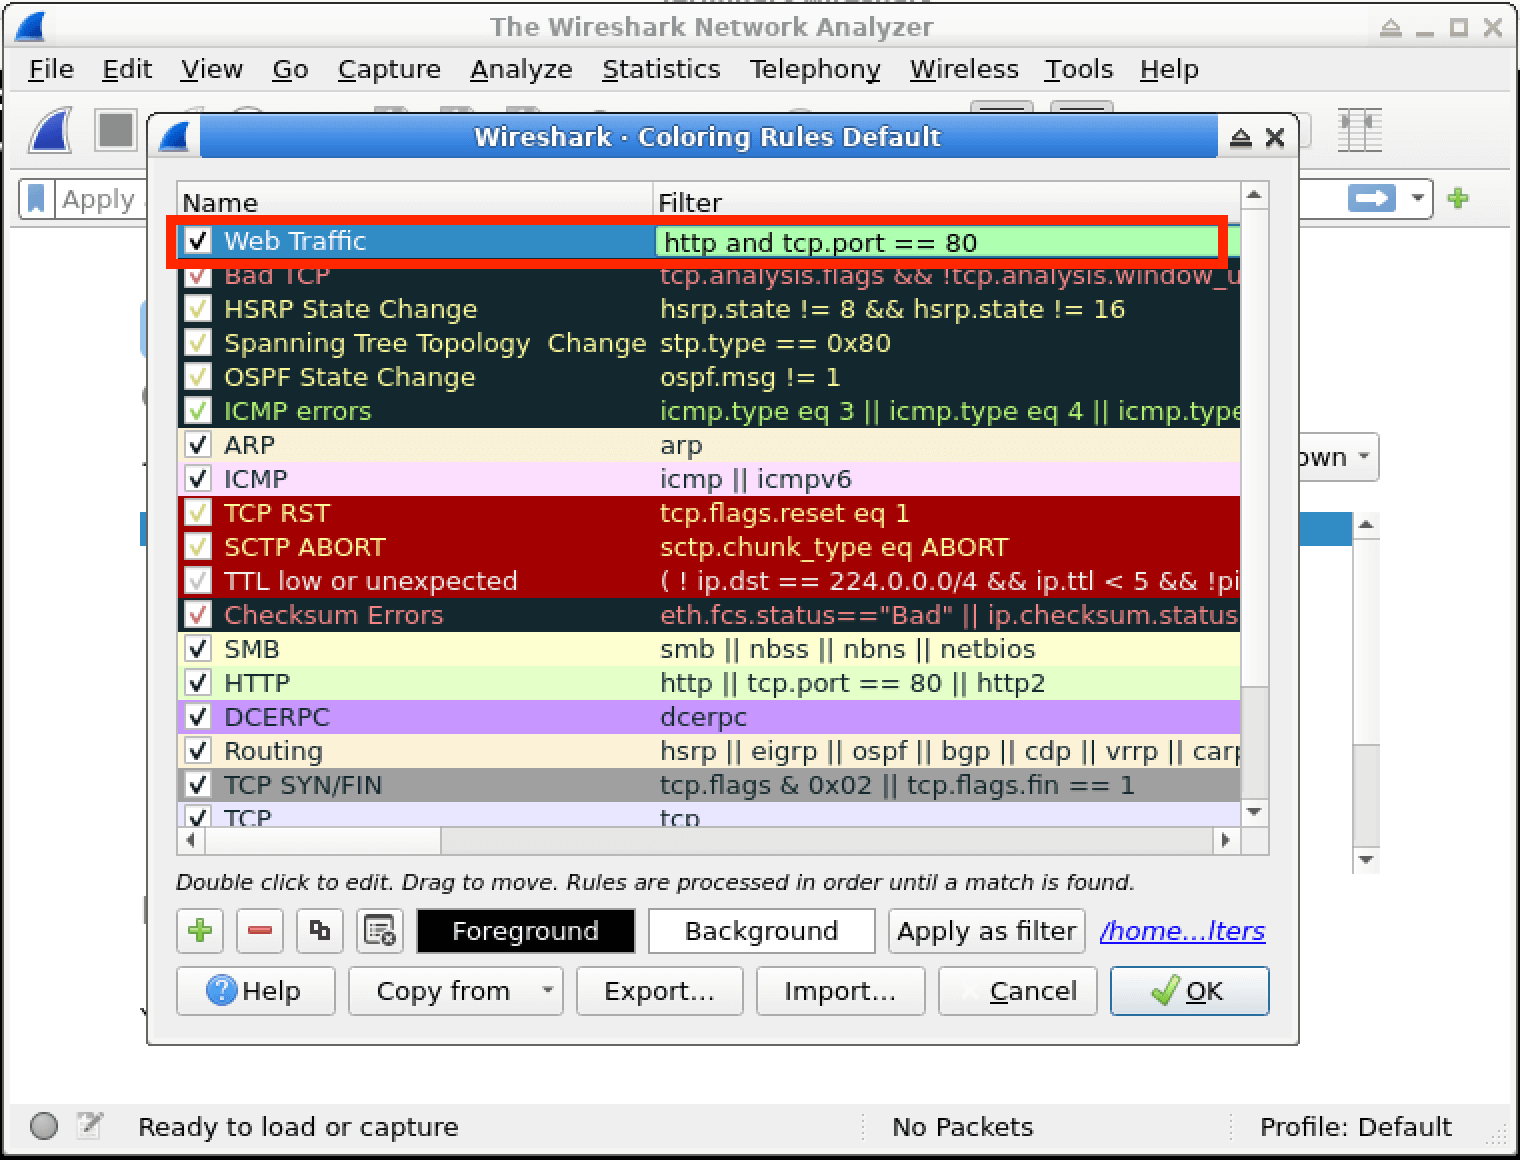
After you've made all the changes you want to the rule, click the
OKbutton in the dialog. This will save the modified rule, and Wireshark will start using the new settings for highlighting packets.To see the effects of the modified rule, you can either open an existing capture file in Wireshark or start a live capture. Once the packets are being displayed, you should now see the network packets that match the modified rule displayed in the updated color or according to the new filter expression. This way, you can easily spot the specific web traffic on port 80 that you're interested in.
Importing Coloring Rules
In this step, we'll learn how to import coloring rules into Wireshark. Coloring rules in Wireshark are a powerful feature that can help you quickly identify different types of network traffic by assigning distinct colors to them. This makes it easier to analyze and understand the data you're capturing.
First, open Wireshark. Once it's open, you need to access the coloring rules settings. To do this, go to the
Viewmenu at the top of the Wireshark window. From the dropdown menu, selectColoring Rules.... This will open theWireshark Coloring Rules Defaultdialog. This dialog is where you can manage all your coloring rules in Wireshark.Now that the
Wireshark Coloring Rules Defaultdialog is open, you'll see several buttons. To import colorizing rules, look for and click theImport...button. This button allows you to bring in pre - defined coloring rules from an external file.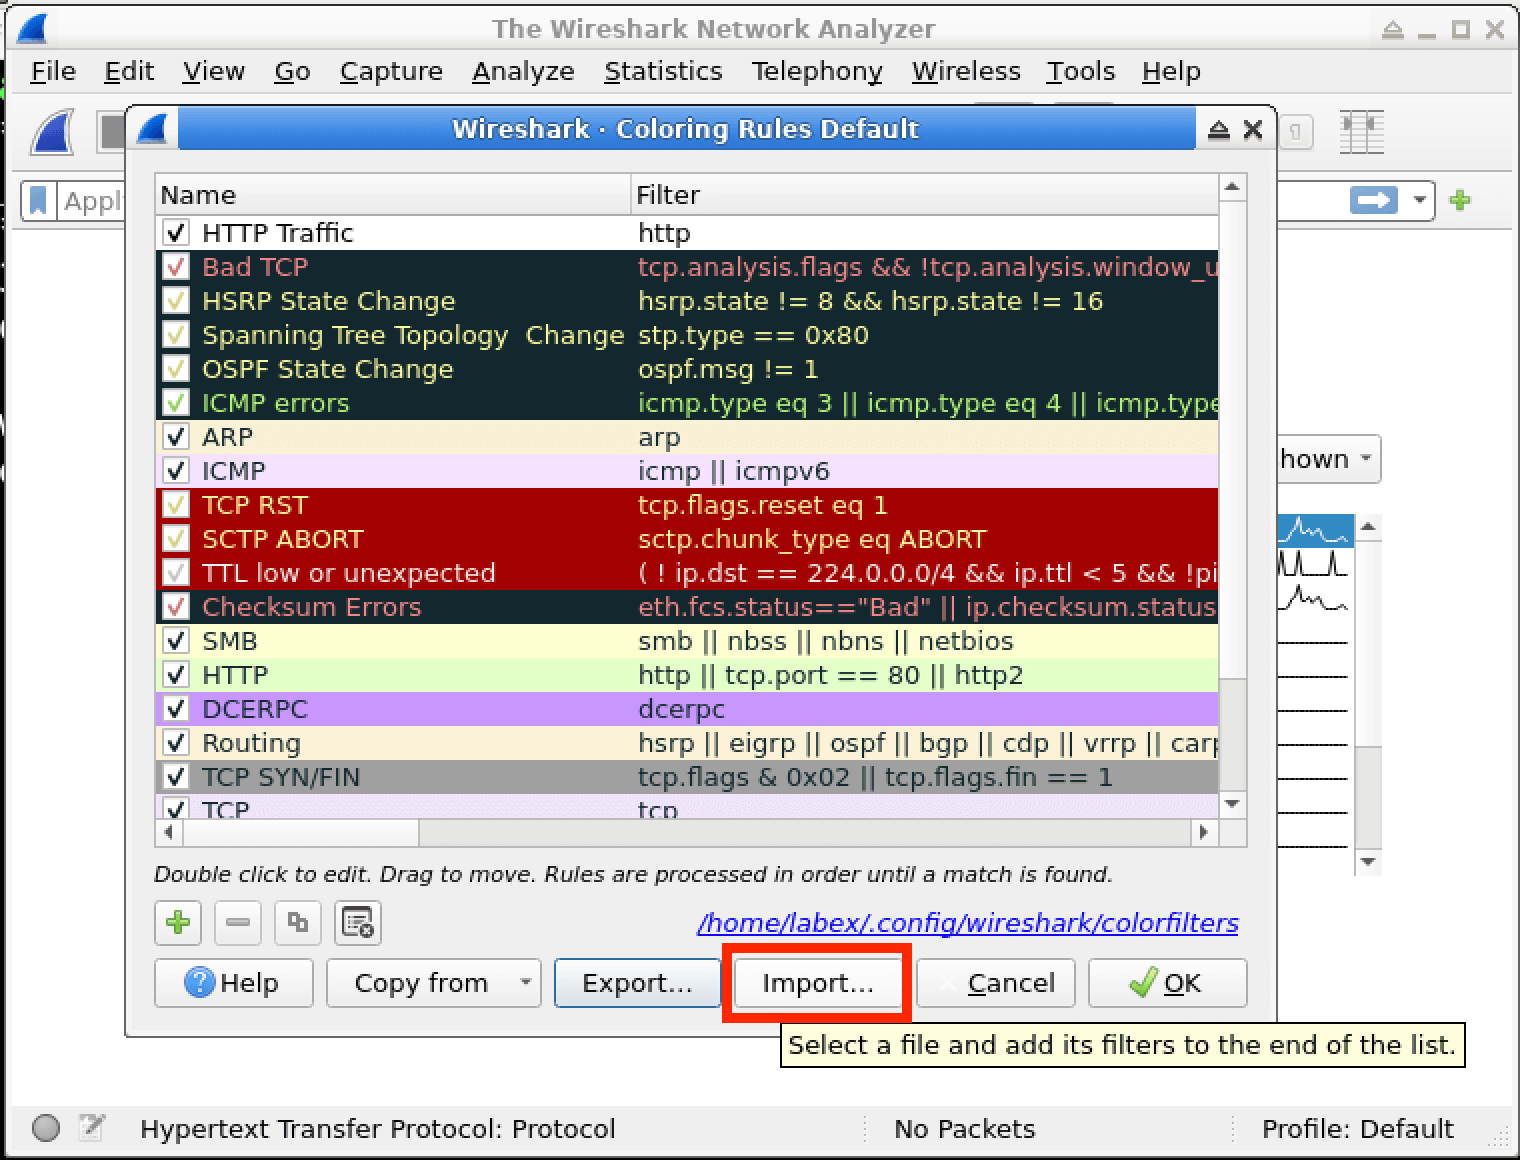
After clicking the
Import...button, a new dialog calledWireshark Import Coloring Ruleswill appear. In this dialog, you need to find the file that contains the coloring rules you want to import. Navigate to the/home/labex/projectdirectory. This is the location where thecolorizing_rules.txtfile you exported earlier is stored. Once you're in the correct directory, select thecolorizing_rules.txtfile.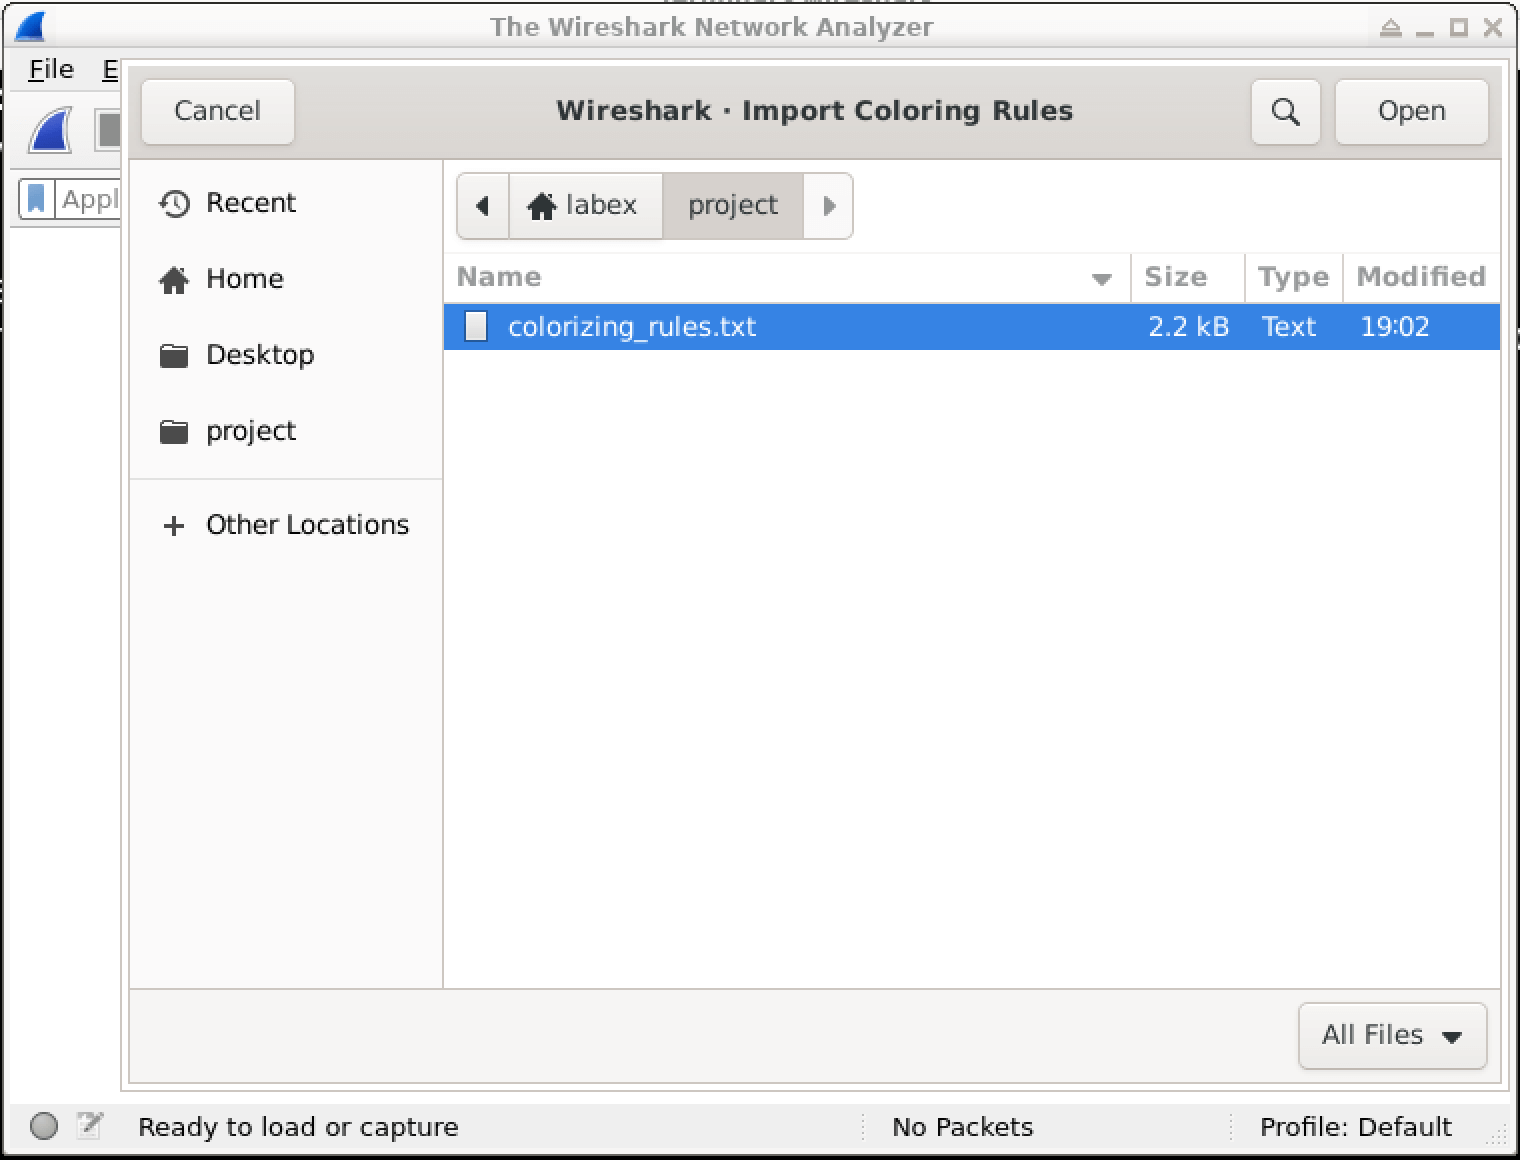
Once you've selected the
colorizing_rules.txtfile, click theOpenbutton. This loads the colorizing rules into theWireshark Coloring Rules Defaultdialog.Before closing the dialog, click the
OKbutton at the bottom of the mainWireshark Coloring Rules Defaultwindow. This final confirmation saves the imported rules to Wireshark's configuration file so the imported ARP rule remains available for verification.After clicking
OK, reopenView>Coloring Rules...if you want to confirm the import. Scroll to the bottom of the list, and you should see the newly imported coloring rule. This indicates that the import was saved successfully, and you can now use these rules to color-code your network traffic in Wireshark.
Summary
In this lab, you have learned how to create, modify, import, and export colorizing rules in Wireshark. By using these rules, you can visually differentiate various types of network traffic according to specific criteria, which simplifies the identification and analysis of network activities. This skill is highly useful in cybersecurity investigations, network troubleshooting, and protocol analysis.
Through hands - on exercises, you gained practical experience in managing the ruleset. Mastering these techniques can enhance your network analysis workflow and improve your ability to quickly spot and prioritize interesting network traffic patterns.