Introduction
A ticket disappears after an accidental SQL deletion, but the application's configuration is still correct. You will capture a D1 Time Travel bookmark, reproduce the loss using one synthetic record, and restore the same database while preserving an unaffected ticket.
This independent recovery drill uses one disposable remote database and a supplied read-only Worker. You will verify the missing state before restoring and verify application access afterward.
Use your own learning account and a fresh VM. Setup first prepares Node.js 22.22.0, then runs npm install for project-local Wrangler 4.131.1 and any assessment dependencies under /home/labex/project/ticket-database. Direct dependency versions are pinned; the installation creates its own lockfile. No cloud login or assessed database work runs in setup. On a personal machine, install the same Wrangler version with npm install --save-dev wrangler@4.131.1 in your project.
This exercise uses small synthetic records within the D1 Free allowances. Existing account usage counts toward those allowances. No purchased domain is needed. Keep this VM until resource deletion and logout have both been checked.
Authorize this VM and select the account
In this step, you connect this fresh terminal to your own learning account. A Dashboard login alone does not authorize the VM. D1 permission allows database creation, SQL changes and deletion; Workers permission allows deployment, and KV permission supports Wrangler cleanup inventory. Review the actual consent page, including Background Access, before authorizing.
Open the prepared project and inspect the pinned CLI:
cd /home/labex/project/ticket-database
npx wrangler --version
Expect 4.131.1. Start device authorization; --device displays a browser code, and --browser=false leaves the browser choice to you:
npx wrangler login --device --browser=false --scopes account:read user:read d1:write workers_scripts:write workers_kv:write
Open the displayed URL in your browser, enter the current code, confirm your learning account and the permissions, and authorize. Wait for the terminal to confirm success. Never paste passwords or tokens into project files.
npx wrangler whoami --json
Check loggedIn: true, then read the account name and id, even when only one account is listed. Copy the intended ID into the configuration below. The following shell variable uses 6 random bytes (12 hexadecimal characters) to avoid colliding with other learners. A here-document writes the JSON between JSON lines; $RUN expands inside it.
The backslash before $schema keeps that JSON key literal; $RUN still expands to this run’s unique name.
RUN=labex-c04-d07-$(openssl rand -hex 6)
cat > wrangler.jsonc <<JSON
{
  "\$schema": "./node_modules/wrangler/config-schema.json",
  "name": "$RUN",
  "account_id": "YOUR_ACCOUNT_ID",
  "main": "src/index.js",
  "compatibility_date": "2026-09-15",
  "workers_dev": true,
  "preview_urls": false
}
JSON
Replace YOUR_ACCOUNT_ID before running the block. Keep this terminal open so RUN remains available. name identifies this run; account_id selects the account for cloud operations. The file is ordinary JSON, which is also valid JSONC. No Worker is deployed by writing it.
Establish a known good restore point
In this step, you create the disposable database and a supplied read-only ticket API. Time Travel restores a database's earlier state in place. It does not create a replacement database, and it can overwrite changes made after the chosen point. Use it here only on this newly created lab resource.
Create a disposable cloud database. --binding DB gives application code a short name, --update-config records its real name and UUID in wrangler.jsonc, and --use-remote=false keeps development local:
npx wrangler d1 create "$RUN-db" --binding DB --update-config --use-remote=false
Read the created name and ID, then inspect the saved binding:
cat wrangler.jsonc
The DB entry must name this run's database. A binding is a configured connection between code and a resource. Its UUID identifies the cloud database, while --local uses a separate SQLite database in this VM. Always include either --local or --remote in SQL commands.
npx wrangler d1 execute DB --remote --file schema.sql
npx wrangler deploy
Copy the deployed URL and read both synthetic tickets:
URL='YOUR_DEPLOYED_HTTPS_URL'
curl -i "$URL/tickets/1"
curl -i "$URL/tickets/2"
Expect 200 for ticket 1 (Cannot sign in, open) and ticket 2 (Invoice copy, closed). If deployment is propagating, retry these reads for up to a minute until status and JSON agree.
Check database information, then save its current bookmark as a recovery artifact. A bookmark is an opaque database-history position. Redirecting with > writes the JSON response to the named file:
npx wrangler d1 info DB
npx wrangler d1 time-travel info DB --json > recovery.json
cat recovery.json
Verify the database uses the production backend and recovery.json has a nonempty bookmark. Keep this file unchanged through the exercise. Time Travel is always on for production D1; Free retains 7 days and Paid retains 30 days. This same-session recovery needs only minutes of history. A CLI help line mentioning 30 days does not override your plan's retention.
Reproduce a bounded accidental deletion
In this step, you remove only synthetic ticket 1 from this lab database and prove the application symptom. First inspect wrangler.jsonc and match DB to the name and UUID you just created. Do not run this against any existing application database.
cat wrangler.jsonc
npx wrangler d1 execute DB --remote --command "DELETE FROM tickets WHERE id = 1;"
Read the API and unaffected record:
curl -i "$URL/tickets/1"
curl -i "$URL/tickets/2"
npx wrangler d1 execute DB --remote --command "SELECT id, subject, status, source FROM tickets ORDER BY id;"
Ticket 1 must return 404 with {"error":"not_found"}. Ticket 2 still returns its original 200 response; the SQL query contains only ticket 2. A network failure or platform 404 page does not establish that the deletion occurred.
Complete this step's verification before restoring. It checks the real missing-row state; a restore without observing the failure would skip the incident's evidence.
Restore history and verify application access
In this step, you restore the same database to its saved bookmark. Read recovery.json, copy the exact bookmark string into BOOKMARK, and recheck the configured database identity:
cat recovery.json
BOOKMARK='YOUR_SAVED_BOOKMARK'
cat wrangler.jsonc
npx wrangler d1 time-travel restore DB --bookmark "$BOOKMARK"
The command warns that it overwrites data and cancels in-flight queries. Confirm only this disposable database. Expect a restore success message and an undo bookmark. Do not recreate the database, re-import the schema, or insert the missing row: those actions would bypass the recovery technique.
Query the restored database and its existing application binding:
npx wrangler d1 execute DB --remote --command "SELECT id, subject, status, source FROM tickets ORDER BY id;"
curl -i "$URL/tickets/1"
curl -i "$URL/tickets/2"
Both original rows and API responses must return. The Worker still points to the same UUID and needs no replacement binding. If a read is briefly unavailable during restore, repeat the read; do not silently replace restoration with a new seed.
In Dashboard, open the exact D1 database, confirm its unchanged ID, and inspect the restored tickets using a read-only view. This checkpoint connects recovered data with the resource; the SQL/API results are the functional evidence. In the account's Audit Logs, filter Resource ID to this database UUID and select a time range covering the recovery. Open the event by clicking its timestamp, then expand Resource in its details and inspect type: database.time_travel.restore. Match the resource ID and successful operation with your restore output. Audit records may take time to appear; do not infer failure from a temporarily empty list. The data checks prove the recovered state, while the actual restore output and audit event document the recovery operation.
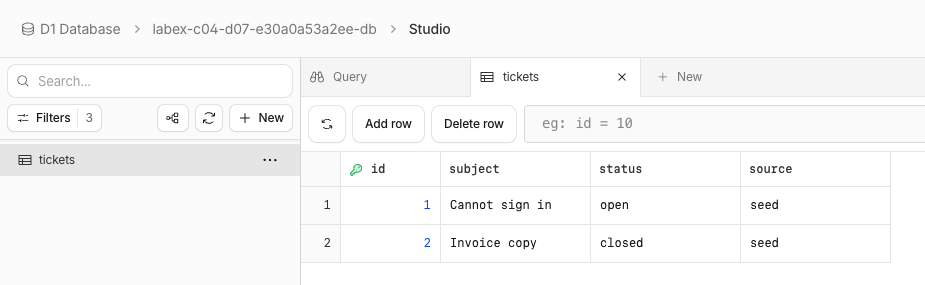
This example shows both original tickets after recovery in the same database. The generated name identifies this example run; your name and UUID will differ. The screenshot shows restored rows. The SQL/API checks establish recovered access, while the actual Time Travel command output and the matching audit event establish the recovery operation.
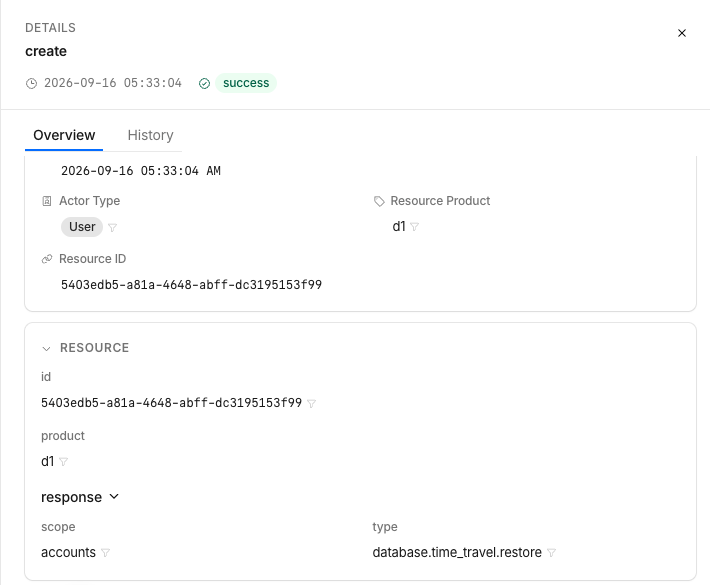
The event header uses the generic action create. In the expanded Resource section, type: database.time_travel.restore identifies the recovery operation. Check the successful result, the exact database UUID and the time; the values here belong to this example run.
Delete the disposable resources
In this step, you remove only this lab's resources while the VM is still authorized. Finish all functional checks first. Keep configuration until deletion verification is complete.
npx wrangler delete
Confirm only the Worker name in this run’s configuration.
npx wrangler d1 delete DB
Inspect the prompt and confirm only this run's database. Then list databases:
npx wrangler d1 list --json
Your recorded database name and UUID must be absent from a successful response. Other resources may remain. An authentication or network error is inconclusive: resolve access and repeat the read before continuing. Run this step's verification while still logged in.
End this VM authorization
In this step, you end the authorization only after the independent deletion check passes. Logout removes this VM's stored Wrangler authorization; closing a VM alone is not cloud cleanup.
npx wrangler logout
npx wrangler whoami --json
Expect loggedIn: false. This unauthenticated query can exit nonzero; that is expected only when the structured response explicitly says you are logged out. Complete verification, then close the lab environment.
Summary
You practiced recover an accidental ticket deletion. You checked observable database results, kept the selected account and local state explicit, and removed the disposable resources before logging out.