Introduction
A Cloudflare Worker is a small application that runs on Cloudflare's network. You write the code; Cloudflare runs it when a request arrives, so you do not need to provision and maintain a server for this exercise. Workers can power a form's backend, return data to a website, or check access before serving a file. Here you will start with a health endpoint: a URL that returns a simple message showing the application is responding. You will run it inside LabEx, publish it to a public workers.dev URL, inspect a request log, and remove the test deployment.
Use your own learning account with a verified email and Workers Free, prepared in Prepare Your Cloudflare Learning Account. You should recognize the device authorization flow from Connect LabEx to Your Cloudflare Account and know basic JavaScript. This fresh VM needs its own authorization, including permission to deploy and delete Workers. No purchased domain, database, or paid upgrade is required. Your test response is public and contains only sample data.
Setup has installed Node.js 22.22.0 and project-local Wrangler 4.131.1 in /home/labex/project/first-worker. You will inspect account information with Wrangler and test responses with curl; these tools also work outside LabEx. You will write the Worker and configuration yourself and run the standard Wrangler commands. Keep this VM open until deletion and logout are verified.
Write a Health Worker
In this step, you will create the JavaScript entrypoint, the file where the application starts. A browser or command-line client sends an HTTP request; Cloudflare calls your exported fetch handler, and its returned Response goes back to that client. You will give Wrangler a configuration file so it knows which code to run. This first Worker returns the same health message for every path; routing belongs in the next lab.
Enter the prepared project and check its CLI version:
cd /home/labex/project/first-worker
npx wrangler --version
The version should be 4.131.1. Wrangler is a project dependency, so run commands from this directory. On your own computer, install a project's pinned dependencies with npm ci when its lockfile is supplied.
The next command uses a here-document: cat writes the lines between <<'WORKER' and WORKER to src/index.js. The > replaces that file. Quoting the delimiter keeps JavaScript text unchanged by the shell. Paste the complete block, including its final delimiter.
cat > src/index.js <<'WORKER'
export default {
  async fetch(request) {
    console.log("health-request", request.method, new URL(request.url).pathname);
    return Response.json({ service: "labex-first-worker", status: "ok" });
  },
};
WORKER
JSON is a text format for named values, such as service and status, that another program can read. Response.json turns the JavaScript object into that format, sets the JSON content type, and uses HTTP status 200, meaning the request succeeded. The console message records the method and path without logging headers or credentials. This tiny response checks that the Worker runs; it does not prove that every feature of a larger application is healthy.
Generate a unique name to avoid overwriting an existing Worker. Node.js's built-in crypto module generates six random bytes and formats them as twelve hexadecimal characters. $(...) captures that text in a shell variable:
WORKER_NAME="labex-first-$(node -p "require('node:crypto').randomBytes(6).toString('hex')")"
Create the configuration. Here the delimiter is unquoted so $WORKER_NAME expands to that unique value:
cat > wrangler.jsonc <<CONFIG
{
  "name": "$WORKER_NAME",
  "main": "src/index.js",
  "compatibility_date": "2026-09-14",
  "workers_dev": true,
  "preview_urls": false
}
CONFIG
main identifies your JavaScript file. compatibility_date selects runtime compatibility behavior; it is not the deployment timestamp. workers_dev enables a public test URL, while preview_urls disables additional version preview URLs. JSONC is JSON with optional comments, which is why the configuration file ends in .jsonc. JSON without comments is also valid JSONC; use the shown format in this lab.
cat wrangler.jsonc
Confirm that the name starts with labex-first- and includes a unique suffix. Keep that name throughout the lab: deployment and deletion will target it. You will add the account ID after authorization.
Use the step's verification button to check the configuration and handler. In the next step you will observe the response yourself through the local runtime.
Run and Test the Worker Locally
In this step, you will run the Worker inside the VM before publishing it. Local development lets you try changes in your practice environment first. Wrangler's local runtime—the software that executes the handler—runs your code without creating a cloud deployment. Here ‘local’ means inside LabEx, even though you open its terminal from your own computer.
Start the development server in the background so the same terminal can send HTTP requests. --ip 0.0.0.0 makes the VM service available to LabEx's web interface, and --port 8080 selects its port. > local.log saves standard output, 2>&1 sends errors to the same file, and & returns the terminal prompt while the server runs.
npx wrangler dev --ip 0.0.0.0 --port 8080 > local.log 2>&1 &
cat local.log
Wait until the log says the server is ready on port 8080. If startup is still in progress, repeat cat local.log before continuing. Leave the server running until the end of this step.
Use curl to send a request. -i includes response headers, so you can check both status and content type:
curl sends an HTTP request without needing a web page. The loopback address 127.0.0.1 points back to this VM, and 8080 selects the local server's port. This gives you a direct way to inspect the response from your handler.
curl -i http://127.0.0.1:8080/health
The response includes these stable values; header order and capitalization can differ:
HTTP/1.1 200 OK
Content-Type: application/json
...
{"service":"labex-first-worker","status":"ok"}
The address 127.0.0.1 refers to this VM. It is not your computer and is not a public Cloudflare deployment. Check the HTTP status, JSON content type, and both response fields before continuing.
Complete this step's verification while the development server is still running.
Authorize and Deploy to Cloudflare
In this step, you will connect this VM to your learning account and deploy the tested Worker. Deployment publishes your code so Cloudflare can serve it at an Internet address. Your local server and the deployed Worker are separate: editing a local file does not update the public application until you deploy again. First inspect the background job. jobs lists jobs started in this terminal; its entry should show wrangler dev.
jobs
Stop that job with kill %1. Here %1 means job 1 in this terminal, not a system process ID. If jobs shows a different number for wrangler dev, use that number instead. This sends a termination signal to the job.
kill %1
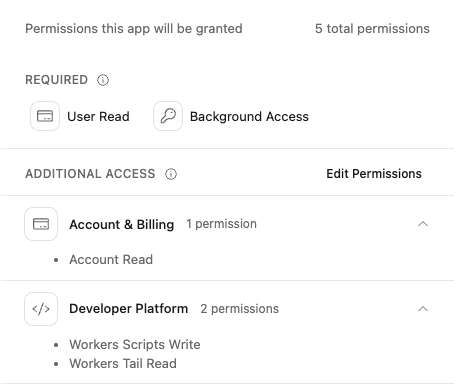
Start device authorization. The read scopes identify your account; workers_scripts:write permits script deployment and deletion, and workers_tail:read permits live log viewing. --browser=false prints the link for you to open in your own browser.
npx wrangler login --device --browser=false --scopes account:read user:read workers_scripts:write workers_tail:read
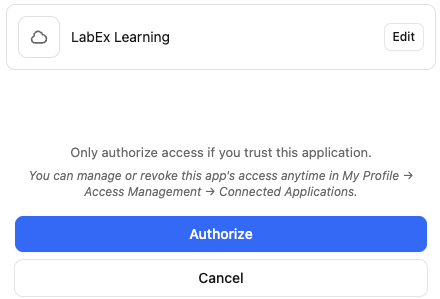
Open the displayed link, sign in to Cloudflare if prompted, enter the current device code, and review Wrangler's permission request. Select your learning account, not all accounts. The consent page also includes required Background Access. Approve only after checking the application, account and permissions; return to the terminal and wait for authorization to finish. If a code expires, rerun the login command for a new code. Do not paste tokens into the terminal or share credential files.
Expand Account & Billing and Developer Platform to inspect the permission names shown below. These permissions are broader than the read-only connection lesson because this lab deploys a Worker and opens its live logs.
Confirm your learning account is selected. Use Edit if the wrong account or all accounts are selected; review your choice before clicking Authorize.
Inspect the accounts available to this login:
npx wrangler whoami --json
Confirm "loggedIn": true and "authType": "OAuth Token". In the accounts array, find the object with your learning account's name and copy its 32-character id. Other account settings are not needed for this lab. If only one account appears, still confirm its name; if several appear, use the Dashboard to distinguish them. If your account is missing, repeat authorization with the intended account.
Add account_id to your configuration. Replace YOUR_ACCOUNT_ID in this block with the copied ID before running it. This rewrites the configuration while preserving the $WORKER_NAME variable from step 1. Keep this terminal open; if you lost the variable, read the original name from cat wrangler.jsonc and restore WORKER_NAME to that exact name first. Do not generate another name or change accounts after deploying.
cat > wrangler.jsonc <<CONFIG
{
  "name": "$WORKER_NAME",
  "main": "src/index.js",
  "compatibility_date": "2026-09-14",
  "workers_dev": true,
  "preview_urls": false,
  "account_id": "YOUR_ACCOUNT_ID"
}
CONFIG
cat wrangler.jsonc
Check the unique Worker name and compare account_id with the intended account object from whoami --json. This ID is configuration, not a password. Wrangler reads it when deploying and deleting. Now publish the local source:
npx wrangler deploy
If this account has no workers.dev subdomain yet, Wrangler asks whether to register one. Answer yes, choose an available lowercase name using letters, numbers and hyphens, and confirm it. This account-level name is shared by your future Workers and is different from this lab's unique Worker name. If a subdomain already exists, reuse it; do not rename it. No custom domain purchase or plan upgrade is needed.
Wait for deployment to finish. Wrangler prints a URL with this structure:
https://<your-worker-name>.<your-subdomain>.workers.dev
Copy the actual URL printed by your deployment into a shell variable. Replace the entire example URL below, keep the quotation marks, and omit a trailing slash:
WORKER_URL="https://YOUR_WORKER.YOUR_SUBDOMAIN.workers.dev"
curl -i "$WORKER_URL/health"
Expect HTTP 200 and the same JSON as the local test. If the new hostname is still propagating, wait briefly and retry; an error page is not a successful deployment. You can also open the actual /health URL in your browser. If your browser or network blocks workers.dev, use the VM curl result; do not disable browser security settings. The VM request and the independent check below are the required response tests.
Now confirm the same deployment visually in the Cloudflare Dashboard. Keep your terminal open.
Select your learning account in the account switcher. Its identity must match the account you selected above.
Open Compute → Workers & Pages. Refresh the application list if necessary, then find the exact labex-first-... name from your configuration. If there are many applications, search for that full name.
Open that Worker. Confirm its name and locate its workers.dev address; compare the address with the URL printed by wrangler deploy.
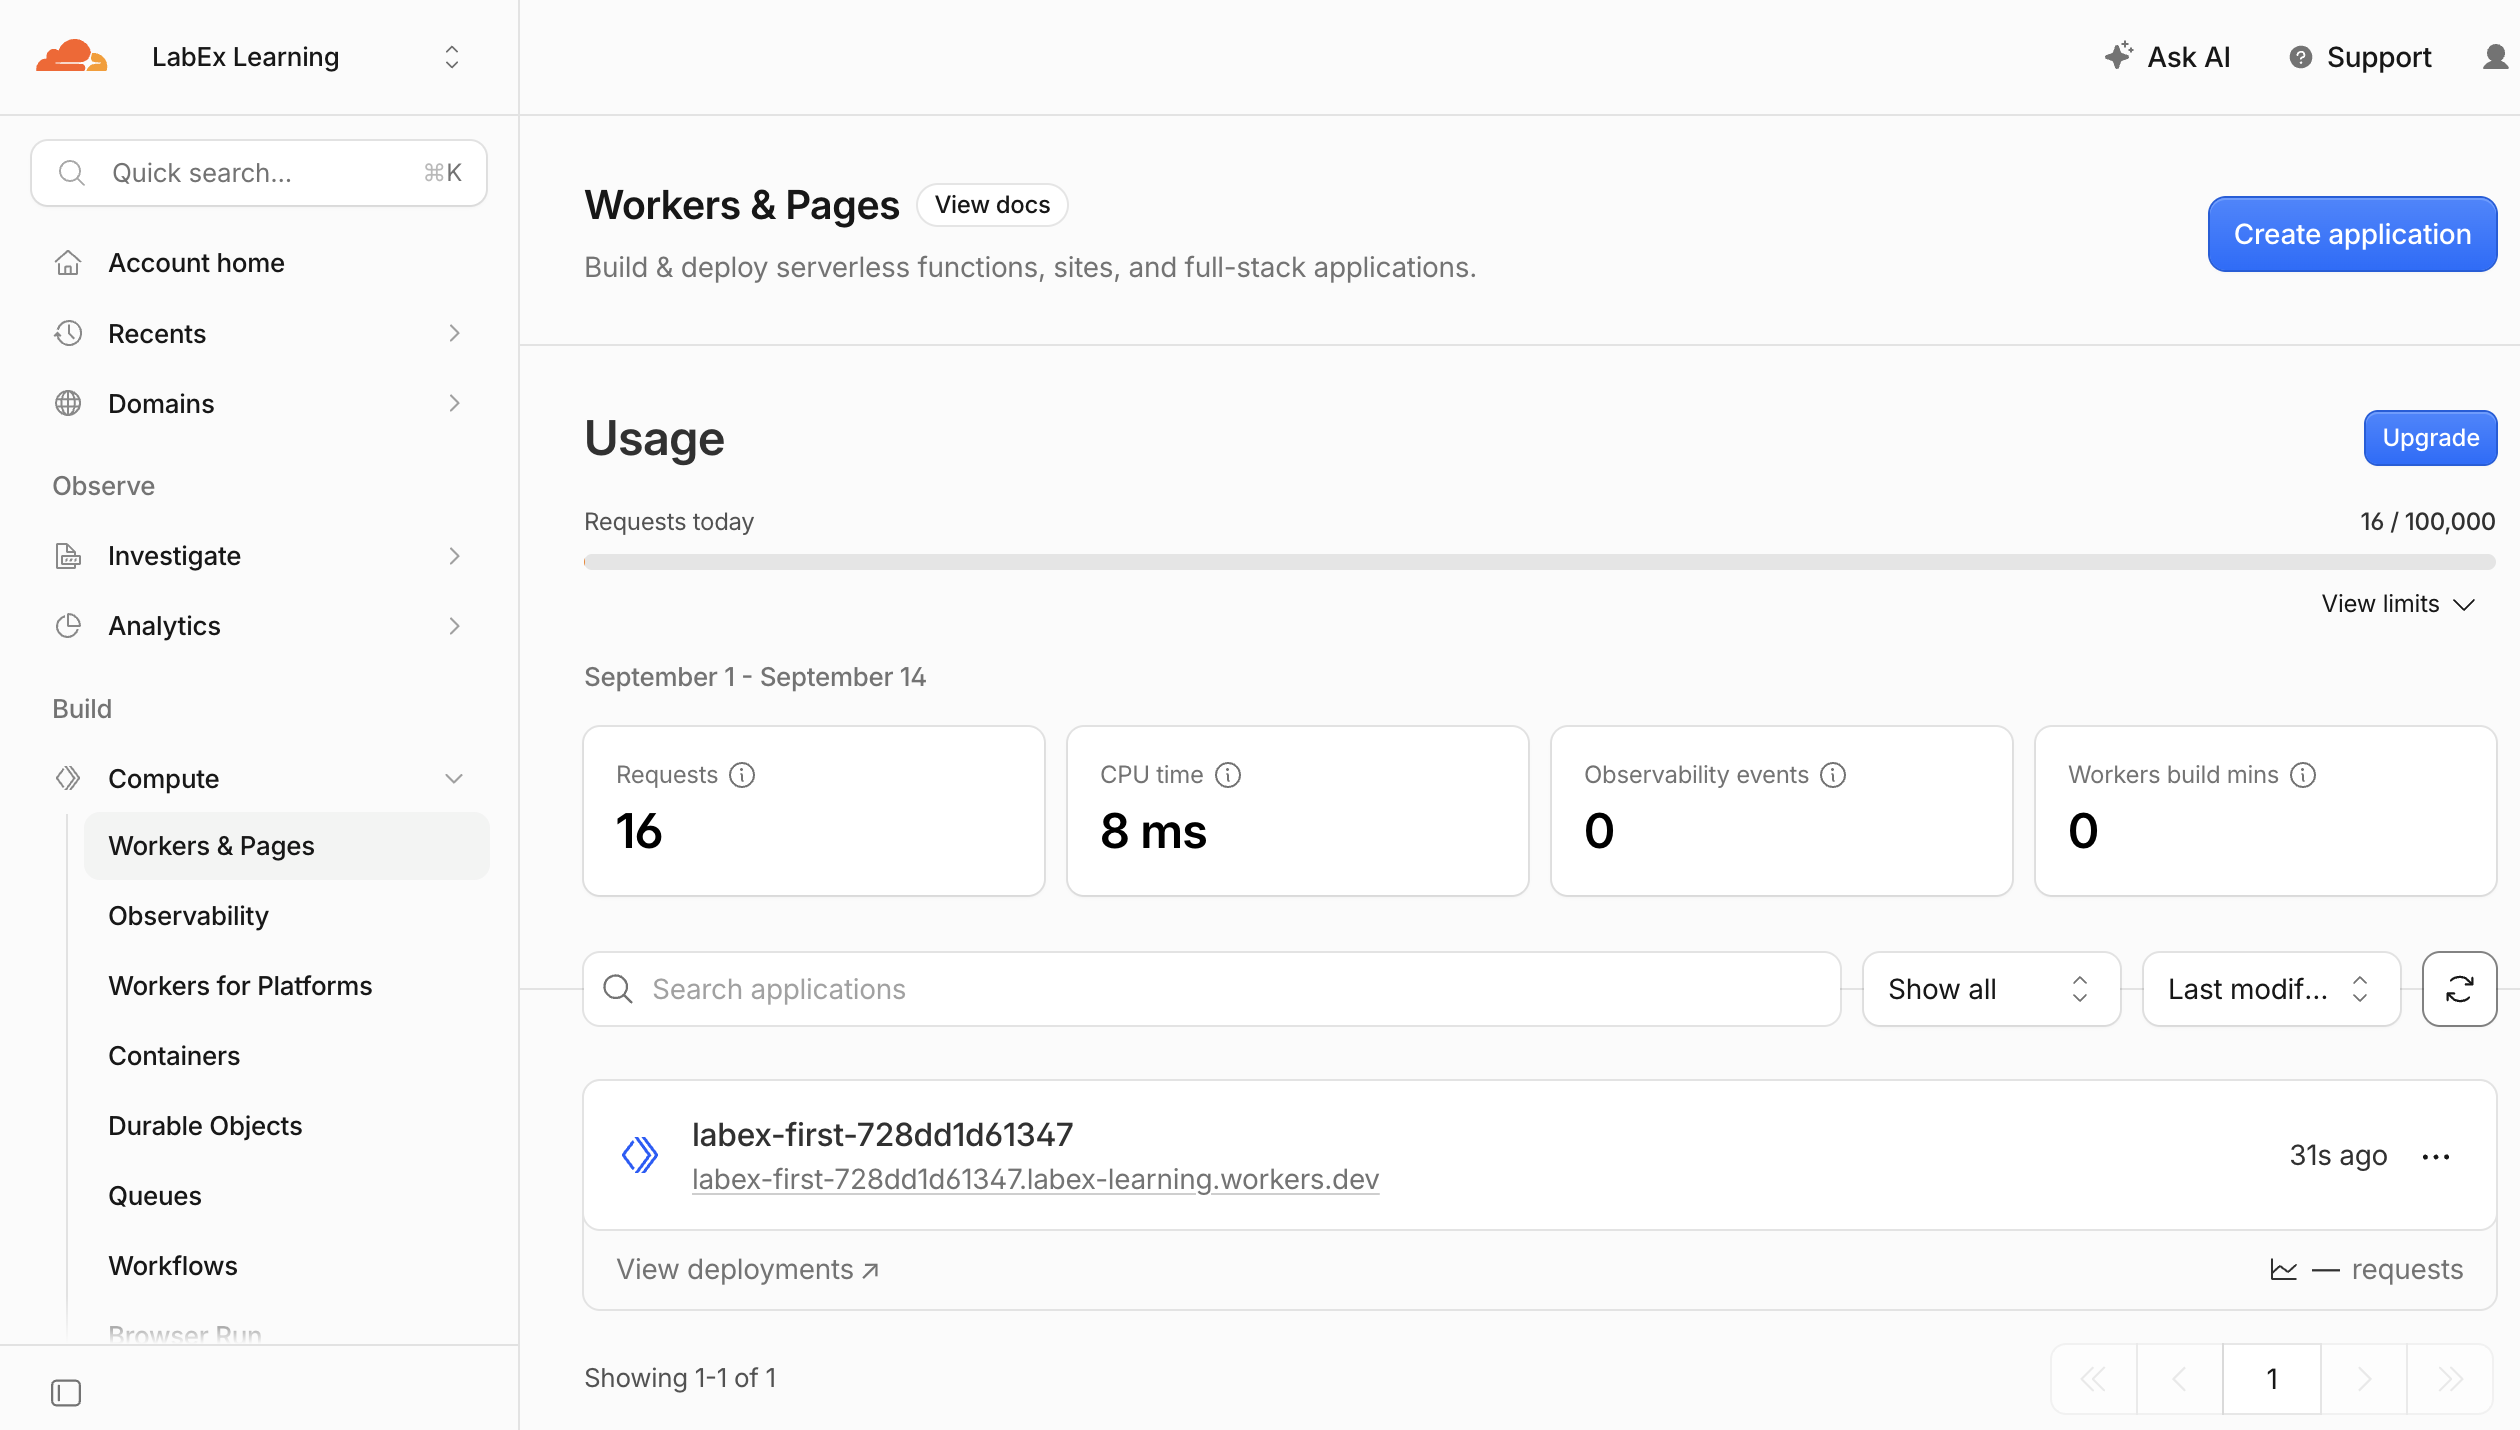
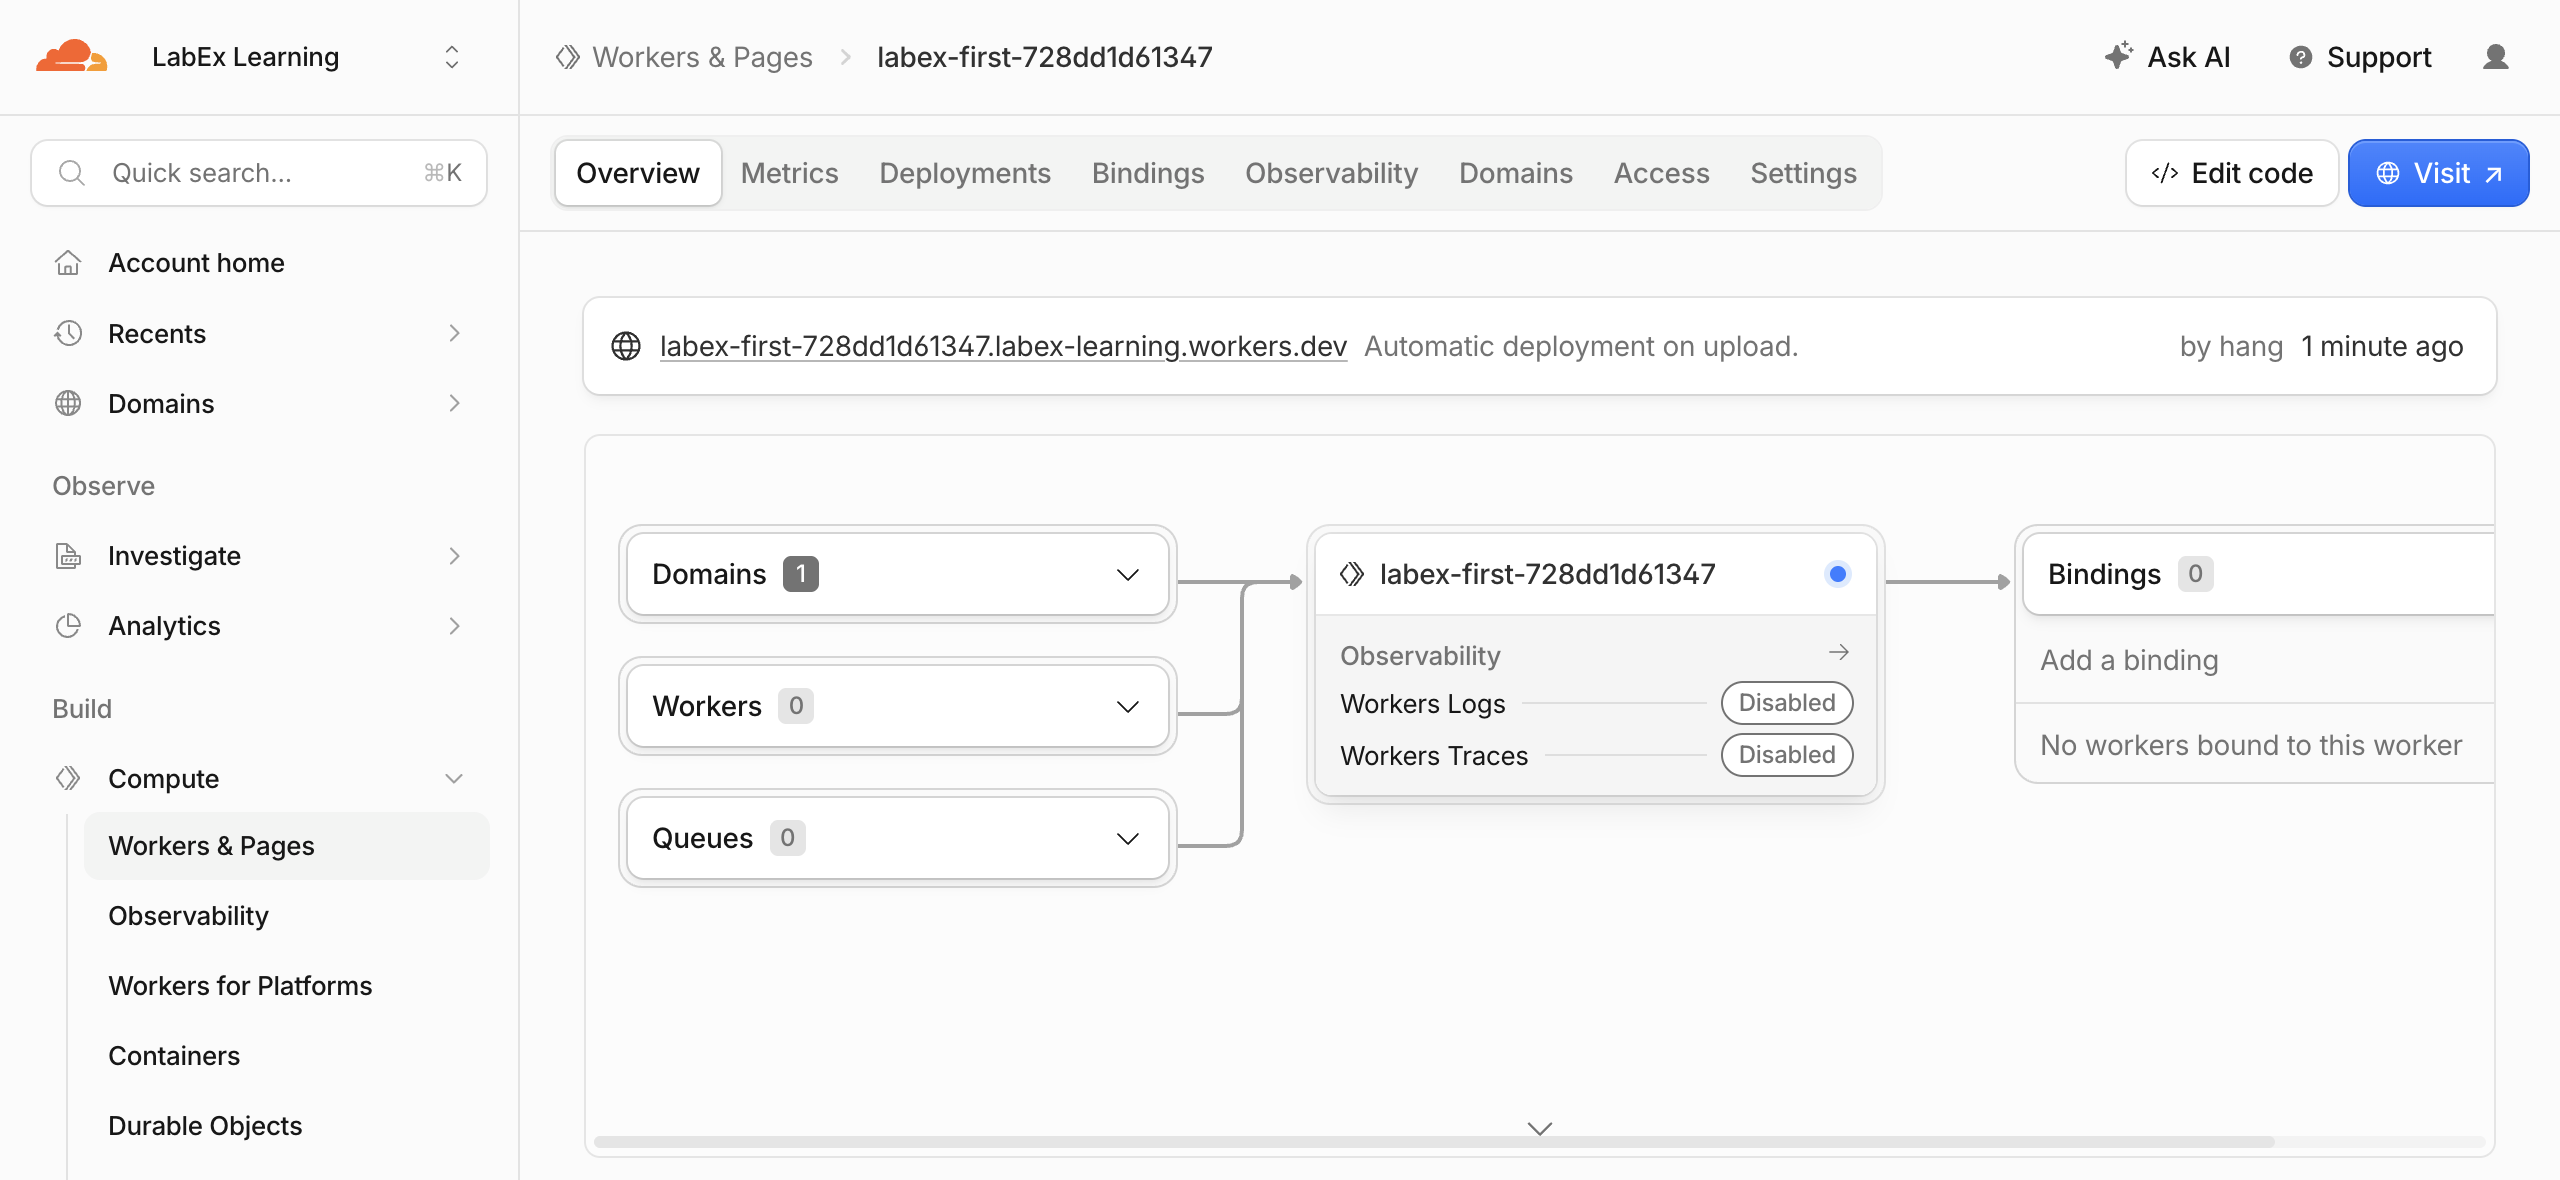
These screenshots show one example deployment. Your random Worker suffix and account subdomain will differ. Locate your own values instead of copying the example. The Dashboard is another view of the resource you created from the terminal; do not create a second Worker or edit its code here. If it is missing, first check the selected account, exact name, and whether the deployment command finished.
The application list confirms that a cloud resource exists; the HTTP response you tested with curl confirms that its code works. You do not need to take or submit your own screenshot.
Use the step's verification button. Its independent backend check reads the Worker settings in the selected account and tests the public endpoint, so another website returning similar text cannot satisfy it.
Observe a Live Request Log
In this step, you will find the message your handler writes when it receives a request. An application log records what happened inside the code, which helps explain behavior you cannot see from the response alone. Wrangler's live log stream shows requests received while it is connected; earlier requests are not replayed.
Start Wrangler tail in the background. --format json produces structured events. This time standard output and errors go to separate files, keeping diagnostic text out of the event data:
npx wrangler tail --format json > requests.json 2> tail-errors.log &
Give the connection a few seconds to initialize, then send a new request:
curl -i "$WORKER_URL/health"
The event file also contains extensive request metadata. head -n 32 displays its first 32 lines so you can focus on the initial event and application message:
head -n 32 requests.json
Look for an event with outcome equal to ok, a GET request ending in /health, and a console message containing health-request. Other fields, timestamps and request headers vary. If the file is empty, inspect tail-errors.log, wait for the connection, send the request again and reread the file.
Stop the tail before verifying its complete saved events. Inspect jobs and use the number shown for wrangler tail (normally 1 after the previous job has stopped):
jobs
kill %1
Use the step's verification button to check the captured event against the deployed Worker.
The file can contain request metadata. Keep it in this VM; do not publish it as a screenshot or submit it to a public repository.
Delete the Test Worker
In this step, you will remove only the test Worker and confirm the result while your management authorization is still active. Deleting a VM would not delete a deployed Worker.
Inspect the project configuration again and confirm its name is the unique labex-first-... name used in this lab:
cat wrangler.jsonc
Delete that Worker using the project's configuration:
npx wrangler delete
Read the confirmation prompt, check the exact name, and press y to confirm. Do not use force deletion or delete another project. Wrangler normally reports that the Worker was deleted. With the pinned version and these scoped permissions, it can instead print an authentication error for /storage/kv/namespaces after deleting the Worker: Wrangler also checks legacy Workers Sites storage during cleanup. This lab creates no KV namespaces. Do not grant all suggested permissions or repeat deployment to fix that diagnostic; use this step's verification button to find out whether the Worker is actually gone. Any other error still needs investigation.
In the Cloudflare Dashboard, open Workers & Pages in your learning account and refresh the list. Confirm that your exact Worker name is absent. Then use the step's verification button for an independent API check.
The check requires a successful authenticated inventory response; a failed network request or an expired login does not count as deletion. Your learning account and its account-level workers.dev subdomain remain available for later labs. Complete this step's verification before logging out.
Disconnect the VM
In this step, you will remove Wrangler's stored authorization after the cloud cleanup has been verified. Local source files remain in the VM, but they no longer authorize access to your account.
npx wrangler logout
npx wrangler whoami --json
Look for "loggedIn": false. This Wrangler version exits nonzero when logged out; that is expected. A network error without this explicit state is not proof of logout. Use the step's verification button to confirm independently.
Your browser can remain signed in to the Cloudflare Dashboard. Browser login and this VM's Wrangler authorization are separate. A later lab will start with a fresh VM and request its own authorization.
Summary
You wrote a Worker fetch handler and configuration, tested its JSON response locally, deployed it to your own learning account, and inspected a live request log. You verified the public response and ownership independently, deleted the test Worker while authorized, and logged out of the VM.
For reference, see Cloudflare's Wrangler commands, fetch handler, and workers.dev configuration.