Introduction
A backup uploader should finish successful uploads and release abandoned parts after an interruption. You will split one bounded synthetic file, complete its multipart session, and inspect and abort a separate unfinished session without disturbing completed objects.
Complete the earlier R2 object and scoped-credential lessons first. This fresh VM has Node.js 22.22.0, Wrangler 4.131.1 and AWS SDK 3.888.0. You create one new private Standard bucket and its own short-lived credentials. R2 must be active; review multipart limits and pricing. Incomplete parts count toward storage. This lab transfers only a small synthetic fixture and requires no domain. Do not reuse previous uploads or buckets.
Create your private document bucket
In this step, you authorize this VM and create one disposable bucket. Device authorization confirms your learning account. R2 bucket management uses a separate API token restricted to that account.
Start Bash for the command syntax used below, then move to the prepared project and check its tools. Keep this same terminal open so your resource-name variables remain available:
bash
cd /home/labex/project/r2-lab
export PATH="$PWD/.tools/node-v22.22.0-linux-x64/bin:$PATH"
node --version
npx wrangler --version
Authorize the displayed device code in your own browser. Confirm the learning account and the requested account and user read scopes before granting consent:
npx wrangler login --device --browser=false --scopes account:read user:read
npx wrangler whoami --json
Require loggedIn: true. Read the account name even if only one is listed. Replace YOUR_ACCOUNT_ID below with that account's actual 32-character ID. openssl rand -hex 6 generates twelve random hexadecimal characters so this lab cannot collide with a previous run. The here-document writes a standard configuration file; the shell substitutes your variables into it.
ACCOUNT_ID=YOUR_ACCOUNT_ID
RUN_ID=$(openssl rand -hex 6)
NAME="labex-c05-r06-$RUN_ID"
BUCKET="$NAME-docs"
cat > wrangler.jsonc <<JSON
{"name":"$NAME","account_id":"$ACCOUNT_ID","compatibility_date":"2026-07-30","r2_buckets":[{"binding":"DOCUMENTS","bucket_name":"$BUCKET"}]}
JSON
For bucket management, open your Cloudflare profile's API Tokens page and create a custom token named after this lab. Grant Account → Workers R2 Storage → Edit, and restrict Account Resources to the learning account whose ID you saved. Set a short expiry. Do not include other accounts or unrelated permissions. This management token is for bucket administration, including creation and deletion. Later in this same step, you create a separate bucket-scoped object token for the S3 SDK to work with objects.
Copy the token once into this hidden VM prompt. umask 077 restricts the file to your user; read -s hides input. The file uses Wrangler's standard token variable and is excluded from Git.
umask 077
read -r -s -p 'R2 management API token: ' R2_MANAGEMENT_TOKEN; printf '\n'
printf 'CLOUDFLARE_API_TOKEN=%s\n' "$R2_MANAGEMENT_TOKEN" > .env.management
unset R2_MANAGEMENT_TOKEN
Use --env-file=.env.management only for R2 management commands; ordinary whoami continues to check the VM's device authorization.
Put --env-file at the end of each Wrangler command so its list of file arguments does not consume the command name. After creating each bucket, if Wrangler asks whether to add a binding to your configuration, type n and press Enter. The configuration already contains the intended binding.
npx wrangler r2 bucket create "$BUCKET" --env-file=.env.management
List your buckets and find the exact generated name. Other buckets belong to other work; leave them alone.
npx wrangler r2 bucket list --env-file=.env.management
In Dashboard, open Storage & databases → R2 → Overview, select this exact bucket, and inspect its empty object list. In its settings, leave the public development URL and custom domains disabled. A bucket name in Dashboard confirms identity; later download checks prove the stored bytes.
The S3-compatible API gives standard storage SDKs access to R2. It uses a separate access-key pair rather than Wrangler's device token. In R2 Overview, use Account Details → API Tokens → Manage, then create a User API token named after this lab's generated resource name. Choose Object Read & Write, restrict it to this exact new bucket, and select a short expiry if the form offers one. Do not choose all buckets or Admin access. Keep this token page available until you have stored the one-time secret.
Use the following Bash prompts in the VM. read -s hides input; umask 077 makes the credential file readable only by your user. These names are the standard AWS SDK environment variables. Paste the Access Key ID and Secret Access Key into their respective prompts, then press Enter. Do not paste the general API token value.
umask 077
read -r -s -p 'Access Key ID: ' AWS_ACCESS_KEY_ID; printf '\n'
read -r -s -p 'Secret Access Key: ' AWS_SECRET_ACCESS_KEY; printf '\n'
printf 'AWS_ACCESS_KEY_ID=%s\nAWS_SECRET_ACCESS_KEY=%s\n' "$AWS_ACCESS_KEY_ID" "$AWS_SECRET_ACCESS_KEY" > .env.s3
unset AWS_ACCESS_KEY_ID AWS_SECRET_ACCESS_KEY
Write a reusable standard SDK client. The SDK requires a region string; R2 uses auto. Reading the existing configuration keeps CLI and SDK operations aimed at the same account and bucket.
cat > storage.mjs <<'JS'
import { S3Client } from "@aws-sdk/client-s3";
import { readFileSync } from "node:fs";
const config = JSON.parse(readFileSync("wrangler.jsonc", "utf8"));
export const Bucket = config.r2_buckets[0].bucket_name;
export const s3 = new S3Client({
  region: "auto",
  endpoint: `https://${config.account_id}.r2.cloudflarestorage.com`,
  credentials: {
    accessKeyId: process.env.AWS_ACCESS_KEY_ID,
    secretAccessKey: process.env.AWS_SECRET_ACCESS_KEY
  }
});
JS
Upload the retained synthetic handbook using Wrangler. It must remain unchanged through completion and abort operations:
npx wrangler r2 object put "$BUCKET/retained/handbook.txt" --remote --file retained.txt --content-type text/plain --env-file=.env.management
Begin a bounded multipart upload
In this step, you start a multipart upload: a server-side upload session that accepts numbered parts before assembling the final object. Uploaded parts are not yet a downloadable object. Saving the upload ID lets you resume or abort this exact session.
Create a 6 MiB synthetic binary file with ordinary Python. The first part will be 5 MiB and the final part 1 MiB. R2 requires supported part sizes; parts other than the final part must be at least 5 MiB, and use equal sizes. This small fixture demonstrates the protocol without a large transfer.
python3 - <<'DATA'
from pathlib import Path
Path("archive.bin").write_bytes(bytes(range(256)) * (6 * 1024 * 1024 // 256))
DATA
cat > start.mjs <<'JS'
import { CreateMultipartUploadCommand } from "@aws-sdk/client-s3";
import { writeFileSync } from "node:fs";
import { s3, Bucket } from "./storage.mjs";
const Key = "exports/archive.bin";
const result = await s3.send(new CreateMultipartUploadCommand({ Bucket, Key, ContentType: "application/octet-stream" }));
writeFileSync("upload.json", JSON.stringify({ Key, UploadId: result.UploadId }));
console.log("Started multipart upload for", Key);
JS
node --env-file=.env.s3 start.mjs
Keep upload.json: it identifies this operation, not a success marker. Do not rerun start unnecessarily; each call creates another incomplete upload that must be cleaned up.
Keep using the upload ID saved by the creation call. In the tested R2 endpoint, the list response used a different opaque ID string; compare the exact object key and use the saved ID with ListParts to confirm the active session.
Upload ordered parts and complete the object
In this step, you send the two parts and tell R2 which returned part identifiers form the final object. Part numbers start at 1. The completion request includes each ETag exactly as returned by its part upload; it is not the same as hashing the complete source file yourself.
cat > complete.mjs <<'JS'
import { UploadPartCommand, CompleteMultipartUploadCommand, GetObjectCommand } from "@aws-sdk/client-s3";
import { readFileSync, writeFileSync } from "node:fs";
import { s3, Bucket } from "./storage.mjs";
const { Key, UploadId } = JSON.parse(readFileSync("upload.json", "utf8"));
const bytes = readFileSync("archive.bin");
const size = 5 * 1024 * 1024;
const Parts = [];
for (let offset = 0, PartNumber = 1; offset < bytes.length; offset += size, PartNumber++) {
  const result = await s3.send(new UploadPartCommand({ Bucket, Key, UploadId, PartNumber, Body: bytes.subarray(offset, offset + size) }));
  Parts.push({ PartNumber, ETag: result.ETag });
  console.log("Uploaded part", PartNumber);
}
await s3.send(new CompleteMultipartUploadCommand({ Bucket, Key, UploadId, MultipartUpload: { Parts } }));
const object = await s3.send(new GetObjectCommand({ Bucket, Key }));
writeFileSync("completed.bin", await object.Body.transformToByteArray());
console.log("Completed and downloaded", Key);
JS
node --env-file=.env.s3 complete.mjs
Require two uploaded-part lines followed by the completion line. Compare the actual downloaded file byte-for-byte:
cmp archive.bin completed.bin && printf "Multipart bytes match\n"
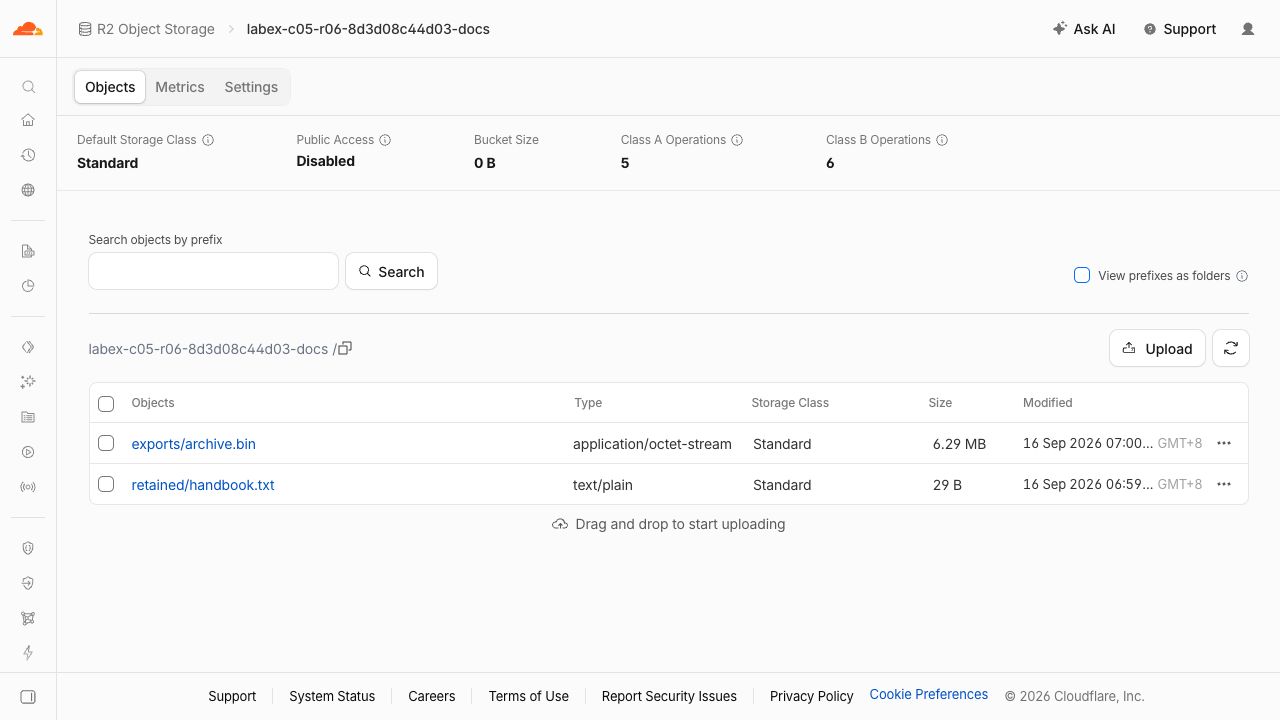
A multipart object's ETag is not necessarily an MD5 of the final file. The byte comparison proves content preservation directly. In Dashboard, open this lab's bucket and inspect exports/archive.bin; the retained handbook must still be present.
Clear View prefixes as folders to see both full object keys as in this example. Your generated bucket name will differ. The archive’s 6.29 MB is the decimal display of 6 MiB (6,291,456 bytes). The top Bucket Size: 0 B summary can lag behind uploads; use the object rows and the verified API bytes to confirm stored content.
Inspect an incomplete upload
In this step, you deliberately leave one new upload incomplete, then list the session and its parts. Incomplete parts consume storage even though a normal object list does not show a completed file. That is why cleanup needs an upload inventory as well as an object inventory.
cat > abandon.mjs <<'JS'
import { CreateMultipartUploadCommand, UploadPartCommand, ListMultipartUploadsCommand, ListPartsCommand } from "@aws-sdk/client-s3";
import { readFileSync, writeFileSync } from "node:fs";
import { s3, Bucket } from "./storage.mjs";
const Key = "temporary/unfinished.bin";
const result = await s3.send(new CreateMultipartUploadCommand({ Bucket, Key }));
const UploadId = result.UploadId;
writeFileSync("abandoned.json", JSON.stringify({ Key, UploadId }));
await s3.send(new UploadPartCommand({ Bucket, Key, UploadId, PartNumber: 1, Body: readFileSync("archive.bin").subarray(0, 5 * 1024 * 1024) }));
const uploads = await s3.send(new ListMultipartUploadsCommand({ Bucket }));
console.log(uploads.Uploads.map(upload => ({ key: upload.Key, uploadId: upload.UploadId })));
const parts = await s3.send(new ListPartsCommand({ Bucket, Key, UploadId }));
console.log(parts.Parts.map(part => ({ part: part.PartNumber, bytes: part.Size })));
JS
node --env-file=.env.s3 abandon.mjs
The multipart inventory contains temporary/unfinished.bin. The ListParts request uses the saved upload ID and must return part 1 with 5,242,880 bytes. Do not compare the list’s ID text with the saved ID or create another session to repeat a read. Use the saved ID with the standard list APIs, and run the platform check while this upload still exists.
Abort only the abandoned session
In this step, you free the unfinished parts by aborting their exact upload ID. Aborting is different from deleting a completed object. It must leave both the completed archive and handbook intact.
cat > abort.mjs <<'JS'
import { AbortMultipartUploadCommand, ListMultipartUploadsCommand } from "@aws-sdk/client-s3";
import { readFileSync } from "node:fs";
import { s3, Bucket } from "./storage.mjs";
const { Key, UploadId } = JSON.parse(readFileSync("abandoned.json", "utf8"));
await s3.send(new AbortMultipartUploadCommand({ Bucket, Key, UploadId }));
const uploads = await s3.send(new ListMultipartUploadsCommand({ Bucket }));
console.log("Incomplete uploads:", uploads.Uploads || []);
JS
node --env-file=.env.s3 abort.mjs
This new bucket should now show an empty multipart-upload list. The platform check also downloads both completed objects to prove they remain unchanged. Never interpret a failed listing as an empty list.
Clean up completed files and the bucket
In this step, you remove the exact two completed objects after the abort check passes. Explicit cleanup does not wait for the default incomplete-upload lifecycle rule.
npx wrangler r2 object delete "$BUCKET/exports/archive.bin" --remote --env-file=.env.management
npx wrangler r2 object delete "$BUCKET/retained/handbook.txt" --remote --env-file=.env.management
npx wrangler r2 bucket delete "$BUCKET" --env-file=.env.management
npx wrangler r2 bucket list --env-file=.env.management
Confirm only this bucket's generated name. Require its absence from a successful inventory and run the platform cleanup check before revoking credentials.
Revoke the lab credential and log out
In this step, you close access left by this exercise. On the R2 API Tokens page, revoke only the object token named for this lab. On your profile API Tokens page, revoke the separate R2 management token you created for this lab. Deleting a bucket does not revoke a token, and Wrangler logout does not revoke S3 credentials.
After revocation, remove the local credential file and log this VM out:
rm .env.s3 .env.management
npx wrangler logout
Inspect structured identity. Its nonzero status is expected when logged out:
npx wrangler whoami --json || true
Require loggedIn: false; keep your ordinary Dashboard login. The platform checks local credential removal and Wrangler logout. Both token revocations are manual Dashboard checkpoints in this candidate; it is not inferred from file deletion.
Summary
Complete a multipart object with exact bytes, inspect and abort unfinished parts, preserve other objects, and clean up storage credentials.