Introduction
A private bucket can still leak files if a public Worker returns them to every caller. You will reproduce that defect using only two synthetic exports, add reader-scoped application authorization, and prove that private downloads stay protected while public health remains available.
Complete the Worker document integration and temporary access lessons first. This fresh VM supplies an intentionally unsafe handler, synthetic files, Node.js 22.22.0, Wrangler 4.131.1 and Miniflare 4.20260730.0. You create a new private bucket and disposable Worker. Active R2 and the corresponding learning-account permissions are required; review pricing. No real files, real customer data or custom domain are needed. Clean the exposed demonstration and its credentials before leaving.
Connect the application bucket
In this step, you authorize this VM and create an independent private bucket for the application. Device authorization confirms your learning account. R2 bucket management uses a separate API token restricted to that account.
Start Bash for the command syntax used below, then move to the prepared project and check its tools. Keep this same terminal open so your resource-name variables remain available:
bash
cd /home/labex/project/r2-lab
export PATH="$PWD/.tools/node-v22.22.0-linux-x64/bin:$PATH"
node --version
npx wrangler --version
Authorize the displayed device code in your own browser. Confirm the learning account and the requested account and user read scopes before granting consent:
npx wrangler login --device --browser=false --scopes account:read user:read workers_scripts:write workers_kv:write
npx wrangler whoami --json
Require loggedIn: true. Read the account name even if only one is listed. Replace YOUR_ACCOUNT_ID below with that account's actual 32-character ID. openssl rand -hex 6 generates twelve random hexadecimal characters so this lab cannot collide with a previous run. The here-document writes a standard configuration file; the shell substitutes your variables into it.
ACCOUNT_ID=YOUR_ACCOUNT_ID
RUN_ID=$(openssl rand -hex 6)
NAME="labex-c05-r08-$RUN_ID"
BUCKET="$NAME-docs"
cat > wrangler.jsonc <<JSON
{"name":"$NAME","account_id":"$ACCOUNT_ID","main":"src/index.js","workers_dev":true,"compatibility_date":"2026-07-30","r2_buckets":[{"binding":"DOCUMENTS","bucket_name":"$BUCKET"}]}
JSON
For bucket management, open your Cloudflare profile's API Tokens page and create a custom token named after this lab. Grant Account → Workers R2 Storage → Edit, and restrict Account Resources to the learning account whose ID you saved. Set a short expiry. Do not include other accounts or unrelated permissions. This management token is for bucket administration, including creation and deletion. In this lab, the Worker accesses R2 objects through its DOCUMENTS binding.
Copy the token once into this hidden VM prompt. umask 077 restricts the file to your user; read -s hides input. The file uses Wrangler's standard token variable and is excluded from Git.
umask 077
read -r -s -p 'R2 management API token: ' R2_MANAGEMENT_TOKEN; printf '\n'
printf 'CLOUDFLARE_API_TOKEN=%s\n' "$R2_MANAGEMENT_TOKEN" > .env.management
unset R2_MANAGEMENT_TOKEN
Use --env-file=.env.management only for R2 management commands; ordinary whoami continues to check the VM's device authorization.
Put --env-file at the end of each Wrangler command so its list of file arguments does not consume the command name. After creating each bucket, if Wrangler asks whether to add a binding to your configuration, type n and press Enter. The configuration already contains the intended binding.
npx wrangler r2 bucket create "$BUCKET" --env-file=.env.management
List your buckets and find the exact generated name. Other buckets belong to other work; leave them alone.
npx wrangler r2 bucket list --env-file=.env.management
In Dashboard, open Storage & databases → R2 → Overview, select this exact bucket, and inspect its empty object list. In its settings, leave the public development URL and custom domains disabled. A bucket name in Dashboard confirms identity; later download checks prove the stored bytes.
Worker script permission supports deployment. KV permission supports Wrangler’s deletion bookkeeping; this lab creates no KV namespace. The R2 management token remains a separate account-scoped credential.
Create two fresh application credentials for the synthetic readers. They are not Cloudflare API tokens. Seed the two owned objects and publish the supplied intentionally exposed handler:
umask 077
printf "BLUE_TOKEN=%s\nGREEN_TOKEN=%s\n" "$(openssl rand -hex 24)" "$(openssl rand -hex 24)" > .dev.vars
npx wrangler r2 object put "$BUCKET/exports/blue/report.txt" --remote --file blue.txt --content-type text/plain --env-file=.env.management
npx wrangler r2 object put "$BUCKET/exports/green/report.txt" --remote --file green.txt --content-type text/plain --env-file=.env.management
npx wrangler deploy
npx wrangler secret bulk .dev.vars
This deliberately exposed deployment contains only these two synthetic files. Do not use real exports or leave it running after the exercise.
Observe the unintended public download
In this step, you reproduce exposure through the Worker while the underlying bucket remains private. A binding gives server-side code access to the bucket; R2 does not automatically decide which HTTP callers that code should trust.
Copy the exact deployment URL and request the blue export without credentials:
BASE_URL=https://YOUR_WORKER.YOUR_SUBDOMAIN.workers.dev
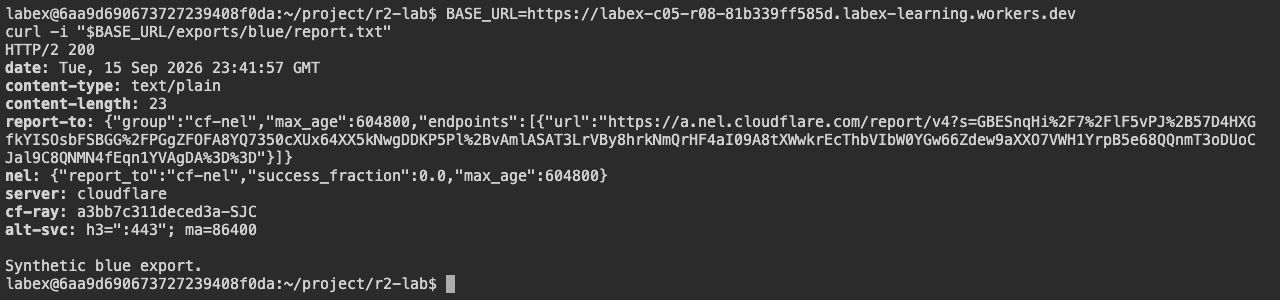
curl -i "$BASE_URL/exports/blue/report.txt"
Require HTTP 200 and Synthetic blue export.. If the new deployment is still propagating, retry the read for up to one minute. This successful anonymous response is the defect to repair.
Inspect the supplied handler:
cat src/index.js
It reads an R2 key directly from the URL and returns its body without deciding whether the caller owns that file. In Dashboard, inspect the bucket settings: public development URL disabled and no custom domains. These settings do not close the separate Worker route. Run the exposure check before replacing the handler.
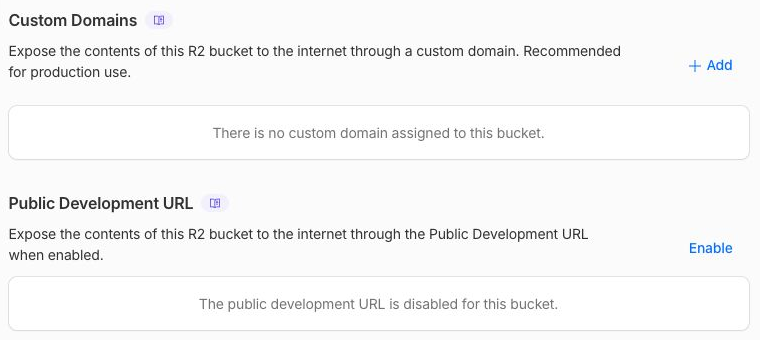
These real bucket settings show no custom domain and a disabled public development URL. A Worker with an R2 binding can still expose data through its own application route.
This real VM terminal request returns HTTP 200 and the synthetic blue report without credentials. The username, resource prefix and Worker URL are examples; use your own deployment URL.
Authenticate the reader before selecting the key
In this step, you connect authentication (which reader holds a valid credential) to authorization (which reader may download this object). A valid blue token must not retrieve a green export. The authenticated identity supplies the key's owner, and the URL owner must agree before R2 is queried.
Replace the handler. The two synthetic credentials model readers for this small example; a real application would use its session or identity provider and authoritative permission records. Never accept a caller-supplied name as proof of identity.
cat > src/index.js <<'JS'
async function matches(actual, secret) {
  if (!secret) return false;
  const expected = `Bearer ${secret}`;
  const a = await crypto.subtle.digest("SHA-256", new TextEncoder().encode(actual));
  const b = await crypto.subtle.digest("SHA-256", new TextEncoder().encode(expected));
  return crypto.subtle.timingSafeEqual(a, b);
}
export default {
  async fetch(request, env) {
    const path = new URL(request.url).pathname;
    if (path === "/health" && request.method === "GET") return new Response("ok");
    const actual = request.headers.get("Authorization") || "";
    const owner = await matches(actual, env.BLUE_TOKEN) ? "blue" : await matches(actual, env.GREEN_TOKEN) ? "green" : null;
    if (!owner) return new Response("Unauthorized", { status: 401 });
    if (request.method !== "GET") return new Response("Method not allowed", { status: 405 });
    const route = /^\/exports\/(blue|green)\/([a-z0-9-]+\.txt)$/.exec(path);
    if (!route) return new Response("Not found", { status: 404 });
    if (route[1] !== owner) return new Response("Forbidden", { status: 403 });
    // The authenticated owner and validated path determine the storage key.
    const key = `exports/${owner}/${route[2]}`;
    const object = await env.DOCUMENTS.get(key);
    if (!object) return new Response("Not found", { status: 404 });
    const headers = new Headers({ "Cache-Control": "private, no-store" });
    object.writeHttpMetadata(headers);
    headers.set("ETag", object.httpEtag);
    return new Response(object.body, { headers });
  }
};
JS
A missing secret cannot accidentally match a caller. The digest comparison uses the runtime's timing-safe equality operation. Health stays outside the protected route, and private responses are not shared-cache candidates. A query-string key cannot override the authenticated storage path.
Deploy the repair:
npx wrangler deploy
The platform check first exercises a separate local runtime with random synthetic credentials and object bytes. A passing local check is useful before evaluating the deployed repair.
Prove reader isolation and retained health
In this step, you exercise both allowed and denied paths. Load the synthetic credentials without displaying them, then download each owner's file:
set -a
source .dev.vars
set +a
curl -fsS -H "Authorization: Bearer $BLUE_TOKEN" "$BASE_URL/exports/blue/report.txt" -o blue-download.txt
cmp blue.txt blue-download.txt
curl -fsS -H "Authorization: Bearer $GREEN_TOKEN" "$BASE_URL/exports/green/report.txt" -o green-download.txt
cmp green.txt green-download.txt
Require exact bytes. Now test anonymous access, a reader crossing into the other owner's path, an owned missing key, and public health:
curl -i "$BASE_URL/exports/blue/report.txt"
curl -i -H "Authorization: Bearer $BLUE_TOKEN" "$BASE_URL/exports/green/report.txt"
curl -i -H "Authorization: Bearer $BLUE_TOKEN" "$BASE_URL/exports/blue/missing.txt"
curl -i "$BASE_URL/health"
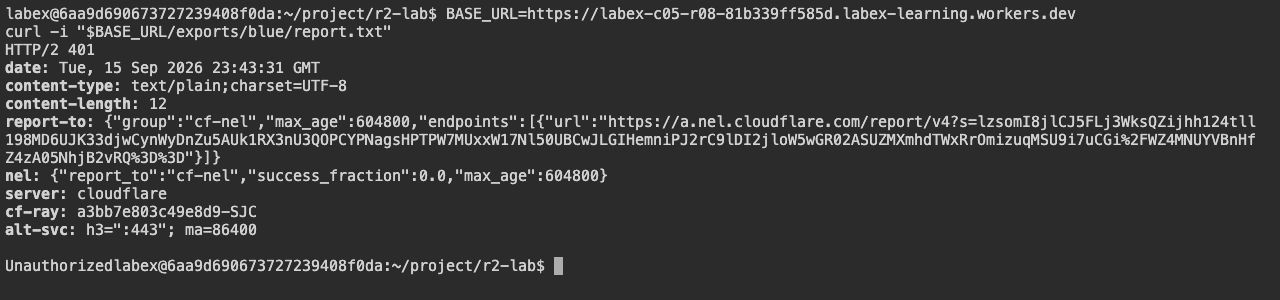
Require 401 Unauthorized, 403 Forbidden, 404 Not found, and 200 ok respectively. Status and body must agree. The platform check repeats remote reader isolation and verifies that the selected account owns the Worker and its private R2 binding.
The same example Worker URL now returns HTTP 401 Unauthorized to an anonymous request in the VM terminal. These are terminal HTTP results; authenticated byte comparisons and independent checks establish reader isolation.
Remove the remote application and bucket
In this step, you delete only this lab's Worker and objects while still authorized. The private bucket does not disappear when its Worker is deleted.
npx wrangler delete
Confirm the exact generated Worker name. Delete the one uploaded object explicitly, then delete the bucket:
BUCKET=$(node -p "JSON.parse(require('fs').readFileSync('wrangler.jsonc')).r2_buckets[0].bucket_name")
npx wrangler r2 object delete "$BUCKET/exports/blue/report.txt" --remote --env-file=.env.management
npx wrangler r2 object delete "$BUCKET/exports/green/report.txt" --remote --env-file=.env.management
npx wrangler r2 bucket delete "$BUCKET" --env-file=.env.management
Only the blue and green report keys were created. Delete their exact keys; preserve unrelated account resources.
Refresh the Worker and bucket lists in Dashboard, and run the platform cleanup check. Authentication/network failures are inconclusive, not successful deletion.
Close remaining credentials
In this step, you revoke this lab's management token on your profile API Tokens page, remove the local application secret and close VM authorization. Do this only after the previous cleanup check passes.
rm .env.management .dev.vars
unset BLUE_TOKEN GREEN_TOKEN
npx wrangler logout
npx wrangler whoami --json || true
Require loggedIn: false. Revocation of the management token is a separate manual Dashboard checkpoint; deleting the local file alone does not revoke it. Keep the ordinary Dashboard login and other labs' tokens untouched.
Summary
Close a synthetic Worker file exposure, connect reader identity to object ownership, retain health access, and verify private bucket cleanup.