Introduction
A support agent needs to share a private synthetic export briefly without making its bucket public or handing out storage credentials. You will issue a presigned download URL, observe expiry, and prove that its signing credential cannot access another lab-owned bucket.
Complete Organize a Document Bucket and Stream Documents Through a Worker first. This independent VM has pinned Node.js 22.22.0, Wrangler 4.131.1 and AWS SDK 3.888.0. The account must have active R2 and permission to create a scoped user object token. Only two tiny synthetic files are used. Review R2 pricing and presigned access; no purchased domain is required. Do not share generated links or credentials. Clean both buckets and revoke only this lab's tokens before leaving.
Create isolated access-test buckets
In this step, you authorize this VM and create one disposable bucket. Device authorization confirms your learning account. R2 bucket management uses a separate API token restricted to that account.
Start Bash for the command syntax used below, then move to the prepared project and check its tools. Keep this same terminal open so your resource-name variables remain available:
bash
cd /home/labex/project/r2-lab
export PATH="$PWD/.tools/node-v22.22.0-linux-x64/bin:$PATH"
node --version
npx wrangler --version
Authorize the displayed device code in your own browser. Confirm the learning account and the requested account and user read scopes before granting consent:
npx wrangler login --device --browser=false --scopes account:read user:read
npx wrangler whoami --json
Require loggedIn: true. Read the account name even if only one is listed. Replace YOUR_ACCOUNT_ID below with that account's actual 32-character ID. openssl rand -hex 6 generates twelve random hexadecimal characters so this lab cannot collide with a previous run. The here-document writes a standard configuration file; the shell substitutes your variables into it.
ACCOUNT_ID=YOUR_ACCOUNT_ID
RUN_ID=$(openssl rand -hex 6)
NAME="labex-c05-r04-$RUN_ID"
BUCKET="$NAME-docs"
cat > wrangler.jsonc <<JSON
{"name":"$NAME","account_id":"$ACCOUNT_ID","compatibility_date":"2026-07-30","r2_buckets":[{"binding":"DOCUMENTS","bucket_name":"$BUCKET"}]}
JSON
For bucket management, open your Cloudflare profile's API Tokens page and create a custom token named after this lab. Grant Account → Workers R2 Storage → Edit, and restrict Account Resources to the learning account whose ID you saved. Set a short expiry. Do not include other accounts or unrelated permissions. This account-level permission creates/deletes buckets; the object-only token in the next step cannot do that.
Copy the token once into this hidden VM prompt. umask 077 restricts the file to your user; read -s hides input. The file uses Wrangler's standard token variable and is excluded from Git.
umask 077
read -r -s -p 'R2 management API token: ' R2_MANAGEMENT_TOKEN; printf '\n'
printf 'CLOUDFLARE_API_TOKEN=%s\n' "$R2_MANAGEMENT_TOKEN" > .env.management
unset R2_MANAGEMENT_TOKEN
Use --env-file=.env.management only for R2 management commands; ordinary whoami continues to check the VM's device authorization.
Put --env-file at the end of each Wrangler command so its list of file arguments does not consume the command name. After creating each bucket, if Wrangler asks whether to add a binding to your configuration, type n and press Enter. The configuration already contains the intended binding.
npx wrangler r2 bucket create "$BUCKET" --env-file=.env.management
List your buckets and find the exact generated name. Other buckets belong to other work; leave them alone.
npx wrangler r2 bucket list --env-file=.env.management
In Dashboard, open Storage & databases → R2 → Overview, select this exact bucket, and inspect its empty object list. In its settings, leave the public development URL and custom domains disabled. A bucket name in Dashboard confirms identity; later download checks prove the stored bytes.
Create a second bucket owned by this lab. It represents an unrelated storage boundary; do not substitute a bucket from another exercise. Upload one synthetic file to each bucket with the management credential:
CONTROL="$NAME-control"
npx wrangler r2 bucket create "$CONTROL" --env-file=.env.management
npx wrangler r2 object put "$BUCKET/documents/report.txt" --remote --file document.txt --content-type text/plain --env-file=.env.management
npx wrangler r2 object put "$CONTROL/retained/handbook.txt" --remote --file retained.txt --content-type text/plain --env-file=.env.management
Keep public access disabled for both buckets. You will allow the next credential to read the document bucket only.
Restrict the signing credential
In this step, you create a read-only credential restricted to one bucket. A presigned URL cannot grant more access than the credential used to sign it. The management token can manage both lab buckets, so it must not be used as the signing identity in this lesson.
The S3-compatible API gives standard storage SDKs access to R2. It uses a separate access-key pair rather than Wrangler's device token. In R2 Overview, use Account Details → API Tokens → Manage, then create a User API token named after this lab's generated resource name. Choose Object Read only, restrict it to this exact new bucket, and select a short expiry if the form offers one. Do not choose all buckets or Admin access. Keep this token page available until you have stored the one-time secret.
Use the following Bash prompts in the VM. read -s hides input; umask 077 makes the credential file readable only by your user. These names are the standard AWS SDK environment variables. Paste the Access Key ID and Secret Access Key into their respective prompts, then press Enter. Do not paste the general API token value.
umask 077
read -r -s -p 'Access Key ID: ' AWS_ACCESS_KEY_ID; printf '\n'
read -r -s -p 'Secret Access Key: ' AWS_SECRET_ACCESS_KEY; printf '\n'
printf 'AWS_ACCESS_KEY_ID=%s\nAWS_SECRET_ACCESS_KEY=%s\n' "$AWS_ACCESS_KEY_ID" "$AWS_SECRET_ACCESS_KEY" > .env.s3
unset AWS_ACCESS_KEY_ID AWS_SECRET_ACCESS_KEY
Write a reusable standard SDK client. The SDK requires a region string; R2 uses auto. Reading the existing configuration keeps CLI and SDK operations aimed at the same account and bucket.
cat > storage.mjs <<'JS'
import { S3Client } from "@aws-sdk/client-s3";
import { readFileSync } from "node:fs";
const config = JSON.parse(readFileSync("wrangler.jsonc", "utf8"));
export const Bucket = config.r2_buckets[0].bucket_name;
export const s3 = new S3Client({
  region: "auto",
  endpoint: `https://${config.account_id}.r2.cloudflarestorage.com`,
  credentials: {
    accessKeyId: process.env.AWS_ACCESS_KEY_ID,
    secretAccessKey: process.env.AWS_SECRET_ACCESS_KEY
  }
});
JS
Select only the -docs bucket; leave the -control bucket outside this token's resource scope. The existing storage.mjs client reads .env.s3 only when --env-file=.env.s3 is present. Do not use Admin permission or all-bucket scope.
Before sharing any URL, confirm the selected bucket on the token form. The next step's real request to the control bucket will independently prove that this boundary works.
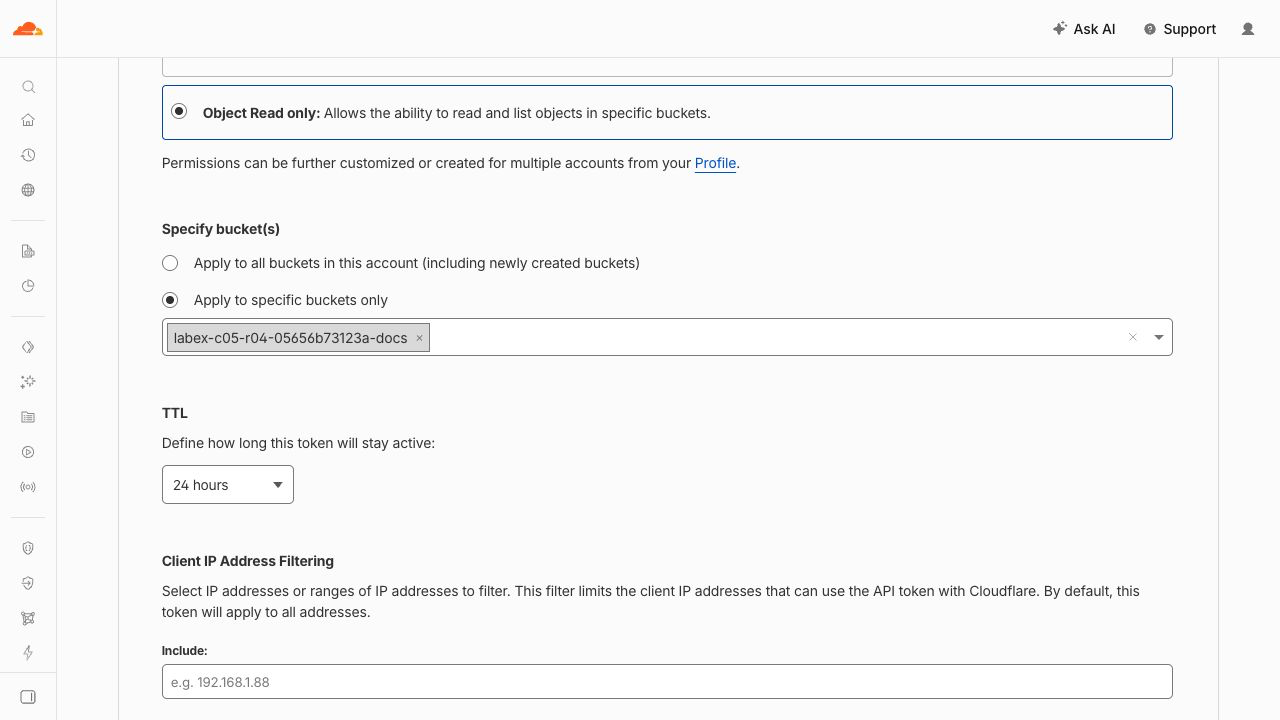
This example selects Object Read only and only the generated -docs bucket; the -control bucket is excluded. Your generated name will differ. The token TTL of 24 hours is separate from each signed URL's five-minute or five-second expiry. This form shows the chosen scope; successful and rejected remote requests establish the actual permissions.
Sign and exercise temporary downloads
In this step, you sign GET requests for a specific object and time window. Signing runs locally without contacting R2; creating a URL does not prove permission. R2 evaluates the signature when a client uses it. Anyone possessing the URL can use its granted operation until expiry, so keep these links out of logs, messages and screenshots.
Write a small signing program. expiresIn is measured in seconds. The file stores a five-minute URL, a five-second URL and a deliberately out-of-scope URL without printing them:
cat > sign.mjs <<'JS'
import { GetObjectCommand } from "@aws-sdk/client-s3";
import { getSignedUrl } from "@aws-sdk/s3-request-presigner";
import { readFileSync, writeFileSync } from "node:fs";
import { s3, Bucket } from "./storage.mjs";
const config = JSON.parse(readFileSync("wrangler.jsonc", "utf8"));
const command = new GetObjectCommand({ Bucket, Key: "documents/report.txt" });
const allowed = await getSignedUrl(s3, command, { expiresIn: 300 });
const short = await getSignedUrl(s3, command, { expiresIn: 5 });
const outside = await getSignedUrl(s3, new GetObjectCommand({
  Bucket: config.name + "-control", Key: "retained/handbook.txt"
}), { expiresIn: 300 });
const unsigned = new URL(allowed); unsigned.search = "";
writeFileSync("signed.json", JSON.stringify({ allowed, short, outside, unsigned: unsigned.href }), { mode: 0o600 });
console.log("Stored temporary request URLs in private signed.json");
JS
node --env-file=.env.s3 sign.mjs
Use the allowed URL promptly. This curl request contains no Authorization header: the URL carries the signature. node -p supplies the stored URL directly to curl without showing it in terminal output.
curl -fsS "$(node -p "require('./signed.json').allowed")" -o signed-download.txt
cmp document.txt signed-download.txt
Require identical bytes. Now wait ten seconds so the five-second URL has expired, then inspect denial responses. These requests intentionally omit --fail to show the HTTP errors:
sleep 10
curl -sS -o expired.xml -w "%{http_code}\n" "$(node -p "require('./signed.json').short")"
curl -sS -o unsigned.xml -w "%{http_code}\n" "$(node -p "require('./signed.json').unsigned")"
curl -sS -o outside.xml -w "%{http_code}\n" "$(node -p "require('./signed.json').outside")"
Require 403 for the expired and out-of-scope requests. The unsigned request to this R2 S3 endpoint returns 400 with InvalidArgument and message Authorization: it lacks the required signing information. This differs from a valid signed credential being denied access to another bucket. Inspect the error names without printing entire response documents (which can contain request details):
python3 - <<'PYXML'
from xml.etree import ElementTree
for path in ["expired.xml", "unsigned.xml", "outside.xml"]:
    root = ElementTree.parse(path).getroot()
    print(path, root.findtext("Code"))
PYXML
The expired response should identify expiry, while the control bucket returns AccessDenied. A network failure is not an authorization result. If you exceeded five minutes before testing the control bucket, regenerate the URLs, repeat the allowed/outside requests, and then let the short one expire again.
Distinguish URL permission from public access
In this step, you connect the observed requests to the access model. The successful link authorized one signed GET for one key. It did not enable the bucket's public development URL, authorize PUT, or log a user into your application.
Open both lab-owned buckets' settings in Dashboard. Keep public development URLs disabled and custom domains absent. On the object-token page, confirm that the read-only token covers only the -docs bucket. Do not reveal its one-time secret in a screenshot.
Run the platform check now. It generates its own signed requests, requires exact allowed bytes, and verifies unsigned, expired and out-of-scope denials. This is real remote API evidence; the saved signed.json is not a completion marker.
In a production application, decide whether a user may access the document before issuing a signed link. Once issued, the bearer link can be copied. The later application-authorization lab addresses that decision directly. Signed S3 URLs target the account's R2 S3 endpoint, not a public r2.dev address or custom domain.
Clean both lab-owned buckets
In this step, you remove the two explicit fixture keys, then their buckets. Keep the management credential active until the platform confirms that both bucket names are absent.
BUCKET=$(node -p "JSON.parse(require('fs').readFileSync('wrangler.jsonc')).r2_buckets[0].bucket_name")
CONTROL=$(node -p "JSON.parse(require('fs').readFileSync('wrangler.jsonc')).name + '-control'")
npx wrangler r2 object delete "$BUCKET/documents/report.txt" --remote --env-file=.env.management
npx wrangler r2 object delete "$CONTROL/retained/handbook.txt" --remote --env-file=.env.management
npx wrangler r2 bucket delete "$BUCKET" --env-file=.env.management
npx wrangler r2 bucket delete "$CONTROL" --env-file=.env.management
npx wrangler r2 bucket list --env-file=.env.management
Confirm each exact name when prompted. A successful bucket listing must omit both names. Never delete another bucket to make a global inventory empty.
Revoke the lab credential and log out
In this step, you close access left by this exercise. On the R2 API Tokens page, revoke only the object token named for this lab. On your profile API Tokens page, revoke the separate R2 management token you created for this lab. Deleting a bucket does not revoke a token, and Wrangler logout does not revoke S3 credentials.
After revocation, remove the local credential file and log this VM out:
rm .env.s3 .env.management signed.json
npx wrangler logout
Inspect structured identity. Its nonzero status is expected when logged out:
npx wrangler whoami --json || true
Require loggedIn: false; keep your ordinary Dashboard login. The platform checks local credential removal and Wrangler logout. Both token revocations are manual Dashboard checkpoints in this candidate; it is not inferred from file deletion.
Summary
Create scoped private-file access, prove presigned success and denial boundaries, distinguish public access from authorization, and revoke lab credentials.