はじめに
この包括的な実験(Lab)では、Ansible を使用して重要な Linux 管理タスクの自動化を習得します。ファイル管理の基礎を基盤として、ソフトウェアのインストールからユーザー管理、サービス設定、ストレージのプロビジョニング、ネットワーク設定まで、システム管理のライフサイクル全体を管理する方法を探求します。
まず、ansible.builtin.dnf、ansible.builtin.yum_repository、ansible.builtin.rpm_key などのモジュールを使用して、ソフトウェアパッケージ管理とリポジトリ設定を自動化します。次に、ユーザーアカウントを作成・管理し、SSH アクセスを設定し、sudo 権限を設定します。この実験は、cron および systemd を使用したスケジュールタスク、LVM を使用したストレージ管理、ファイルシステム操作へと進み、サービス管理へと進みます。最後に、ネットワークインターフェイスを設定し、システム情報を収集します。
この実験は、エンタープライズ Linux 環境で一般的に遭遇する現実世界のシナリオを重視しており、Infrastructure as Code (IaC) の実践を効果的に実装できるよう準備します。
リポジトリの構成とソフトウェアパッケージの管理
このステップでは、Ansible を使用して RHEL システム上のソフトウェアパッケージ管理を自動化する方法を学びます。Yum リポジトリを設定し、RPM GPG キーを管理し、管理対象ホストでパッケージ情報を収集します。これは、インフラストラクチャ全体で一貫したソフトウェアインストールを維持するために不可欠です。
いくつかの主要なモジュールを使用します。リポジトリ管理には ansible.builtin.yum_repository、GPG キーの処理には ansible.builtin.rpm_key、パッケージ情報の収集には ansible.builtin.package_facts、パッケージのインストールには ansible.builtin.dnf を使用します。
まず、プロジェクト環境をセットアップし、Ansible をインストールします。
ansible-coreパッケージをインストールし、プロジェクトディレクトリに移動します。sudo dnf install -y ansible-core cd ~/project mkdir system-software cd system-software管理対象ホストを定義する Ansible インベントリファイルを作成します。 この実験では、ローカルマシンを管理します。
cat << EOF > inventory.ini
[webservers]
localhost ansible_connection=local

[all:children]
webservers
EOF
リポジトリ設定とパッケージインストールを管理するメインプレイブック
repo_playbook.ymlを作成します。 このプレイブックは、完全なソフトウェア管理ワークフローを示しています。nano repo_playbook.yml包括的なソフトウェア管理プレイブックを作成するために、以下のコンテンツを追加します。
---
- name: Repository Configuration and Software Management
  hosts: all
  become: true
  vars:
    custom_pkg: httpd
  tasks:
    - name: Gather Package Facts
      ansible.builtin.package_facts:
        manager: auto

    - name: Show Package Facts for the custom package (initial check)
      ansible.builtin.debug:
        var: ansible_facts['packages'][custom_pkg]
      when: custom_pkg in ansible_facts['packages']

    - name: Ensure EPEL repository is configured
      ansible.builtin.yum_repository:
        name: epel
        description: Extra Packages for Enterprise Linux 9
        file: epel
        baseurl: https://download.fedoraproject.org/pub/epel/9/Everything/x86_64/
        gpgcheck: yes
        gpgkey: https://download.fedoraproject.org/pub/epel/RPM-GPG-KEY-EPEL-9
        enabled: yes
        state: present

    - name: Import EPEL GPG key
      ansible.builtin.rpm_key:
        state: present
        key: https://download.fedoraproject.org/pub/epel/RPM-GPG-KEY-EPEL-9

    - name: Install the custom package
      ansible.builtin.dnf:
        name: "{{ custom_pkg }}"
        state: present

    - name: Gather Package Facts (after installation)
      ansible.builtin.package_facts:
        manager: auto

    - name: Show Package Facts for the custom package (post-installation)
      ansible.builtin.debug:
        var: ansible_facts['packages'][custom_pkg]
      when: custom_pkg in ansible_facts['packages']

    - name: Display installed package version
      ansible.builtin.debug:
        msg: "{{ custom_pkg }} version {{ ansible_facts['packages'][custom_pkg][0]['version'] }} is installed"
      when: custom_pkg in ansible_facts['packages']
注: この実験の設定ファイルは非常に長いため、ドキュメントを簡潔に保つために詳細な説明は省略します。いずれかの部分について clarification が必要な場合は、コードブロックの左下にある「Explain Code」ボタンをクリックして、Labby による詳細な説明を参照してください。
このプレイブックは、いくつかの重要な概念を示しています。
- パッケージ事実の収集: インストールされているパッケージに関する情報を収集する方法を示します。
- リポジトリ管理: EPEL リポジトリを適切な GPG 検証で設定します。
- GPG キー管理: セキュリティのためにリポジトリの GPG キーをインポートします。
- パッケージインストール: dnf モジュールを使用して指定されたパッケージをインストールします。
- 検証: 更新された事実でパッケージのインストールを確認します。
プレイブックを実行して、完全なソフトウェア管理ワークフローを実際に確認します。
ansible-playbook -i inventory.ini repo_playbook.yml以下のような出力が表示されるはずです。
- 初期パッケージチェック(httpd がインストールされていないため、おそらくスキップされます)
- リポジトリ設定
- GPG キーのインポート
- パッケージのインストール
- インストールされたパッケージを示す最終検証
作成されたリポジトリファイルを確認して、リポジトリ設定を検証します。
cat /etc/yum.repos.d/epel.repoEPEL リポジトリの設定が、baseurl、gpgcheck、gpgkey の設定とともに表示されるはずです。
プレイブックを再度実行して、パッケージ管理の冪等性(idempotency)をテストします。
ansible-playbook -i inventory.ini repo_playbook.ymlAnsible が変更を必要としないタスクに対して「ok」と報告していることに注意してください。これは冪等性を示しています。
リポジトリ設定、GPG キー管理、パッケージインストール検証を含むソフトウェアパッケージ管理を Ansible を使用して正常に自動化しました。
ユーザー管理と SSH 構成の自動化
このステップでは、Ansible を使用してユーザーアカウント管理、SSH 設定、および sudo 権限の自動化方法を学びます。これは、インフラストラクチャ全体で一貫したユーザーアクセスとセキュリティポリシーを維持するために不可欠です。
ユーザー管理には ansible.builtin.user、グループ作成には ansible.builtin.group、SSH キー管理には ansible.posix.authorized_key、設定ファイル変更には ansible.builtin.lineinfile などのモジュールを使用します。
ユーザー管理タスク用の新しいプロジェクトディレクトリに移動します。
cd ~/project mkdir system-users cd system-usersansible.posixコレクションをインストールします。ansible-galaxy collection install ansible.posixこの演習用のインベントリファイルを作成します。
cat << EOF > inventory.ini
[webservers]
localhost ansible_connection=local
EOF
管理したいユーザーとグループを定義する変数ファイルを作成します。
mkdir vars
nano vars/users_vars.yml
ユーザーアカウントとそのグループメンバーシップを定義するために、以下のコンテンツを追加します。
---
users:
  - username: webuser1
    groups: webadmin
  - username: webuser2
    groups: webadmin
  - username: devuser1
    groups: webadmin
ユーザーの SSH キーペアを生成します。 実際の環境では、ユーザーが公開鍵を提供します。
mkdir files

## Generate SSH keys for each user
ssh-keygen -t rsa -b 2048 -f files/webuser1.key -N "" -C "webuser1@example.com"
ssh-keygen -t rsa -b 2048 -f files/webuser2.key -N "" -C "webuser2@example.com"
ssh-keygen -t rsa -b 2048 -f files/devuser1.key -N "" -C "devuser1@example.com"
メインのユーザー管理プレイブック
users.ymlを作成します。 このプレイブックは、グループ、ユーザーを作成し、SSH キーを配布し、sudo アクセスを設定します。nano users.yml包括的なユーザー管理プレイブックを以下に追加します。
---
- name: Create and manage user accounts
  hosts: webservers
  become: true
  vars_files:
    - vars/users_vars.yml
  tasks:
    - name: Create webadmin group
      ansible.builtin.group:
        name: webadmin
        state: present

    - name: Create user accounts
      ansible.builtin.user:
        name: "{{ item['username'] }}"
        groups: "{{ item['groups'] }}"
        shell: /bin/bash
        create_home: yes
        state: present
      loop: "{{ users }}"

    - name: Set up SSH authorized keys
      ansible.posix.authorized_key:
        user: "{{ item['username'] }}"
        key: "{{ lookup('file', 'files/' + item['username'] + '.key.pub') }}"
        state: present
      loop: "{{ users }}"

    - name: Configure sudo access for webadmin group
      ansible.builtin.lineinfile:
        path: /etc/sudoers.d/webadmin
        state: present
        create: yes
        mode: "0440"
        line: "%webadmin ALL=(ALL) NOPASSWD: ALL"
        validate: /usr/sbin/visudo -cf %s

    - name: Configure SSH to disable root login
      ansible.builtin.lineinfile:
        dest: /etc/ssh/sshd_config
        regexp: "^PermitRootLogin"
        line: "PermitRootLogin no"
        backup: yes
      notify: restart sshd

    - name: Configure SSH to disable password authentication
      ansible.builtin.lineinfile:
        dest: /etc/ssh/sshd_config
        regexp: "^PasswordAuthentication"
        line: "PasswordAuthentication no"
        backup: yes
      notify: restart sshd

  handlers:
    - name: restart sshd
      ansible.builtin.service:
        name: sshd
        state: restarted
このプレイブックは、いくつかのユーザー管理のベストプラクティスを示しています。
- グループ管理: 管理グループを作成します。
- ユーザー作成: 適切なホームディレクトリを持つユーザーアカウントを設定します。
- SSH キー管理: キーベース認証のための公開鍵を配布します。
- Sudo 設定: 管理権限を安全に付与します。
- SSH ハードニング: root ログインとパスワード認証を無効にします。
- サービス管理: 設定変更時に SSH サービスを再起動します。
ユーザー管理プレイブックを実行します。
ansible-playbook -i inventory.ini users.ymlプレイブックは、ユーザーを作成し、SSH キーを設定し、sudo アクセスを設定し、SSH 設定を強化します。
ユーザー作成とグループメンバーシップを確認します。
## Check if users were created
getent passwd webuser1 webuser2 devuser1

## Check group membership
groups webuser1
groups webuser2
groups devuser1

## Verify webadmin group exists
getent group webadmin
作成されたユーザーのいずれかに対して SSH キー認証をテストします。
## Test SSH key authentication (this will connect to localhost)
ssh -i files/webuser1.key webuser1@localhost "whoami"
パスワードなしの sudo アクセスをテストして、sudo 設定を確認します。
## Test sudo access for webuser1
ssh -i files/webuser1.key webuser1@localhost "sudo whoami"
SSH 設定の変更を確認します。
## Verify SSH configuration
sudo grep "PermitRootLogin\|PasswordAuthentication" /etc/ssh/sshd_config

## Check sudo configuration
sudo cat /etc/sudoers.d/webadmin
Ansible を使用してユーザーアカウント作成、SSH キー配布、およびセキュリティ設定を正常に自動化し、インフラストラクチャ全体での安全なユーザー管理の基盤を確立しました。
サービス管理とタスクスケジューリングの自動化
このステップでは、Ansible を使用して systemd サービスを管理し、cron ジョブをスケジュールし、システムブートターゲットを設定する方法を学びます。これは、サービス可用性の維持と、インフラストラクチャ全体での定型タスクの自動化に不可欠です。
サービス管理には ansible.builtin.service、タスクスケジューリングには ansible.builtin.cron、単発タスクには ansible.posix.at、システムターゲット管理には ansible.builtin.systemd などのモジュールを使用します。
サービスとプロセス管理用の新しいプロジェクトディレクトリに移動します。
cd ~/project
mkdir system-process
cd system-process
この演習用のインベントリファイルを作成します。
cat << EOF > inventory.ini
[webservers]
localhost ansible_connection=local
EOF
Apache HTTP サーバーサービスを管理するプレイブックを作成します。 これは基本的なサービス管理を示します。
nano service_management.yml以下のコンテンツを追加します。
---
- name: Manage Apache HTTP Server Service
  hosts: webservers
  become: true
  tasks:
    - name: Start and enable httpd service
      ansible.builtin.service:
        name: httpd
        state: started
        enabled: yes

    - name: Create a simple index.html
      ansible.builtin.copy:
        content: |
          <html>
          <head><title>Ansible Managed Server</title></head>
          <body>
          <h1>Welcome to Ansible Managed Apache Server</h1>
          <p>This server is configured and managed by Ansible.</p>
          <p>Service started at: $(date)</p>
          </body>
          </html>
        dest: /var/www/html/index.html
        owner: apache
        group: apache
        mode: "0644"

    - name: Verify httpd service is running
      ansible.builtin.service_facts:

    - name: Display httpd service status
      ansible.builtin.debug:
        var: ansible_facts.services['httpd.service']
cron ジョブスケジューリング用のプレイブックを作成します。 これは自動化されたタスクスケジューリングを示します。
nano create_crontab_file.yml以下のコンテンツを追加します。
--- - name: Schedule recurring cron jobs hosts: webservers become: true tasks: - name: Create labex user for cron jobs ansible.builtin.user: name: labex state: present create_home: yes - name: Schedule system monitoring cron job ansible.builtin.cron: name: System monitoring log job: "date >> /home/labex/system_monitor.log && df -h >> /home/labex/system_monitor.log" minute: "*/5" hour: "*" user: labex cron_file: system-monitoring state: present - name: Schedule daily log rotation ansible.builtin.cron: name: Daily log cleanup job: "find /home/labex -name '*.log' -mtime +7 -delete" minute: "0" hour: "2" weekday: "*" user: labex cron_file: log-cleanup state: present - name: Schedule weekly system update check ansible.builtin.cron: name: Weekly update check job: "dnf check-update > /home/labex/update_check.log 2>&1" minute: "0" hour: "3" weekday: "0" user: labex cron_file: update-check state: presentatを使用した単発タスクスケジューリング用のプレイブックを作成します。nano schedule_at_task.yml以下のコンテンツを追加します。
---
- name: Schedule one-time tasks with at
  hosts: webservers
  become: true
  become_user: labex
  tasks:
    - name: Schedule immediate system info collection
      ansible.posix.at:
        command: "uname -a > ~/system_info_$(date +%Y%m%d_%H%M%S).txt"
        count: 2
        units: minutes
        unique: yes
        state: present

    - name: Schedule delayed service status check
      ansible.posix.at:
        command: "systemctl status httpd > ~/httpd_status_$(date +%Y%m%d_%H%M%S).txt"
        count: 5
        units: minutes
        unique: yes
        state: present
システムブートターゲットを管理するプレイブックを作成します。
nano boot_target_management.yml以下のコンテンツを追加します。
---
- name: Manage system boot targets
  hosts: webservers
  become: true
  tasks:
    - name: Check current default target
      ansible.builtin.command:
        cmd: systemctl get-default
      register: current_target
      changed_when: false

    - name: Display current boot target
      ansible.builtin.debug:
        msg: "Current default boot target: {{ current_target.stdout }}"

    - name: Set default boot target to multi-user
      ansible.builtin.systemd:
        name: multi-user.target
        enabled: yes
      when: current_target.stdout != "multi-user.target"

    - name: Verify the boot target change
      ansible.builtin.command:
        cmd: systemctl get-default
      register: new_target
      changed_when: false

    - name: Display new boot target
      ansible.builtin.debug:
        msg: "New default boot target: {{ new_target.stdout }}"
サービス管理プレイブックを実行します。
ansible-playbook -i inventory.ini service_management.ymlこれにより、httpd サービスが開始され、ウェルカムページが作成されます。
cron ジョブスケジューリングプレイブックを実行します。
ansible-playbook -i inventory.ini create_crontab_file.ymlこれにより、システム監視とメンテナンスのためのいくつかのスケジュール済みタスクが作成されます。
単発タスクスケジューリングプレイブックを実行します。
ansible-playbook -i inventory.ini schedule_at_task.ymlこれにより、
atコマンドを使用した即時タスクがスケジュールされます。ブートターゲット管理プレイブックを実行します。
ansible-playbook -i inventory.ini boot_target_management.ymlこれにより、システムのデフォルトブートターゲットがチェックされ、必要に応じて変更されます。
スケジュールされたタスクとサービスを確認します。
## Check cron jobs
sudo cat /etc/cron.d/system-monitoring
sudo cat /etc/cron.d/log-cleanup
sudo cat /etc/cron.d/update-check

## Check at jobs
sudo atq

## Check httpd service status
sudo systemctl status httpd

## Test the web server
curl localhost

## Check system monitoring log (wait a few minutes for cron to run)
sudo cat /home/labex/system_monitor.log
必要に応じてスケジュールされたタスクを削除するためのクリーンアッププレイブックを作成します。
nano remove_scheduled_tasks.yml以下のコンテンツを追加します。
---
- name: Remove scheduled tasks
  hosts: webservers
  become: true
  tasks:
    - name: Remove system monitoring cron job
      ansible.builtin.cron:
        name: System monitoring log
        user: labex
        cron_file: system-monitoring
        state: absent

    - name: Remove log cleanup cron job
      ansible.builtin.cron:
        name: Daily log cleanup
        user: labex
        cron_file: log-cleanup
        state: absent

    - name: Remove update check cron job
      ansible.builtin.cron:
        name: Weekly update check
        user: labex
        cron_file: update-check
        state: absent
Ansible を使用してサービス管理、タスクスケジューリング、およびシステム設定を正常に自動化し、インフラストラクチャの維持と監視を自動化するための基盤を提供しました。
LVM とファイルシステムによるストレージ管理の自動化
このステップでは、Ansible を使用して LVM の物理ボリューム、ボリュームグループ、論理ボリューム、およびファイルシステムを作成し、ストレージ管理を自動化する方法を学びます。これは、インフラストラクチャ全体でストレージリソースを一貫性がありスケーラブルな方法で管理するために不可欠です。
ボリュームグループ管理には ansible.builtin.lvg、論理ボリューム作成には ansible.builtin.lvol、ファイルシステム作成には ansible.builtin.filesystem、マウントポイント管理には ansible.posix.mount などのモジュールを使用します。
ストレージ管理用の新しいプロジェクトディレクトリに移動します。
cd ~/project
mkdir system-storage
cd system-storage
この演習用のインベントリファイルを作成します。
cat << EOF > inventory.ini
[webservers]
localhost ansible_connection=local
EOF
仮想環境で作業しているため、追加のストレージをシミュレートするループデバイスを作成します。
## Create a 1GB file to use as a virtual disk
sudo dd if=/dev/zero of=/tmp/virtual_disk bs=1M count=1024

## Set up loop device
sudo losetup /dev/loop0 /tmp/virtual_disk

## Verify the loop device
lsblk | grep loop0
包括的なストレージ管理プレイブックを作成します。 これは LVM 操作とファイルシステム管理を示します。
nano storage.yml以下のコンテンツを追加します。
---
- name: Configure LVM storage and filesystems
  hosts: webservers
  become: true
  vars:
    storage_device: /dev/loop0
    volume_group: apache-vg
    content_lv: content-lv
    logs_lv: logs-lv
    backup_lv: backup-lv
  tasks:
    - name: Install LVM utilities
      ansible.builtin.dnf:
        name: lvm2
        state: present

    - name: Create physical volume
      community.general.lvg:
        vg: "{{ volume_group }}"
        pvs: "{{ storage_device }}"
        state: present

    - name: Create logical volume for web content
      community.general.lvol:
        vg: "{{ volume_group }}"
        lv: "{{ content_lv }}"
        size: 256m
        state: present

    - name: Create logical volume for logs
      community.general.lvol:
        vg: "{{ volume_group }}"
        lv: "{{ logs_lv }}"
        size: 256m
        state: present

    - name: Create logical volume for backup
      community.general.lvol:
        vg: "{{ volume_group }}"
        lv: "{{ backup_lv }}"
        size: 256m
        state: present

    - name: Create XFS filesystem on content volume
      community.general.filesystem:
        fstype: xfs
        dev: "/dev/{{ volume_group }}/{{ content_lv }}"
        force: no

    - name: Create XFS filesystem on logs volume
      community.general.filesystem:
        fstype: xfs
        dev: "/dev/{{ volume_group }}/{{ logs_lv }}"
        force: no

    - name: Create ext4 filesystem on backup volume
      community.general.filesystem:
        fstype: ext4
        dev: "/dev/{{ volume_group }}/{{ backup_lv }}"
        force: no

    - name: Create mount points
      ansible.builtin.file:
        path: "{{ item }}"
        state: directory
        mode: "0755"
      loop:
        - /var/www
        - /var/log/httpd
        - /backup

    - name: Mount web content volume
      ansible.posix.mount:
        path: /var/www
        src: "/dev/{{ volume_group }}/{{ content_lv }}"
        fstype: xfs
        opts: defaults
        state: mounted

    - name: Mount logs volume
      ansible.posix.mount:
        path: /var/log/httpd
        src: "/dev/{{ volume_group }}/{{ logs_lv }}"
        fstype: xfs
        opts: defaults
        state: mounted

    - name: Mount backup volume
      ansible.posix.mount:
        path: /backup
        src: "/dev/{{ volume_group }}/{{ backup_lv }}"
        fstype: ext4
        opts: defaults
        state: mounted

    - name: Set appropriate ownership for web content
      ansible.builtin.file:
        path: /var/www
        owner: apache
        group: apache
        recurse: yes

    - name: Set appropriate ownership for httpd logs
      ansible.builtin.file:
        path: /var/log/httpd
        owner: apache
        group: apache
        recurse: yes

    - name: Create html directory for web content
      ansible.builtin.file:
        path: /var/www/html
        state: directory
        owner: apache
        group: apache
        mode: "0755"

    - name: Create sample web content
      ansible.builtin.copy:
        content: |
          <html>
          <head><title>Storage Management Demo</title></head>
          <body>
          <h1>LVM Storage Configuration</h1>
          <p>This content is served from an LVM logical volume managed by Ansible.</p>
          <p>Volume Group: {{ volume_group }}</p>
          <p>Logical Volume: {{ content_lv }}</p>
          <p>Filesystem: XFS</p>
          </body>
          </html>
        dest: /var/www/html/storage.html
        owner: apache
        group: apache
        mode: "0644"
LVM 管理に必要な Ansible コレクションをインストールします。
ansible-galaxy collection install community.generalストレージ管理プレイブックを実行します。
ansible-playbook -i inventory.ini storage.ymlこれにより、LVM 構造、ファイルシステム、およびマウントポイントが作成されます。
ストレージ情報を収集して表示するプレイブックを作成します。
nano get-storage.yml以下のコンテンツを追加します。
---
- name: Gather storage information
  hosts: webservers
  become: true
  tasks:
    - name: Gather disk facts
      ansible.builtin.setup:
        gather_subset:
          - hardware

    - name: Display volume group information
      ansible.builtin.command:
        cmd: vgdisplay apache-vg
      register: vg_info
      changed_when: false

    - name: Display logical volume information
      ansible.builtin.command:
        cmd: lvdisplay apache-vg
      register: lv_info
      changed_when: false

    - name: Display filesystem information
      ansible.builtin.command:
        cmd: df -h /var/www /var/log/httpd /backup
      register: fs_info
      changed_when: false

    - name: Display mount information
      ansible.builtin.command:
        cmd: cat /proc/mounts
      register: mount_info
      changed_when: false

    - name: Show volume group details
      ansible.builtin.debug:
        var: vg_info.stdout_lines

    - name: Show logical volume details
      ansible.builtin.debug:
        var: lv_info.stdout_lines

    - name: Show filesystem usage
      ansible.builtin.debug:
        var: fs_info.stdout_lines

    - name: Show fstab entries
      ansible.builtin.command:
        cmd: grep apache-vg /etc/fstab
      register: fstab_entries
      changed_when: false
      failed_when: false

    - name: Display fstab entries
      ansible.builtin.debug:
        var: fstab_entries.stdout_lines
ストレージ情報収集プレイブックを実行します。
ansible-playbook -i inventory.ini get-storage.ymlこれにより、作成されたストレージ構造に関する詳細情報が表示されます。
ストレージ構成を手動で確認します。
## Check LVM structure
sudo vgs apache-vg
sudo lvs apache-vg
sudo pvs /dev/loop0

## Check filesystems
df -h /var/www /var/log/httpd /backup

## Check mount points
mount | grep apache-vg

## Check fstab entries
grep apache-vg /etc/fstab

## Test the web content
cat /var/www/html/storage.html
スケーリング操作を示すストレージ拡張プレイブックを作成します。
nano expand_storage.yml以下のコンテンツを追加します。
---
- name: Expand storage volumes
  hosts: webservers
  become: true
  vars:
    volume_group: apache-vg
    content_lv: content-lv
  tasks:
    - name: Extend content logical volume
      community.general.lvol:
        vg: "{{ volume_group }}"
        lv: "{{ content_lv }}"
        size: 400m
        state: present

    - name: Extend XFS filesystem
      community.general.filesystem:
        fstype: xfs
        dev: "/dev/{{ volume_group }}/{{ content_lv }}"
        resizefs: yes

    - name: Display updated filesystem size
      ansible.builtin.command:
        cmd: df -h /var/www
      register: new_size
      changed_when: false

    - name: Show new filesystem size
      ansible.builtin.debug:
        var: new_size.stdout_lines
ストレージ拡張をテストします。
## Check current size before expansion
df -h /var/www

## Run the expansion playbook
ansible-playbook -i inventory.ini expand_storage.yml

## Verify the expansion
df -h /var/www
sudo lvs apache-vg/content-lv
Ansible を使用して、物理ボリューム作成、論理ボリューム管理、ファイルシステム作成、およびマウントポイント設定を含む LVM ストレージ管理を正常に自動化しました。
ネットワーク構成と情報収集の自動化
この最終ステップでは、Ansible を使用してネットワークインターフェイス構成を自動化し、包括的なシステム情報を収集する方法を学びます。これにより、ソフトウェアからストレージ、ネットワークに至るまで、システム管理の自動化の全範囲が完了します。
ネットワーク構成ファイルには ansible.builtin.template モジュールを使用し、ネットワークファクトを収集し、包括的なシステムレポートを作成します。
ネットワーク管理用の新しいプロジェクトディレクトリに移動します。
cd ~/project
mkdir system-network
cd system-network
この演習用のインベントリファイルを作成します。
cat << EOF > inventory.ini
[webservers]
localhost ansible_connection=local
EOF
包括的なネットワークおよびシステム情報収集プレイブックを作成します。
nano network_info.yml以下のコンテンツを追加します。
---
- name: Gather comprehensive system information
  hosts: webservers
  become: true
  tasks:
    - name: Gather all system facts
      ansible.builtin.setup:

    - name: Create system report directory
      ansible.builtin.file:
        path: /tmp/system_reports
        state: directory
        mode: "0755"

    - name: Generate system information report
      ansible.builtin.template:
        src: system_report.j2
        dest: /tmp/system_reports/system_info_{{ ansible_facts['hostname'] }}.html
        mode: "0644"

    - name: Generate network configuration report
      ansible.builtin.template:
        src: network_report.j2
        dest: /tmp/system_reports/network_info_{{ ansible_facts['hostname'] }}.html
        mode: "0644"

    - name: Collect network interface information
      ansible.builtin.command:
        cmd: ip addr show
      register: ip_info
      changed_when: false

    - name: Collect routing information
      ansible.builtin.command:
        cmd: ip route show
      register: route_info
      changed_when: false

    - name: Collect DNS configuration
      ansible.builtin.command:
        cmd: cat /etc/resolv.conf
      register: dns_info
      changed_when: false

    - name: Display network summary
      ansible.builtin.debug:
        msg: |
          System: {{ ansible_facts['hostname'] }}
          OS: {{ ansible_facts['distribution'] }} {{ ansible_facts['distribution_version'] }}
          Kernel: {{ ansible_facts['kernel'] }}
          Default IPv4: {{ ansible_facts['default_ipv4']['address'] | default('N/A') }}
          Default Interface: {{ ansible_facts['default_ipv4']['interface'] | default('N/A') }}
          Total Memory: {{ ansible_facts['memtotal_mb'] }}MB
          CPU Cores: {{ ansible_facts['processor_vcpus'] }}
レポート用のテンプレートディレクトリとファイルを作成します。
mkdir templates
nano templates/system_report.j2
システムレポートテンプレートに以下のコンテンツを追加します。
<!doctype html>
<html>
  <head>
    <title>System Report - {{ ansible_facts['hostname'] }}</title>
    <style>
      body {
        font-family: Arial, sans-serif;
        margin: 20px;
      }
      .section {
        margin-bottom: 20px;
        padding: 10px;
        border: 1px solid #ccc;
      }
      .header {
        background-color: #f5f5f5;
        padding: 10px;
      }
      table {
        border-collapse: collapse;
        width: 100%;
      }
      th,
      td {
        border: 1px solid #ddd;
        padding: 8px;
        text-align: left;
      }
      th {
        background-color: #f2f2f2;
      }
    </style>
  </head>
  <body>
    <div class="header">
      <h1>System Report for {{ ansible_facts['hostname'] }}</h1>
      <p>
        Generated on: {{ ansible_date_time.date }} {{ ansible_date_time.time
        }}
      </p>
    </div>

    <div class="section">
      <h2>System Information</h2>
      <table>
        <tr>
          <th>Property</th>
          <th>Value</th>
        </tr>
        <tr>
          <td>Hostname</td>
          <td>{{ ansible_facts['hostname'] }}</td>
        </tr>
        <tr>
          <td>FQDN</td>
          <td>{{ ansible_facts['fqdn'] }}</td>
        </tr>
        <tr>
          <td>Operating System</td>
          <td>
            {{ ansible_facts['distribution'] }} {{
            ansible_facts['distribution_version'] }}
          </td>
        </tr>
        <tr>
          <td>Kernel</td>
          <td>{{ ansible_facts['kernel'] }}</td>
        </tr>
        <tr>
          <td>Architecture</td>
          <td>{{ ansible_facts['architecture'] }}</td>
        </tr>
        <tr>
          <td>CPU Cores</td>
          <td>{{ ansible_facts['processor_vcpus'] }}</td>
        </tr>
        <tr>
          <td>Total Memory</td>
          <td>{{ ansible_facts['memtotal_mb'] }}MB</td>
        </tr>
        <tr>
          <td>Uptime</td>
          <td>{{ ansible_facts['uptime_seconds'] }} seconds</td>
        </tr>
      </table>
    </div>

    <div class="section">
      <h2>Storage Information</h2>
      <table>
        <tr>
          <th>Mount Point</th>
          <th>Filesystem</th>
          <th>Size</th>
          <th>Used</th>
          <th>Available</th>
        </tr>
        {% for mount in ansible_facts['mounts'] %}
        <tr>
          <td>{{ mount.mount }}</td>
          <td>{{ mount.fstype }}</td>
          <td>
            {{ (mount.size_total / 1024 / 1024 / 1024) | round(2) }}GB
          </td>
          <td>
            {{ ((mount.size_total - mount.size_available) / 1024 / 1024 /
            1024) | round(2) }}GB
          </td>
          <td>
            {{ (mount.size_available / 1024 / 1024 / 1024) | round(2) }}GB
          </td>
        </tr>
        {% endfor %}
      </table>
    </div>

    <div class="section">
      <h2>Services Status</h2>
      <table>
        <tr>
          <th>Service</th>
          <th>Status</th>
        </tr>
        <tr>
          <td>httpd</td>
          <td>
            {{ ansible_facts.services['httpd.service']['state'] |
            default('not installed') }}
          </td>
        </tr>
        <tr>
          <td>sshd</td>
          <td>
            {{ ansible_facts.services['sshd.service']['state'] |
            default('unknown') }}
          </td>
        </tr>
        <tr>
          <td>NetworkManager</td>
          <td>
            {{ ansible_facts.services['NetworkManager.service']['state'] |
            default('unknown') }}
          </td>
        </tr>
      </table>
    </div>
  </body>
</html>
ネットワークレポートテンプレートを作成します。
nano templates/network_report.j2以下のコンテンツを追加します。
<!doctype html>
<html>
  <head>
    <title>Network Report - {{ ansible_facts['hostname'] }}</title>
    <style>
      body {
        font-family: Arial, sans-serif;
        margin: 20px;
      }
      .section {
        margin-bottom: 20px;
        padding: 10px;
        border: 1px solid #ccc;
      }
      .header {
        background-color: #f5f5f5;
        padding: 10px;
      }
      table {
        border-collapse: collapse;
        width: 100%;
      }
      th,
      td {
        border: 1px solid #ddd;
        padding: 8px;
        text-align: left;
      }
      th {
        background-color: #f2f2f2;
      }
      pre {
        background-color: #f9f9f9;
        padding: 10px;
        overflow-x: auto;
      }
    </style>
  </head>
  <body>
    <div class="header">
      <h1>Network Configuration Report</h1>
      <p>Host: {{ ansible_facts['hostname'] }}</p>
      <p>
        Generated on: {{ ansible_date_time.date }} {{ ansible_date_time.time
        }}
      </p>
    </div>

    <div class="section">
      <h2>Network Interfaces</h2>
      <table>
        <tr>
          <th>Interface</th>
          <th>IPv4 Address</th>
          <th>IPv6 Address</th>
          <th>MAC Address</th>
          <th>Status</th>
        </tr>
        {% for interface_name in ansible_facts['interfaces'] %} {% if
        interface_name != 'lo' %} {% set interface_facts =
        ansible_facts[interface_name] %}
        <tr>
          <td>{{ interface_name }}</td>
          <td>
            {{ interface_facts.get('ipv4', {}).get('address', 'N/A') }}
          </td>
          <td>
            {{ interface_facts.get('ipv6', [{}])[0].get('address', 'N/A') if
            interface_facts.get('ipv6') else 'N/A' }}
          </td>
          <td>{{ interface_facts.get('macaddress', 'N/A') }}</td>
          <td>
            {{ interface_facts.get('active', false) | ternary('Active',
            'Inactive') }}
          </td>
        </tr>
        {% endif %} {% endfor %}
      </table>
    </div>

    <div class="section">
      <h2>Default Gateway</h2>
      <table>
        <tr>
          <th>Property</th>
          <th>Value</th>
        </tr>
        <tr>
          <td>Default IPv4 Address</td>
          <td>
            {{ ansible_facts['default_ipv4']['address'] | default('N/A') }}
          </td>
        </tr>
        <tr>
          <td>Default Interface</td>
          <td>
            {{ ansible_facts['default_ipv4']['interface'] | default('N/A')
            }}
          </td>
        </tr>
        <tr>
          <td>Default Gateway</td>
          <td>
            {{ ansible_facts['default_ipv4']['gateway'] | default('N/A') }}
          </td>
        </tr>
      </table>
    </div>

    <div class="section">
      <h2>DNS Configuration</h2>
      <table>
        <tr>
          <th>DNS Servers</th>
        </tr>
        {% for dns in ansible_facts['dns']['nameservers'] %}
        <tr>
          <td>{{ dns }}</td>
        </tr>
        {% endfor %}
      </table>
    </div>
  </body>
</html>
ネットワークインターフェイス構成プレイブックを作成します。
nano configure_network.yml以下のコンテンツを追加します。
---
- name: Configure network settings
  hosts: webservers
  become: true
  tasks:
    - name: Install NetworkManager if not present
      ansible.builtin.dnf:
        name: NetworkManager
        state: present

    - name: Ensure NetworkManager is running
      ansible.builtin.service:
        name: NetworkManager
        state: started
        enabled: yes

    - name: Configure hosts file with system information
      ansible.builtin.lineinfile:
        path: /etc/hosts
        line: "{{ ansible_facts['default_ipv4']['address'] }} {{ ansible_facts['hostname'] }}.lab.example.com {{ ansible_facts['hostname'] }}"
        regexp: ".*{{ ansible_facts['hostname'] }}.*"
        backup: yes

    - name: Create network monitoring script
      ansible.builtin.copy:
        content: |
          #!/bin/bash
          ## Network monitoring script generated by Ansible
          echo "=== Network Status Report ==="
          echo "Generated at: $(date)"
          echo
          echo "=== Interface Status ==="
          ip addr show
          echo
          echo "=== Routing Table ==="
          ip route show
          echo
          echo "=== DNS Configuration ==="
          cat /etc/resolv.conf
          echo
          echo "=== Network Connectivity Test ==="
          ping -c 3 8.8.8.8
        dest: /usr/local/bin/network-status.sh
        mode: "0755"

    - name: Create network information gathering cron job
      ansible.builtin.cron:
        name: Network status monitoring
        job: "/usr/local/bin/network-status.sh >> /var/log/network-status.log 2>&1"
        minute: "*/15"
        user: root
        cron_file: network-monitoring
        state: present
ネットワーク情報収集プレイブックを実行します。
ansible-playbook -i inventory.ini network_info.ymlこれにより、包括的なシステムおよびネットワークレポートが生成されます。
ネットワーク構成プレイブックを実行します。
ansible-playbook -i inventory.ini configure_network.ymlこれにより、ネットワーク設定と監視が構成されます。
生成されたレポートを表示します。
## List generated reports
ls -la /tmp/system_reports/

## View the system report (you can also open in a browser)
cat /tmp/system_reports/system_info_*.html

## Check the network monitoring script
cat /usr/local/bin/network-status.sh

## Test the network monitoring script
sudo /usr/local/bin/network-status.sh

## Check the network monitoring cron job
sudo cat /etc/cron.d/network-monitoring
すべての学習済み概念を組み合わせた、最終的な包括的プレイブックを作成します。
nano complete_system_setup.yml以下のコンテンツを追加します。
---
- name: Complete system setup and configuration
  hosts: webservers
  become: true
  vars:
    admin_users:
      - webuser1
      - webuser2
  tasks:
    - name: Ensure all required packages are installed
      ansible.builtin.dnf:
        name:
          - httpd
          - lvm2
          - NetworkManager
          - cronie
        state: present

    - name: Ensure all services are running
      ansible.builtin.service:
        name: "{{ item }}"
        state: started
        enabled: yes
      loop:
        - httpd
        - NetworkManager
        - crond

    - name: Generate final system status report
      ansible.builtin.template:
        src: system_report.j2
        dest: /tmp/final_system_report.html
        mode: "0644"

    - name: Display completion message
      ansible.builtin.debug:
        msg: |
          ============================================
          RHEL System Administration Automation Complete!
          ============================================

          Summary of configured components:
          - Software: EPEL repository and packages installed
          - Users: {{ admin_users | length }} administrative users created
          - Services: httpd, NetworkManager, and crond configured
          - Storage: LVM volumes and filesystems configured
          - Network: Interface configuration and monitoring set up
          - Scheduling: Cron jobs and at tasks configured

          Reports available at:
          - /tmp/system_reports/
          - /tmp/final_system_report.html

          Your RHEL system is now fully automated with Ansible!
最終的な包括的セットアップを実行します。
ansible-playbook -i inventory.ini complete_system_setup.yml
Ansible を使用して、ソフトウェア管理、ユーザー管理、サービス管理、ストレージ構成、およびネットワークセットアップを網羅する RHEL システム管理タスクの包括的な自動化を正常に完了しました。
生成されたレポートを Web ブラウザでプレビューします。
レポートディレクトリに移動します。
cd /tmp/system_reportsPython を使用して一時的な Web サーバーを起動します。
python -m http.server 8000ブラウザでレポートをプレビューするには:
- 上部のメニューバーにある + ボタンをクリックします。
- Web Service を選択します。
- ポート番号 8000 を入力します。
- これで、生成された HTML レポートをオンラインで表示できます。
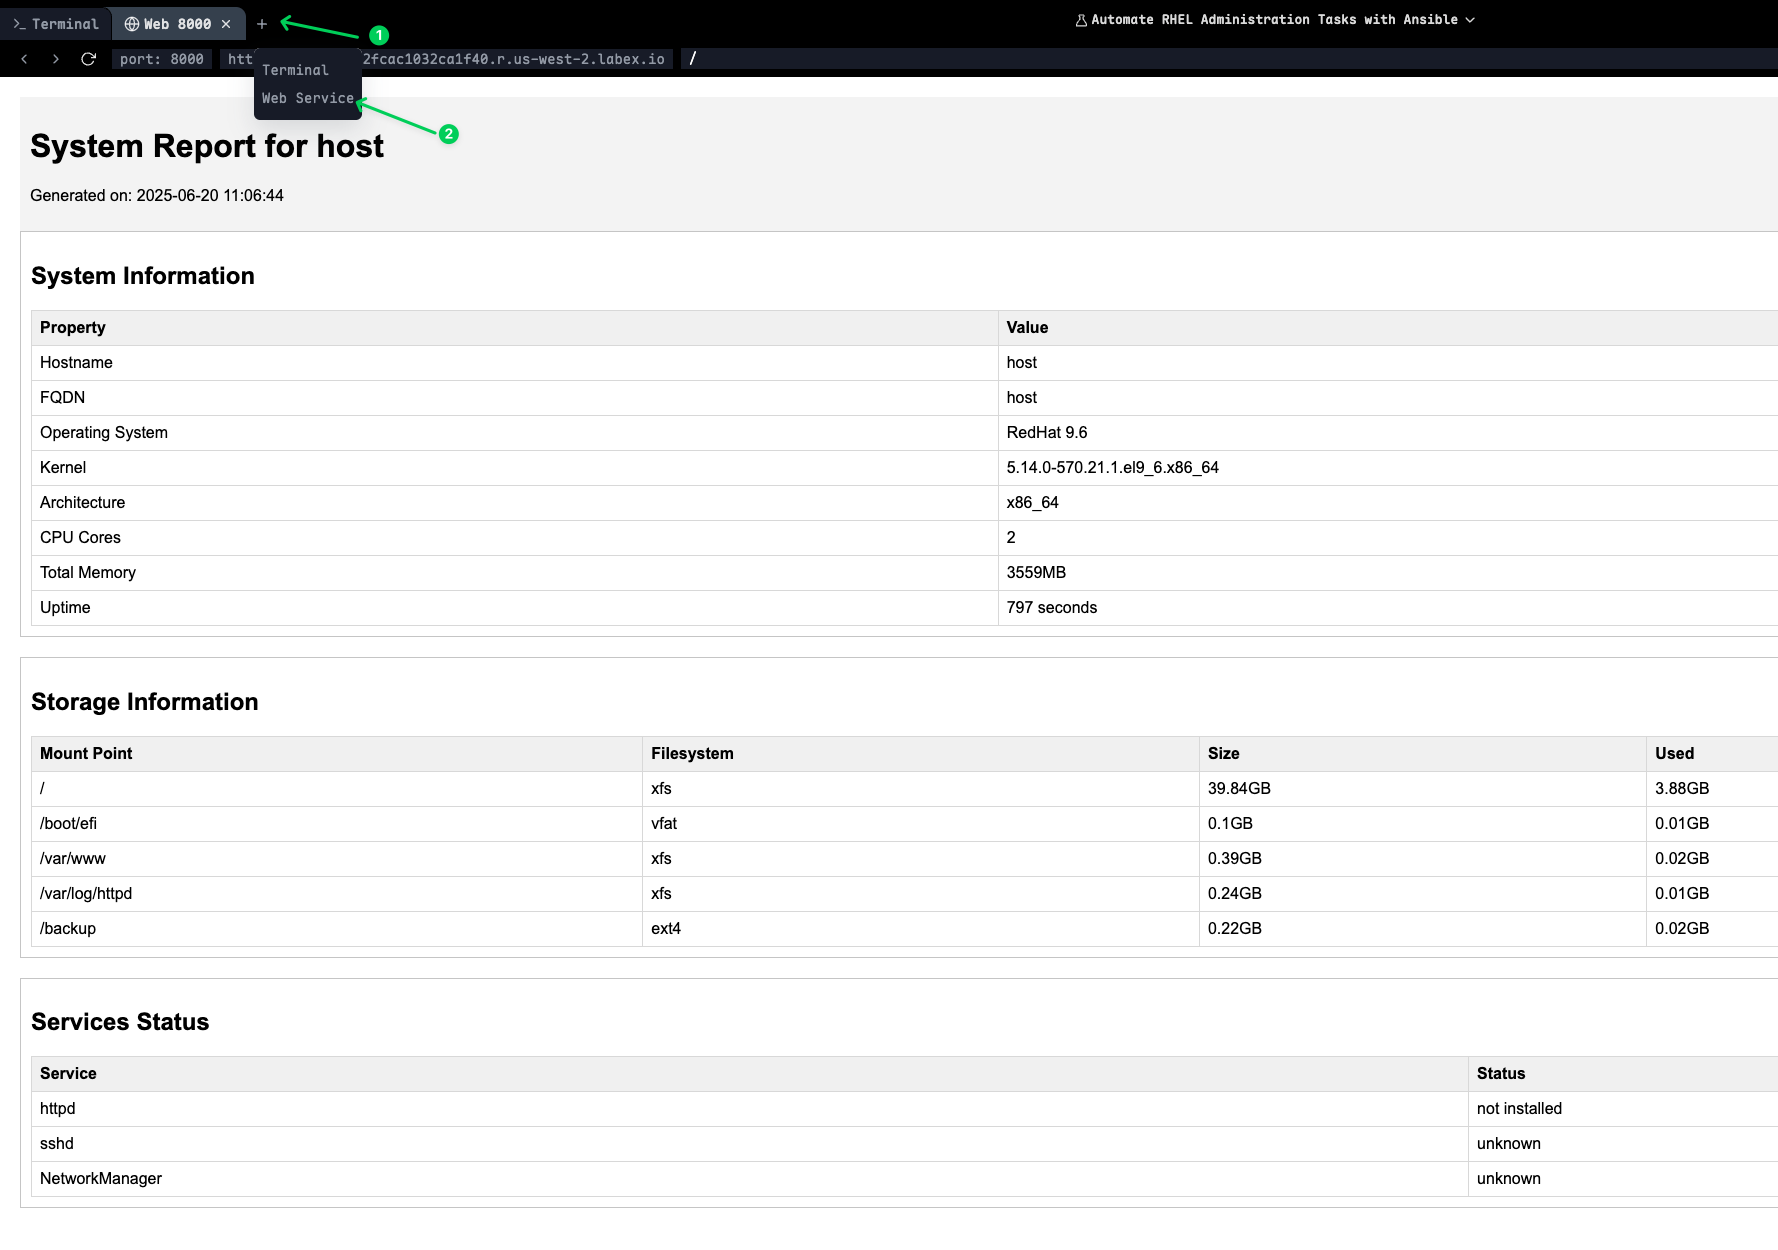
Web サーバーはディレクトリリストを表示し、そこから HTML ファイルをクリックして、Ansible プレイブックによって生成された包括的なシステムおよびネットワークレポートを表示できます。
注意: レポートの表示が終了したら、Web サーバーを停止するには
Ctrl+Cを押してください。
まとめ
この包括的な実験では、Ansible を使用して、必須の Red Hat Enterprise Linux (RHEL) 管理タスクの自動化を習得しました。ソフトウェアパッケージ管理から始め、リポジトリの構成、GPG キーの管理、パッケージのインストール方法を学び、パッケージファクトを通じてシステム情報を収集しました。これにより、インフラストラクチャ全体での一貫したソフトウェア展開の基盤が確立されました。
次に、ユーザー管理と認証に進み、ユーザーアカウントの作成を自動化し、SSH キーベース認証を構成し、sudo 権限を設定し、SSH 構成を強化しました。これにより、エンタープライズ環境に不可欠な、安全で標準化されたユーザーアクセスポリシーが確立されました。
実験はサービス管理とタスクスケジューリングに進み、systemd サービス、繰り返し実行される cron ジョブの作成、at を使用した単発タスクのスケジューリング、およびシステムブートターゲットの構成方法を学びました。これらのスキルは、サービス可用性の維持と定期的なメンテナンスタスクの自動化に不可欠です。
ストレージ管理は、物理ボリュームの作成、ボリュームグループ管理、論理ボリュームのプロビジョニング、ファイルシステムの作成、およびマウントポイント構成を含む、包括的な LVM 自動化を通じてカバーされました。また、スケーラブルなインフラストラクチャ管理に不可欠な、ストレージボリュームの動的な拡張方法も学びました。
最後に、ネットワーク構成の自動化と包括的なシステム監視を完了しました。ネットワークファクトの収集、インターフェイスの構成、Jinja2 テンプレートを使用した詳細なシステムレポートの作成、および自動監視スクリプトの設定方法を学びました。これにより、システム状態管理とレポート作成の完全な全体像が得られました。
この実験全体を通して、インフラストラクチャ・アズ・コード (IaC) の原則を適用し、すべてのシステム構成が再現可能で、バージョン管理され、一貫して展開可能であることを保証しました。これで、初期展開から継続的なメンテナンスおよび監視に至るまで、RHEL システム管理のライフサイクル全体を自動化するスキルを習得しました。