



介绍
Moonroom 是一个展示真实阿波罗照片的小型展览。照片集已准备好,但当前展览还没有照片卡片。你将制作一张语义明确的卡片,根据数据扩展为完整照片集,再让图库在窄屏和宽屏上都清晰可读。独立的 Study collection 会在开始前展示预期的浏览体验。
你需要了解基本 HTML 结构、CSS 选择器与布局,以及 JavaScript 对象、数组和 DOM 事件。本实验会介绍这里使用的 figure、figcaption、原生按钮、稳定照片 ID、forEach、dataset 和响应式规则。第一个实验已准备好详细查看器;下一个实验会让你构建它的行为。作者估计需要 50 分钟,包含阅读和处理常见编辑错误的时间。
打开或刷新网站页面后,请等页面加载完成,再操作照片控件。用 WebIDE 编辑 /home/labex/project/moonroom,用 Web 8080 浏览网站。本实验只编辑 index.html、gallery.js 和 styles.css。保留 photos.js、viewer.js、images/ 和 credits.html。提供的图片文件和元数据必须始终与原有 ID 对应。所有网站标签保持英文。这些实际键盘检查并不构成完整的无障碍认证。
让一张照片与其含义对应
本步骤先用键盘体验可用的展览,再为自己的展览制作第一张卡片。
切换到 Web 8080,选择页面链接 Study collection。这是单独准备的示例,不属于你可以修改的工作区。按 Tab,直到第一张 Earthrise 照片按钮出现可见轮廓,再按 Enter。详细视图会显示月球地平线上方的地球。按 Esc:焦点回到同一张卡片。注意另一张 Earthrise 的照片和说明不同。标题是标签,并不是唯一身份。
选择页面链接 Current exhibition,返回自己的页面。这个链接在网站内部导航,并不是切换 LabEx 的 Tab。你的页面最初只有标题和图片署名,没有卡片。这就是你将要改变的未完成状态。
切换到 WebIDE。在 Explorer 中打开 /home/labex/project 下的 moonroom 文件夹。如果 Explorer 隐藏了,选择 View → Explorer。打开 photos.js。photos 数组的每个对象代表一张照片,把以下相关值放在一起:
| 字段 | 含义 |
|---|---|
id |
稳定身份,例如 earthrise-eight;两张照片的标题可以相同。 |
thumbnail |
用于卡片的真实本地小尺寸版本。 |
large |
查看器中对应的大尺寸版本。 |
alt |
为无法看到图片的人描述图片内容的有意义文字。 |
title 和 caption |
可见名称及背景说明。 |
不要编辑这个文件。第一条记录的缩略图是 images/earthrise-eight-thumb.jpg,大图是 images/earthrise-eight.jpg。相对图片路径根据 HTML 页面的地址解析,与编辑器当前文件夹无关。大小写和 .jpg 扩展名都必须正确。
figure 将图片与它的 figcaption 组合在一起。按钮让打开照片成为原生键盘操作:它可以通过 Tab 获得焦点,也能用 Enter 激活。只有鼠标点击处理器的 div 不会自动拥有这些行为。type="button" 明确指定按钮用途。可见标题和说明不需要悬停就能阅读。aria-label 为按钮提供简短的无障碍名称 Open Earthrise;alt 描述图片包含的内容。由于两张照片共用这个名称,aria-describedby 还会通过说明文字的唯一 id 将按钮与说明关联起来。说明提供 Apollo 8 或 Apollo 11 等可区分的背景。无障碍名称识别控件,关联的描述补充背景。这能避免无法看到图片的人遇到两个名称相同、无法区分的控件。占位符或背景图片不能提供这样的图片描述。
data-photo-card 属性标识完整卡片容器;data-photo-id 标识打开照片的按钮。两者都使用记录的稳定 ID。保留这些小型关联属性,数据、卡片和查看器才能引用同一张照片;它们不是可见文字。卡片可以有额外包裹层,但按钮和说明必须属于最近的、具有匹配 data-photo-card 的容器。
打开 index.html,用 Ctrl+A 或 Cmd+A 选中全部文字,然后替换为下面完整的 HTML。保留 script 行:defer 会在 HTML 解析后按列出的顺序执行这些脚本。photos.js 提供数据;下一步的 gallery.js 将生成照片集;已准备好的 viewer.js 处理本实验的详细查看。dialog 标记就是刚才体验的面板;下一个实验会解释并构建其行为。
<!doctype html>
<html lang="en">
<head>
  <meta charset="utf-8">
  <meta name="viewport" content="width=device-width, initial-scale=1">
  <title>Moonroom — A little farther from home</title>
  <link rel="stylesheet" href="styles.css">
  <script src="photos.js" defer></script>
  <script src="gallery.js" defer></script>
  <script src="viewer.js" defer></script>
</head>
<body>
  <main>
    <header>
      <nav aria-label="Exhibitions"><a href="/">Current exhibition</a> · <a href="/example/">Study collection</a></nav>
      <p class="eyebrow">Moonroom / Photographic studies</p>
      <h1>A little farther from home.</h1>
      <p class="intro">Three moments from the Apollo archive. Take a closer look.</p>
    </header>
    <section id="gallery" class="photo-grid" aria-label="Photographs">
      <figure data-photo-card="earthrise-eight">
        <button type="button" class="photo-button" data-photo-id="earthrise-eight" aria-label="Open Earthrise" aria-describedby="caption-earthrise-eight">
          <img src="images/earthrise-eight-thumb.jpg" alt="Blue and white Earth above the grey lunar horizon">
          <span class="photo-name">Earthrise</span>
        </button>
        <figcaption id="caption-earthrise-eight">Apollo 8 · Earth above the Moon, December 1968.</figcaption>
      </figure>
    </section>
    <footer>Photographs: NASA. An independent educational exhibition. <a href="credits.html">Image credits</a></footer>
  </main>
  <dialog id="viewer" aria-labelledby="photo-title" aria-describedby="photo-caption">
    <button id="close" type="button" autofocus>Close</button>
    <h2 id="photo-title"></h2>
    <img id="large-photo" alt="">
    <p id="photo-error" role="status"></p>
    <p id="photo-caption"></p>
    <nav aria-label="Photo navigation">
      <button id="previous" type="button">Previous</button>
      <p id="photo-position"></p>
      <button id="next" type="button">Next</button>
    </nav>
  </dialog>
</body>
</html>
用 Ctrl+S 或 Cmd+S 保存。切换到 Web 8080,必要时选择 Current exhibition,然后刷新该网站页面。应该看到一张 Earthrise 卡片、真实照片和 Apollo 8 说明。目前布局还很朴素,稍后会添加样式。用 Tab 到达卡片,Enter 打开,Esc 返回。大图应该呈现同一场景的更多细节。
如果图片损坏或页面空白,返回 WebIDE。确认文件名为 index.html,保存在 moonroom 内,并且 src、引号和结束标签与示例一致。保存后重新打开 Current exhibition 并刷新。不要重置环境,也不要换另一张图片来掩盖错误路径。需要时可以重新复制完整 HTML 来恢复整个文件。
真实卡片可见后再运行本步骤检查。检查只查看你当前的展览,不会检查独立示例。
渲染所有记录并保留身份
本步骤将手写的单张卡片替换为根据完整数组生成的卡片。
留在 WebIDE,重新打开 photos.js 进行对照。第一条和第三条记录都叫 Earthrise,但 ID、图片路径和说明不同。按标题查找照片会丢失这个区别。完成后的图库必须为三个提供的 ID 各显示一个独立可见的打开按钮,并配有匹配的缩略图、标题、替代文本和说明。保留提供的顺序和数据。
现在打开 gallery.js。document.querySelector('#gallery') 选择 id 为 gallery 的元素。replaceChildren() 清空该元素,移除临时手写卡片,避免重复显示。photos.forEach(function (photo) { ... }) 按顺序对每条数组记录调用其中的函数一次;photo 是当前对象。这与循环的重复工作思路相同,只是将每条记录传给函数。
document.createElement() 在内存中创建真正的 HTML 元素。赋值给 textContent 会把内容当作文字,而不是作为 HTML 解析。append() 按列出的顺序插入已准备的元素。浏览器看到的仍然是第一张卡片中 figure、按钮、图片和说明的关系。
dataset 读写 data- 属性。JavaScript 使用驼峰命名:figure.dataset.photoCard 写入 data-photo-card,button.dataset.photoId 写入 data-photo-id。两者都使用 photo.id,显示的标题则使用 photo.title。每条说明还会把 caption- 和 photo.id 拼接成唯一 id,按钮的 aria-describedby 引用该说明 ID。可见说明留在按钮外部,但与按钮关联。setAttribute() 设置 aria-label 等属性;+ 运算符将文字 Open 与标题连接起来。这里不需要字符串模板语法。
用下面完整代码替换 gallery.js 的全部内容,然后保存:
const gallery = document.querySelector('#gallery');
gallery.replaceChildren();
photos.forEach(function (photo) {
  const figure = document.createElement('figure');
  figure.dataset.photoCard = photo.id;
  const button = document.createElement('button');
  button.type = 'button';
  button.className = 'photo-button';
  button.dataset.photoId = photo.id;
  button.setAttribute('aria-label', 'Open ' + photo.title);
  const image = document.createElement('img');
  image.src = photo.thumbnail;
  image.alt = photo.alt;
  const title = document.createElement('span');
  title.className = 'photo-name';
  title.textContent = photo.title;
  const caption = document.createElement('figcaption');
  caption.id = 'caption-' + photo.id;
  button.setAttribute('aria-describedby', caption.id);
  caption.textContent = photo.caption;
  button.append(image, title);
  figure.append(button, caption);
  gallery.append(figure);
});
切换到 Web 8080,刷新 Current exhibition。应该依次看到 Earthrise、A trace of a visitor 和第二张 Earthrise。每条说明都显示在其按钮下方。足印是竖幅照片,两张 Earthrise 是方形照片。图库随后会让缩略图使用一致的画框,同时在详细查看时保留不同的比例。
用 Tab 和 Enter 分别打开每张卡片。第一张 Earthrise 的说明是 Apollo 8,最后一张是 Apollo 11。每次打开后按 Esc,检查焦点是否回到刚才使用的卡片;从最后一张打开时也应回到最后一张,而不是总回第一张。
如果仍然只有一张卡片,脚本可能未保存、存在语法错误,或保存在错误文件夹中。返回 WebIDE,将 gallery.js 与完整代码块比较,并检查 forEach 末尾的 });。不要修改 photos.js,使不同记录变得一样。保存并刷新网站,重新对照卡片后再运行检查。
让图库适应屏幕并显示键盘焦点
本步骤让完整展览在窄屏上清晰可读,也让当前获得焦点的卡片容易辨认。
返回 WebIDE,打开 styles.css。响应式布局会根据可用空间调整,而不是强制使用固定页面宽度。本样式表使用你在 CSS 基础中见过的 flexbox。display: flex 将卡片排成一行;flex-wrap: wrap 允许换行;gap 在卡片之间留出间距。flex: 1 1 260px 让 figure 可以增长、缩小,并以 260 像素作为首选宽度。min-width: 0 允许长内容在卡片内收缩,而不是把整个页面撑宽。
卡片图片使用 width: 100% 和 aspect-ratio: 4 / 3,形成一致的画框。object-fit: cover 会通过裁切显示边缘来填满缩略图画框,并不改变文件。详细图片则使用 object-fit: contain、max-width 和 max-height,让整张图片以原有比例显示。vw 和 vh 分别是视口宽度和高度的百分之一。min() 限制尺寸上限,clamp() 让标题字号在最小值与最大值之间增长。overflow-wrap: anywhere 允许很长的标题换行,而不是撑宽页面。
:focus-visible 选择应当显示键盘焦点的控件。高对比度轮廓和 outline-offset 能突出当前按钮,而不移动布局。不要在没有提供其他清晰指示的情况下移除浏览器轮廓。本项目接受至少 2 像素宽的明显焦点轮廓、至少 2 像素宽的明显可见边框,或控件获得键盘焦点时出现的可见阴影。只要保留这些可观察的行为,你可以改变配色或布局。
下面的规则保留已准备的查看器:::backdrop 设置模态对话框后方的背景;:disabled 在视觉上区分边界按钮;虽然普通查看器图片使用 display: block,但 [hidden] 必须真正隐藏加载失败的图片。减少动态效果的媒体查询尊重浏览器的动态效果偏好;这个展览没有动画过渡。
用下面完整样式表替换 styles.css 的全部内容并保存:
* { box-sizing: border-box; }
body { margin: 0; background: #f5f1e8; color: #252c28; font: 17px/1.6 system-ui, sans-serif; }
main { max-width: 1160px; margin: auto; padding: 40px 24px; }
header { max-width: 760px; margin-bottom: 40px; }
.eyebrow { color: #6e593f; font-size: 12px; letter-spacing: .16em; text-transform: uppercase; }
h1 { margin: 12px 0; font: clamp(2.5rem, 6vw, 5rem)/1.08 Georgia, serif; }
.intro { max-width: 40rem; color: #5c655e; }
.photo-grid { display: flex; flex-wrap: wrap; gap: 28px; }
figure { flex: 1 1 260px; min-width: 0; margin: 0; }
button { color: inherit; font: inherit; cursor: pointer; }
.photo-button { width: 100%; padding: 0; text-align: left; background: transparent; border: 0; }
.photo-button img { display: block; width: 100%; aspect-ratio: 4 / 3; object-fit: cover; border-radius: 4px; }
.photo-name { display: block; margin-top: 12px; font: 1.5rem/1.3 Georgia, serif; overflow-wrap: anywhere; }
figcaption { margin-top: 6px; color: #5c655e; font-size: 14px; }
a { color: #814820; text-underline-offset: 4px; }
button:focus-visible, a:focus-visible { outline: 3px solid #af421f; outline-offset: 5px; }
footer { margin-top: 48px; border-top: 1px solid #d1c8b8; padding-top: 18px; color: #5c655e; font-size: 13px; }
dialog { width: min(880px, 94vw); max-height: 94vh; overflow: auto; padding: 24px; border: 0; border-radius: 8px; background: #fffcf6; color: #252c28; }
dialog::backdrop { background: #19251fe6; }
dialog h2 { font: 1.8rem/1.3 Georgia, serif; overflow-wrap: anywhere; }
dialog img { display: block; max-width: 100%; max-height: 52vh; margin: auto; object-fit: contain; }
dialog img[hidden] { display: none; }
dialog button { padding: 8px 14px; border: 1px solid #6c746b; border-radius: 4px; background: #fffcf6; }
dialog nav { display: flex; align-items: center; justify-content: space-between; gap: 12px; }
dialog button:disabled { opacity: .45; cursor: default; }
#photo-position { white-space: nowrap; }
#photo-error { color: #9b301c; }
#photo-error:empty { display: none; }
@media (prefers-reduced-motion: reduce) { * { scroll-behavior: auto; } }
切换到 Web 8080,刷新 Current exhibition。宽视口下卡片共用一行,窄视口下则堆叠成清晰的单列。将浏览器或网站面板调整到大约 390 像素宽,再重新加宽。页面不应出现水平滚动、标题截断或卡片丢失。打开后的真实大图应保留竖幅或方形形状。
从页面开始连续按 Tab。网站链接和三个照片按钮都应显示可见的焦点轮廓。Enter 打开获得焦点的照片,Esc 返回。任何说明都不应依赖鼠标悬停。打开 Image credits,确认真正的页面列出了 NASA 图片来源,再选择 Current exhibition 返回。这些都是网站链接,与切换 WebIDE 和 Web 8080 不同。
如果布局仍然朴素,确认保存的文件名是 styles.css,并且 index.html 仍链接到它。如果卡片比页面宽,检查 min-width: 0、图片上的 width: 100%,以及 flex 换行规则。需要时恢复完整样式表;保留每张照片,不要隐藏难处理的卡片。检查两种屏幕尺寸和键盘路径后,再运行最终检查。
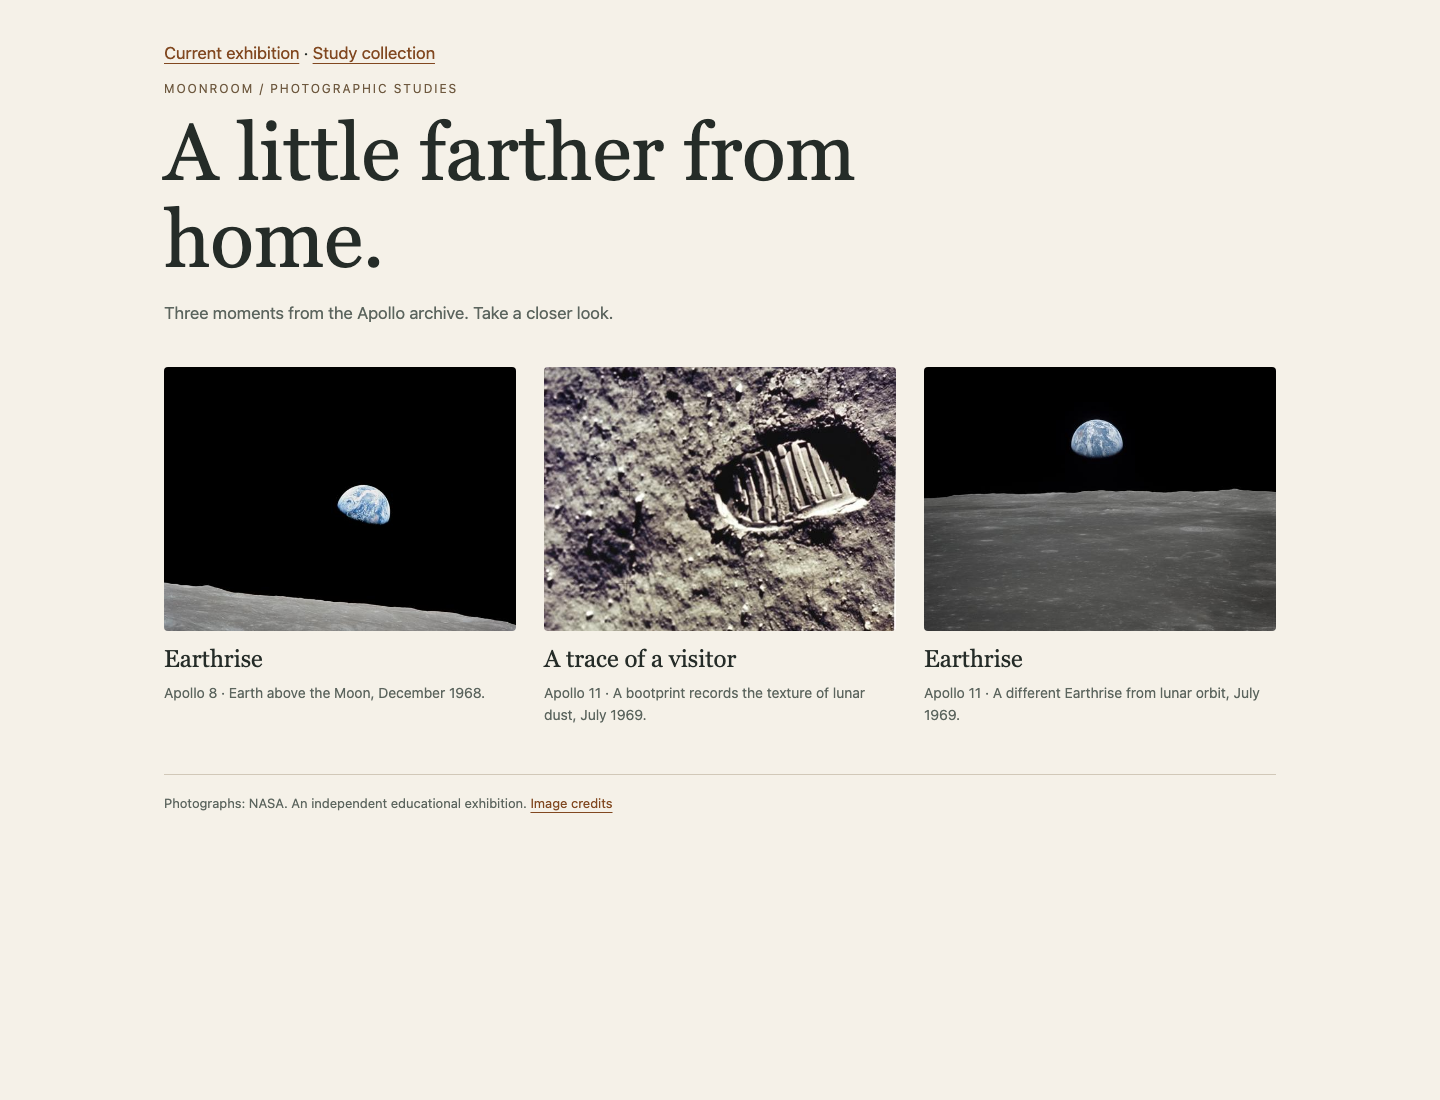
在这张最终宽屏视图中,对照第一张与最后一张 Earthrise 的说明:它们来自不同的任务。足印仍是独立的中间卡片。在窄屏上,同样的三张卡片会堆叠显示。
总结
你将真实图片与描述关联,把一张语义卡片扩展为完整的数据驱动照片集,并用稳定 ID 区分两张标题相同的照片。响应式图库保留了所有卡片、真实图片内容和可见键盘焦点。下一个实验将由你构建详细查看器,包括导航边界和可恢复的图片加载失败。