介绍
在实际的 CI/CD 流水线中,工作流很少只是一个简单的步骤列表。它们通常由多个需要按特定顺序运行的独立“任务”(jobs)组成。
例如,你可能有一个编译代码的 Build 任务,以及一个将代码推送到服务器的 Deploy 任务。你肯定不希望在 Build 任务失败时运行 Deploy 任务,而且你不能同时运行它们,因为部署需要已构建的产物(artifacts)。
在这个实验(Lab)中,你将把工作流拆分成两个独立的任务,并使用 needs 关键字来强制执行依赖关系,确保部署任务等待构建任务成功完成。
本实验基于你在先前实验中创建的仓库。你将使用 github-actions-demo 仓库。
定义构建任务 (build job)
首先,我们将清理现有的工作流(workflow),以专注于一个 build 实验。为了清晰起见,我们将简化前一个 Lab 中的矩阵策略(matrix strategy),恢复使用单一版本,以便将重点放在实验依赖关系上。
- 在你的 GitHub 仓库页面
github-actions-demo上,点击绿色的 Code 按钮。 - 确保选择了 HTTPS 标签页,并复制 URL。它应该看起来像
https://github.com/your-username/github-actions-demo.git。 - 在 LabEx 环境中打开终端。默认路径是
~/project。 - 使用
git clone命令下载仓库。将your-username替换为你的实际 GitHub 用户名。
cd ~/project
git clone https://github.com/your-username/github-actions-demo.git
示例输出:
Cloning into 'github-actions-demo'...
remote: Enumerating objects: X, done.
remote: Counting objects: 100% (X/X), done.
remote: Total X (delta 0), reused 0 (delta 0), pack-reused 0
Receiving objects: 100% (X/X), done.
- 进入克隆下来的仓库:
cd ~/project/github-actions-demo
使用 WebIDE 编辑器创建一个新的工作流文件
.github/workflows/job-dependencies.yml。你可以在左侧文件浏览器中project/github-actions-demo/.github/workflows/下找到该文件。首先创建基本的工作流结构。添加工作流名称和触发器:
name: Job Dependencies

on: [push]
- 添加
jobs部分并定义build实验及其运行器(runner):
jobs:
  build:
    runs-on: ubuntu-latest
- 添加
steps部分。首先,添加checkout步骤以下载仓库代码:
steps:
  - uses: actions/checkout@v4
- 添加 Node.js 设置步骤:
- name: Use Node.js
  uses: actions/setup-node@v4
  with:
    node-version: "20"
- 添加安装依赖项的步骤:
- name: Install dependencies
  run: npm install
- 添加运行测试的步骤:
- name: Run tests
  run: npm test
- 添加构建步骤,该步骤创建工件(artifact)目录和文件:
- name: Build project
  run: |
    mkdir dist
    echo "Build artifact created at $(date)" > dist/build.txt
- 最后,添加上传工件的步骤。此步骤至关重要,因为它会保存构建输出,以便下一个实验可以使用它:
- name: Upload build artifact
  uses: actions/upload-artifact@v4
  with:
    name: dist-files
    path: dist
你的完整文件现在应该如下所示:
name: Job Dependencies

on: [push]

jobs:
  build:
    runs-on: ubuntu-latest
    steps:
      - uses: actions/checkout@v4
      - name: Use Node.js
        uses: actions/setup-node@v4
        with:
          node-version: "20"
      - name: Install dependencies
        run: npm install
      - name: Run tests
        run: npm test
      - name: Build project
        run: |
          mkdir dist
          echo "Build artifact created at $(date)" > dist/build.txt
      - name: Upload build artifact
        uses: actions/upload-artifact@v4
        with:
          name: dist-files
          path: dist
解释
- 我们为了简化而移除了
matrix策略。 - 我们保留了
Upload build artifact步骤。这至关重要,因为下一个实验将需要这些文件!
完成更改后,保存文件(Ctrl+S 或 Cmd+S)。
定义依赖于构建任务的部署任务 (deploy job)
现在我们将添加第二个名为 deploy 的任务。此任务仅应在 build 任务成功时运行。我们通过使用 needs: build 来实现这一点。
将以下
deploy任务追加到你的.github/workflows/job-dependencies.yml文件中。确保它的缩进级别与build任务相同。首先,添加部署任务的定义,包括其运行环境(runner)和依赖项:
deploy:
  runs-on: ubuntu-latest
  needs: build
needs: build 这一行至关重要——它告诉 GitHub Actions 此任务依赖于 build 任务的成功完成。
- 添加步骤(steps)部分。首先,添加下载工件(artifact)的步骤:
steps:
  - name: Download artifact
    uses: actions/download-artifact@v4
    with:
      name: dist-files
      path: dist
这会下载在 build 任务中上传的工件。name 必须与上传步骤中使用的名称相匹配。
- 添加部署步骤:
- name: Deploy project
  run: |
    echo "Deploying project..."
    ls -R dist
    echo "Deployment successful!"
此步骤通过列出已下载的文件来模拟部署过程。
- 你的完整文件结构应如下所示:
name: Job Dependencies

on: [push]

jobs:
  build:
    runs-on: ubuntu-latest
    steps:
      - uses: actions/checkout@v4
      - name: Use Node.js
        uses: actions/setup-node@v4
        with:
          node-version: "20"
      - name: Install dependencies
        run: npm install
      - name: Run tests
        run: npm test
      - name: Build project
        run: |
          mkdir dist
          echo "Build artifact created at $(date)" > dist/build.txt
      - name: Upload build artifact
        uses: actions/upload-artifact@v4
        with:
          name: dist-files
          path: dist

  deploy:
    runs-on: ubuntu-latest
    needs: build
    steps:
      - name: Download artifact
        uses: actions/download-artifact@v4
        with:
          name: dist-files
          path: dist
      - name: Deploy project
        run: |
          echo "Deploying project..."
          ls -R dist
          echo "Deployment successful!"
解释
needs: build: 这是关键的一行。它告诉 GitHub Actions 此任务依赖于build任务的成功完成。uses: actions/download-artifact@v4: 由于任务在不同的虚拟机上运行,它们不共享文件系统。为了获取在build任务中创建的dist文件夹,我们必须下载之前上传的工件。name: dist-files: 必须与上传步骤中使用的名称相匹配。
保存文件 (Ctrl+S 或 Cmd+S)。
提交、推送并验证顺序执行
现在让我们验证这些实验 (jobs) 是否按正确的顺序运行。
- 确保你位于仓库目录中:
cd ~/project/github-actions-demo
- 暂存更改:
git add .
- 提交更改:
git commit -m "Add deploy job with dependency on build"
- 将更改推送到 GitHub 上的远程仓库:
git push
关于认证的注意事项 (Note on Authentication):
当你运行 git push 时,WebIDE 会自动提示你进行认证。请遵循以下详细步骤:
- 会弹出一个提示框,显示消息:“'GitHub' 扩展希望使用 GitHub 登录。” (The extension 'GitHub' wants to sign in using GitHub.) 点击 Allow。
- 会出现一个新的通知。点击 **"Copy&Continue to GitHub"**,然后在下一个提示中点击 **"Open"**。
- 在打开的浏览器窗口中登录你的 GitHub 账户,并输入已复制的授权码。确认授权后,页面将自动关闭。
- 等待几秒钟,你将看到终端成功完成推送操作。
隐私声明 (Privacy Note): WebIDE 会请求完全访问你的 GitHub 账户以进行认证。你无需担心隐私问题——LabEx 虚拟机 (VM) 在你完成当前实验 (lab) 后会立即销毁,你的凭证和授权信息不会被保留。
此认证过程不需要手动配置用户名或个人访问令牌 (Personal Access Token)。
在 GitHub 上验证
- 在网页浏览器中访问你的仓库。
- 点击 Actions 标签页。
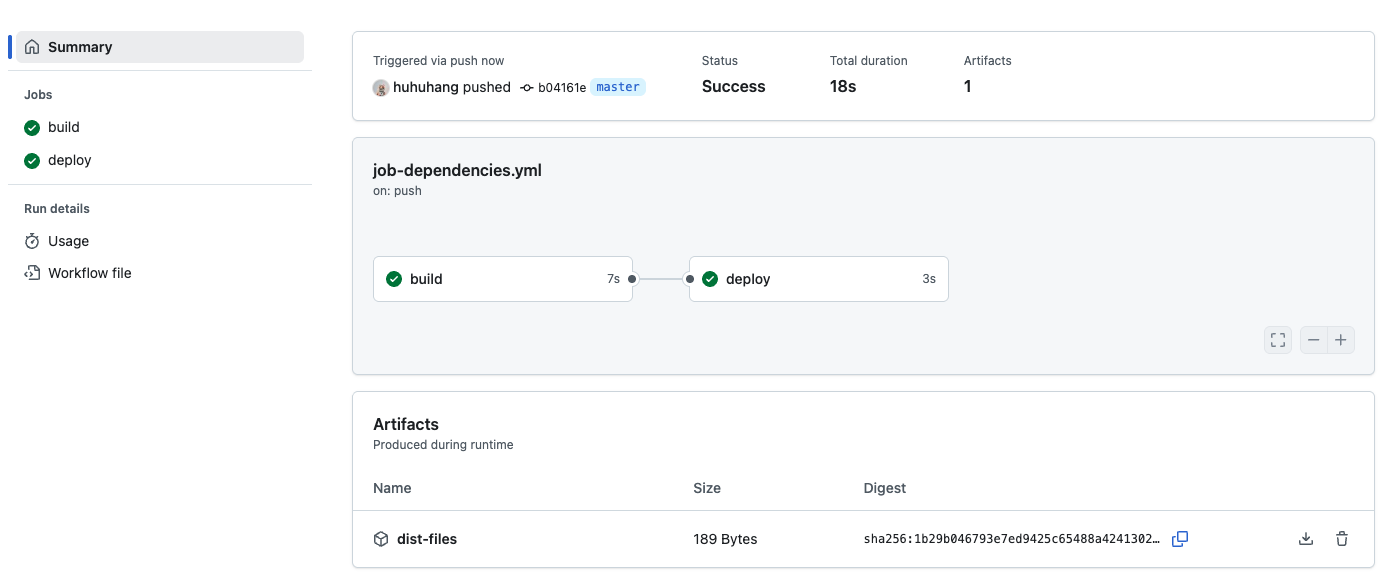
- 点击最新的工作流运行 (workflow run)。
- 查看可视化图表。你应该会看到两个由一条线连接的圆圈(实验/jobs)。
build实验会在左侧。deploy实验会在右侧。
- 观察进度。你会注意到
deploy会一直保持在“Pending”或“Waiting”状态,直到build变为绿色(Success)。 - 一旦
build完成,deploy就会开始运行。 - 点击
deploy实验的日志,查看 "Deploying project..." 消息以及下载的工件 (artifact) 的文件列表。
总结
在这个实验中,你学习了如何在 GitHub Actions 中编排多任务工作流。你:
- 创建了独立的
build和deploy任务。 - 使用了
needs关键字来定义依赖关系,确保deploy仅在build之后运行。 - 使用了
upload-artifact和download-artifact在这些独立任务之间传递数据(文件)。
这种模式对于构建健壮的 CI/CD 流水线至关重要,在这种流水线中,你希望只构建一次,并且只有在先前步骤成功的情况下才部署到多个环境(预演环境 staging、生产环境 production)。