简介
V01 为每篇帮助文章存储了一个向量。真实文章不会永久不变:说明会更新,标题会修正,过时页面也会被弃用。如果搜索索引不跟随这个生命周期变化,即使源网站内容正确,也可能返回过时答案。
Cloudflare Vectorize 提供了三个相关的写入操作:
- insert 添加新的向量 ID,并且不应静默替换已存在的 ID;
- upsert 表示「更新或插入」,会替换该 ID 对应的向量和元数据;
- 按 ID 删除 可以弃用选定记录,而不必重建整个索引。
你将创建三个合成文档,使用 upsert 更新密码文章,删除已弃用的账单文章,并证明无关的上传文章从未发生变化。每次写入都会返回一个异步变更 ID,因此你需要等待确切状态,而不是假设写入被接受后就已经可以读取。
这是第二个 Vectorize 实验。如果你直接进入本实验,请先完成 将 LabEx 连接到 Cloudflare 账户,然后完成 V01,以熟悉索引兼容性、文档 ID 和变更可见性。
Vectorize 可在 Workers Free 计划中使用。本实验最多只存储三个很小的 384 维向量,执行有界读取,并且不会调用 AI 模型,因此不需要 Workers Paid 或 Workers AI Neurons。
实验环境会在 /home/labex/project/document-lifecycle-index 中安装 Node.js 22.22.0 和项目本地的 Wrangler 4.132.0。它提供独立的只读检查,但不会授权 Wrangler、创建索引、写入向量或修改你的 Cloudflare 账户。
授权新的文档生命周期索引
在本步骤中,你将授权新的虚拟机,记录目标账户,并为一个临时索引创建唯一的本地配置。
进入准备好的项目目录,并确认固定版本的 CLI:
cd /home/labex/project/document-lifecycle-index
npx wrangler --version
预期输出为 4.132.0。使用 V01 中相同的受限账户和 Workers 资源访问权限进行授权:
npx wrangler login --device --browser=false --scopes account:read user:read workers:write
npx wrangler whoami --json
确认输出中包含 loggedIn: true,识别你的学习账户,然后生成唯一名称:
RUN="labex-c08-v02-$(openssl rand -hex 6)"
printf '%s\n' "$RUN"
将 YOUR_ACCOUNT_ID 替换为该账户的实际 ID:
cat > wrangler.jsonc <<JSON
{
  "\$schema": "./node_modules/wrangler/config-schema.json",
  "name": "$RUN-tools",
  "account_id": "YOUR_ACCOUNT_ID",
  "compatibility_date": "2026-09-16",
  "vectorize": [
    { "binding": "DOCUMENTS", "index_name": "$RUN", "remote": true }
  ]
}
JSON
这个新索引与 V01 相互独立。复用已学知识,并不意味着依赖之前实验的虚拟机或云资源。
创建当前文档集
在本步骤中,你将创建索引,并插入三个记录,表示在进行任何修改或弃用操作之前帮助中心中的当前文档。
创建与 BGE Small 嵌入模型相同的 384 维余弦契约:
npx wrangler vectorize create "$RUN" --dimensions=384 --metric=cosine --update-config=false
创建一个可重复使用的有界等待脚本。连续三次匹配读取可以避免副本短暂过时影响学习者可见的结果:
cat > scripts/wait-for-vectorize.mjs <<'JS'
import { execFileSync } from "node:child_process";

const [indexName, mutationId, expectedCountText] = process.argv.slice(2);
const expectedCount = Number(expectedCountText);
const wrangler = "./node_modules/wrangler/bin/wrangler.js";
let consecutiveMatches = 0;

for (let attempt = 1; attempt <= 120; attempt += 1) {
  const output = execFileSync(process.execPath, [wrangler, "vectorize", "info", indexName, "--json"], { encoding: "utf8" });
  const info = JSON.parse(output);
  if (info.processedUpToMutation === mutationId && info.vectorCount === expectedCount) {
    consecutiveMatches += 1;
  } else {
    consecutiveMatches = 0;
  }
  if (consecutiveMatches === 3) {
    console.log(`mutation ${mutationId} is consistently readable with ${expectedCount} vectors`);
    console.log(JSON.stringify(info, null, 2));
    process.exit(0);
  }
  await new Promise((resolve) => setTimeout(resolve, 2000));
}
throw new Error(`mutation ${mutationId} was not readable within four minutes`);
JS
生成三个确定性的文档向量。revision 字段便于识别后续替换;完整的元数据对象表示源内容更新后搜索应用需要的信息。
cat > scripts/create-seed.mjs <<'JS'
import { writeFileSync } from "node:fs";

const DIMENSIONS = 384;
const documents = [
  { id: "password-reset", axis: 0, category: "account", title: "Reset your password" },
  { id: "upload-pdf", axis: 1, category: "files", title: "Upload a PDF" },
  { id: "billing-receipt", axis: 2, category: "billing", title: "Download a billing receipt" }
];

const rows = documents.map((document) => {
  const values = Array(DIMENSIONS).fill(0);
  values[document.axis] = 1;
  return {
    id: document.id,
    values,
    metadata: {
      category: document.category,
      published: true,
      title: document.title,
      revision: 1,
      model: "@cf/baai/bge-small-en-v1.5",
      pooling: "cls"
    }
  };
});

writeFileSync("vectors/seed.ndjson", rows.map(JSON.stringify).join("\n") + "\n");
console.log(`prepared ${rows.length} current documents`);
JS
node scripts/create-seed.mjs
只插入新的 ID,保存完整输出,并等待实际变更完成:
set -o pipefail
npx wrangler vectorize insert "$RUN" --file=vectors/seed.ndjson 2>&1 | tee .labex/seed-output.txt
只有在 Wrangler 报告已加入队列的向量数量为三个,并返回变更 ID 后,才能继续。如果出现身份验证或网络错误,不能据此判断写入是否成功;先修复错误,再执行等待操作。
SEED_MUTATION_ID=$(sed -nE 's/.*Mutation changeset identifier: ([0-9a-f-]{36}).*/\1/p' .labex/seed-output.txt | tail -n 1)
if [ -z "$SEED_MUTATION_ID" ]; then
  printf '%s\n' 'No seed mutation ID was returned; fix the insert error before waiting.' >&2
else
  node scripts/wait-for-vectorize.mjs "$RUN" "$SEED_MUTATION_ID" 3
fi
npx wrangler vectorize list-vectors "$RUN" --count=10
向量清单中应包含这三个稳定的应用 ID。这里使用 insert 是因为它们都是新 ID;下一步将有意替换一个已存在的 ID。
使用 upsert 更新密码文章
在本步骤中,你将替换 password-reset 的向量和元数据,同时保留其稳定 ID。
upsert 可以插入不存在的 ID,也可以替换已存在的 ID。当某篇源文档发生变化时,替换操作非常有用,但这也意味着你必须发送完整的目标元数据。不要假设新记录中省略的字段会继续保留。
使用不同的确定性轴和更新后的标题创建第 2 版,同时保留所有仍然有效的元数据字段:
cat > scripts/create-update.mjs <<'JS'
import { writeFileSync } from "node:fs";

const values = Array(384).fill(0);
values[3] = 1;
const updated = {
  id: "password-reset",
  values,
  metadata: {
    category: "account",
    published: true,
    title: "Reset an expired password",
    revision: 2,
    model: "@cf/baai/bge-small-en-v1.5",
    pooling: "cls"
  }
};

writeFileSync("vectors/password-update.ndjson", JSON.stringify(updated) + "\n");
console.log("prepared password-reset revision 2");
JS
node scripts/create-update.mjs
提交替换操作,并保留其确切的变更 ID:
set -o pipefail
npx wrangler vectorize upsert "$RUN" --file=vectors/password-update.ndjson 2>&1 | tee .labex/upsert-output.txt
UPSERT_MUTATION_ID=$(sed -nE 's/.*Mutation changeset identifier: ([0-9a-f-]{36}).*/\1/p' .labex/upsert-output.txt | tail -n 1)
if [ -z "$UPSERT_MUTATION_ID" ]; then
  printf '%s\n' 'No upsert mutation ID was returned; fix the write error before waiting.' >&2
else
  node scripts/wait-for-vectorize.mjs "$RUN" "$UPSERT_MUTATION_ID" 3
fi
npx wrangler vectorize get-vectors "$RUN" --ids password-reset > .labex/password-after-upsert.txt
node - <<'JS'
const text = require("fs").readFileSync(".labex/password-after-upsert.txt", "utf8");
const [row] = JSON.parse(text.slice(text.indexOf("[")));
console.table([{ id: row.id, dimensions: row.values.length, changedAxis: row.values[3], title: row.metadata.title, revision: row.metadata.revision }]);
JS
预期结果是:ID 不变,维度为 384,第 3 轴的值为 1,标题已更新,版本为 2。总数量仍然是三个,因为 upsert 替换的是一个已有身份,而不是新增第四篇文档。
不重建索引,弃用一篇文档
在本步骤中,你将按稳定 ID 删除已弃用的账单文章,并证明更新后的密码文章和未修改的上传文章仍然存在。
按 ID 删除的范围小于删除整个索引:索引契约和所有无关记录都会保留。这里只提交已弃用的 ID:
set -o pipefail
npx wrangler vectorize delete-vectors "$RUN" --ids billing-receipt 2>&1 | tee .labex/delete-output.txt
等待删除变更完成,并确认向量数量为两个:
DELETE_MUTATION_ID=$(sed -nE 's/.*Mutation changeset identifier: ([0-9a-f-]{36}).*/\1/p' .labex/delete-output.txt | tail -n 1)
if [ -z "$DELETE_MUTATION_ID" ]; then
  printf '%s\n' 'No delete mutation ID was returned; fix the write error before waiting.' >&2
else
  node scripts/wait-for-vectorize.mjs "$RUN" "$DELETE_MUTATION_ID" 2
fi
npx wrangler vectorize list-vectors "$RUN" --count=10
npx wrangler vectorize get-vectors "$RUN" --ids password-reset upload-pdf billing-receipt > .labex/documents-after-retirement.txt
node - <<'JS'
const text = require("fs").readFileSync(".labex/documents-after-retirement.txt", "utf8");
const rows = JSON.parse(text.slice(text.indexOf("[")));
console.table(rows.map((row) => ({ id: row.id, title: row.metadata.title, revision: row.metadata.revision })));
JS
最终只应保留 password-reset 第 2 版和 upload-pdf 第 1 版。billing-receipt 不存在,这一点很重要,因为同一次经过身份验证的读取还返回了必须保留的另外两条记录。
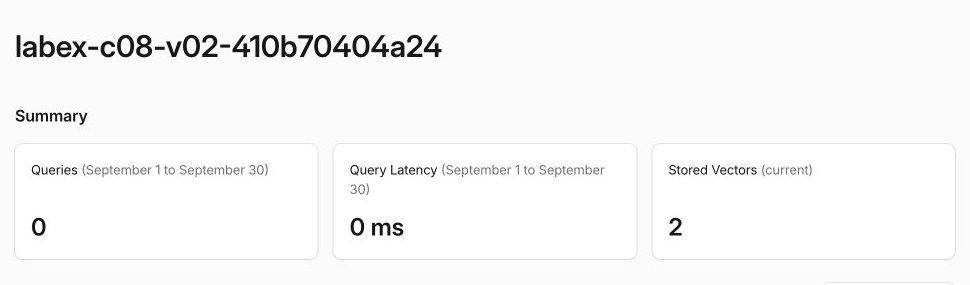
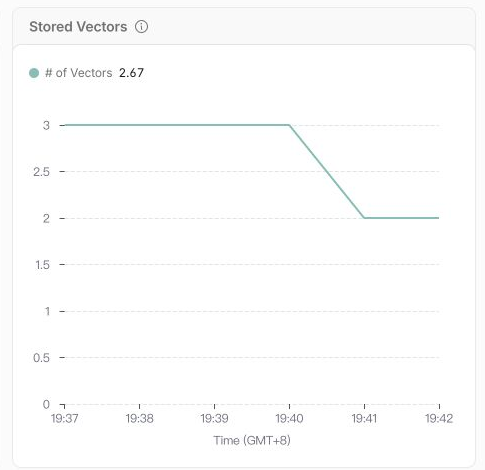
打开 Cloudflare Dashboard 中选定的账户,进入 AI → Vectorize,然后打开 $RUN 中指定名称的索引。确认摘要显示已存储两个向量。在 Stored Vectors 图表中,将可见的生命周期变化与命令对应起来:种子变更完成后数量上升到三个,定向删除后下降到两个。Dashboard 不会显示删除的是哪个 ID,因此 Wrangler 和独立 API 读取结果仍然是判断 ID 的权威证据。
摘要可以让你一眼看到当前状态:弃用一条记录后,仍有两篇文档可供搜索。
图表将生命周期变化直观呈现出来。由于曲线覆盖了多个一分钟采样点,其平均值可能短暂显示小数;重要的是能看到存储向量数量从三个变为两个。
删除生命周期索引并退出登录
在本步骤中,你将在证明定向文档生命周期操作完成后,删除整个临时索引。
上一步删除一个向量时保留了索引。最后这条命令会有意删除完整的实验资源:
npx wrangler vectorize delete "$RUN" --force
npx wrangler vectorize list --json > .labex/indexes-after-cleanup.json
node -e '
  const rows = JSON.parse(require("fs").readFileSync(process.argv[1], "utf8"));
  if (rows.some((row) => row.name === process.argv[2])) throw new Error("lab index still exists");
  console.log("lab index is absent");
' .labex/indexes-after-cleanup.json "$RUN"
在成功的身份验证清单仍然可用时,完成实验的清理检查。保持 Wrangler 处于授权状态,直到检查通过,因为如果先退出登录,身份验证错误就无法与删除成功区分。
然后删除此虚拟机的授权,并检查结构化结果:
npx wrangler logout
npx wrangler whoami --json
预期输出中包含 loggedIn: false。独立的 Dashboard 浏览器会话仍然可以访问你的学习账户。
总结
你从三个当前文档 ID 开始,使用 upsert 替换一篇更新后文章的完整向量和元数据,并使用定向删除弃用一篇过时文章。通过精确的变更 ID 和连续的有界读取,你区分了「写入已被接受」和「状态已经可以读取」这两个阶段。
你还证明了真实索引流程中最重要的两个安全属性:更新不会创建重复身份,弃用不会删除无关文档。最后,你将包含两条记录的状态与 Dashboard 对照,删除了临时索引,确认经过身份验证后索引已不存在,并退出了新虚拟机的登录状态。
V03 将使用相同的模型契约生成实时查询嵌入,并利用维护后的索引检索相似的帮助文章。