소개
이 프로젝트에서는 인기 있는 Java 지속성 프레임워크인 MyBatis 를 사용하여 강좌 시간표 테이블에 대한 CRUD (Create, Read, Update, Delete) 작업을 수행하는 방법을 배우게 됩니다.
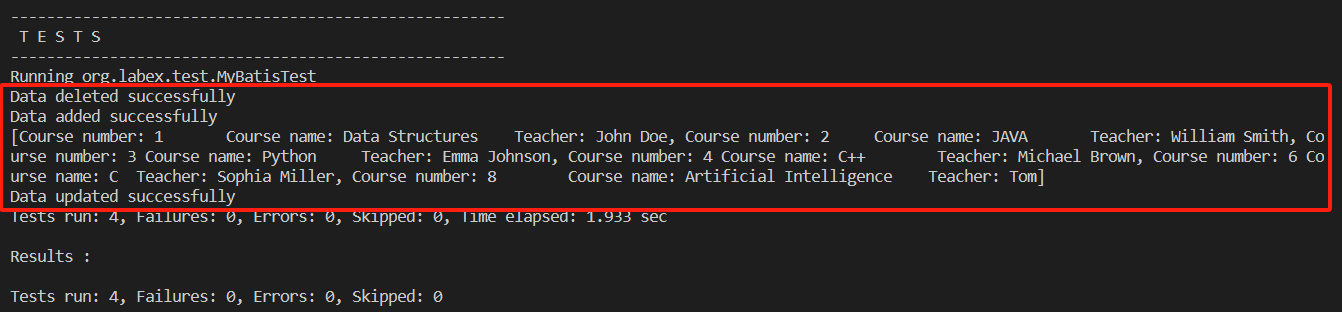
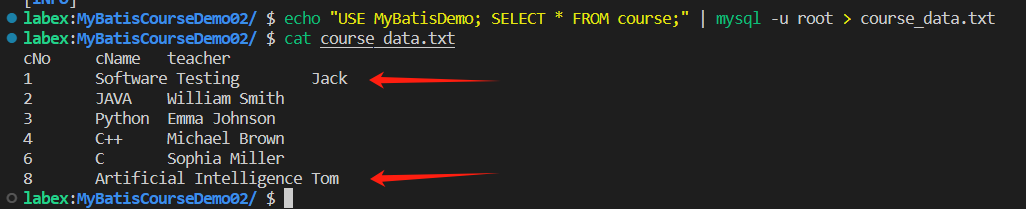
👀 미리보기
🎯 과제
이 프로젝트에서 다음을 배우게 됩니다:
- 프로젝트를 구성하고 필요한 종속성을 설정하는 방법
- 속성, 생성자, setter/getter 메서드 및 기타 내용을 추가하여
Course엔티티 클래스를 개선하는 방법 - MyBatis 구성 파일
mybatis-config.xml을 개선하는 방법 CourseMapper인터페이스와 해당 메서드를 구현하는 방법CourseMapper.xml파일에서 SQL 매핑을 구현하는 방법MyBatisTest.java파일에서 테스트 케이스를 구현하는 방법
🏆 성과
이 프로젝트를 완료하면 다음을 수행할 수 있습니다:
- MyBatis 를 사용하여 MySQL 데이터베이스와 상호 작용
- 엔티티 클래스를 정의하고 MyBatis 매핑 파일을 구성
- MyBatis 를 사용하여 CRUD 작업을 구현
- 애플리케이션의 기능을 확인하기 위해 단위 테스트를 작성
프로젝트 설정
이 단계에서는 프로젝트를 구성하고 필요한 종속성을 설정하는 방법을 배우게 됩니다.
MyBatisCourseDemo02프로젝트에서pom.xml파일을 엽니다.- 다음 종속성을
<dependencies>섹션에 추가합니다:
<!-- MyBatis jar -->
    <dependency>
        <groupId>org.mybatis</groupId>
        <artifactId>mybatis</artifactId>
        <version>3.5.6</version>
    </dependency>

    <!-- MySQL database driver jar -->
    <dependency>
        <groupId>mysql</groupId>
        <artifactId>mysql-connector-java</artifactId>
        <version>8.0.16</version>
    </dependency>
- 문자 인코딩 및 JDK 버전을 구성하기 위해 다음 속성을
<properties>섹션에 추가합니다:
    <properties>
        <project.build.sourceEncoding>UTF-8</project.build.sourceEncoding>
        <maven.compiler.source>1.8</maven.compiler.source>
        <maven.compiler.target>1.8</maven.compiler.target>
    </properties>
- XML 매핑 파일을 classpath 에 포함하기 위해 다음
<build>섹션을 추가합니다:
    <build>
        <resources>
            <resource>
                <directory>src/main/java</directory>
                <includes>
                    <include>**/*.xml</include>
                </includes>
                <filtering>true</filtering>
            </resource>
            <resource>
                <directory>src/main/resources</directory>
                <filtering>true</filtering>
            </resource>
        </resources>
    </build>
Entity 클래스 개선
이 단계에서는 속성, 생성자, setter/getter 메서드 및 기타 내용을 추가하여 Course 엔티티 클래스를 개선합니다.
/src/main/java/org/labex/pojo디렉토리에서Course.java파일을 엽니다.- 다음 속성을
Course클래스에 추가합니다:
    private int cNo;
    private String cName;
    private String teacher;
- 다음 생성자를 추가합니다:
    public Course() {

    }

    public Course(int cNo, String cName, String teacher) {
        this.cNo = cNo;
        this.cName = cName;
        this.teacher = teacher;
    }
- 다음 getter 및 setter 메서드를 추가합니다:
    public int getCNo() {
        return cNo;
    }

    public void setCNo(int cNo) {
        this.cNo = cNo;
    }

    public String getCName() {
        return cName;
    }

    public void setCName(String cName) {
        this.cName = cName;
    }

    public String getTeacher() {
        return teacher;
    }

    public void setTeacher(String teacher) {
        this.teacher = teacher;
    }
- 다음
toString()메서드를 추가합니다:
    @Override
    public String toString() {
        return "Course number: " + this.cNo + "\tCourse name: " + this.cName + "\tTeacher: " + this.teacher;
    }
MyBatis 설정 개선
이 단계에서는 MyBatis 구성 파일 mybatis-config.xml을 개선합니다.
src/main/resources디렉토리에서mybatis-config.xml파일을 엽니다.- 엔티티 클래스에 대한 별칭을 정의하기 위해 다음
<typeAliases>섹션을 추가합니다:
    <typeAliases>
        <package name="org.labex.pojo"/>
    </typeAliases>
<environments>섹션에서 데이터 소스 환경을 구성합니다:
    <environments default="development">
        <environment id="development">
            <transactionManager type="JDBC" />
            <dataSource type="POOLED">
                <property name="driver" value="${mysql.driver}" />
                <property name="url" value="${mysql.url}" />
                <property name="username" value="${mysql.username}" />
                <property name="password" value="${mysql.password}" />
            </dataSource>
        </environment>
    </environments>
- SQL 매핑 파일
CourseMapper.xml을<mappers>섹션에 등록합니다:
    <mappers>
        <package name="org.labex.mapper" />
    </mappers>
CourseMapper 인터페이스 구현
이 단계에서는 CourseMapper 인터페이스와 해당 메서드를 구현합니다.
org.labex.mapper패키지에서CourseMapper.java파일을 엽니다.- 다음 메서드를
CourseMapper인터페이스에 추가합니다:
import java.util.List;

import org.labex.pojo.Course;

public interface CourseMapper {

    /**
     * 모든 코스 정보 쿼리
     */
    public List<Course> queryAllCourse();

    /**
     * 새로운 코스 삽입
     * @param course
     */
    public int insertCourse(Course course);

    /**
     * 코스 정보 업데이트
     * @param course
     */
    public int updateCourse(Course course);

    /**
     * 코스 번호로 코스 정보 삭제
     * @param course
     */
    public int deleteCourse(int cNo);
}
SQL 매핑 구현
이 단계에서는 CourseMapper.xml 파일에서 SQL 매핑을 구현합니다.
src/main/java/org/labex/mapper디렉토리에서CourseMapper.xml파일을 엽니다.- 다음 SQL 매핑 문을 추가합니다:
    <!-- 모든 코스 정보 검색 -->
    <select id="queryAllCourse" resultType="org.labex.pojo.Course">
        select * from course
    </select>

    <!-- 새로운 코스 삽입 -->
    <insert id="insertCourse" parameterType="org.labex.pojo.Course">
        insert into course(cNo,cName,teacher)
        values(#{cNo},#{cName},#{teacher})
    </insert>

    <!-- 코스 번호를 기반으로 코스 정보 업데이트 -->
    <update id="updateCourse" parameterType="org.labex.pojo.Course">
        update course set cName=#{cName},teacher=#{teacher}
        where cNo=#{cNo}
    </update>

    <!-- 코스 번호를 기반으로 코스 정보 삭제 -->
    <delete id="deleteCourse" parameterType="int">
        delete from course where cNo=#{cNo}
    </delete>
테스트 케이스 구현
이 단계에서는 MyBatisTest.java 파일에서 테스트 케이스를 구현합니다.
/src/test/java/org/labex/test디렉토리에서MyBatisTest.java파일을 엽니다.- 다음 테스트 메서드를 추가합니다:
import java.io.IOException;
import java.io.Reader;
import java.util.List;

import org.apache.ibatis.io.Resources;
import org.apache.ibatis.session.SqlSession;
import org.apache.ibatis.session.SqlSessionFactory;
import org.apache.ibatis.session.SqlSessionFactoryBuilder;
import org.junit.Before;
import org.junit.Test;
import org.labex.mapper.CourseMapper;
import org.labex.pojo.Course;

public class MyBatisTest {

    SqlSessionFactory sessionFactory = null;
    SqlSession session = null;

    @Before
    public void before() throws IOException{
        String resource = "mybatis-config.xml";
        // Load MyBatis configuration file
        Reader reader = Resources.getResourceAsReader(resource);
        // Create SqlSession factory
        sessionFactory = new SqlSessionFactoryBuilder().build(reader);
        // Create SqlSession object capable of executing SQL statements in SQL mapping files
        session = sessionFactory.openSession();
    }

    @Test
    public void testSel() throws IOException{
        // Call the getMapper() method in session to return the interface object
        CourseMapper cMapper = session.getMapper(CourseMapper.class);
        // Perform query and return all Course objects
        List<Course> courses = cMapper.queryAllCourse();
        System.out.println(courses);
        session.close();
    }

    @Test
    public void testIns() throws IOException{
        // Call the getMapper() method in session to return the interface object
        CourseMapper cMapper = session.getMapper(CourseMapper.class);

        Course course = new Course(8,"Artificial Intelligence","Tom");

        int i = cMapper.insertCourse(course);

        session.commit();

        System.out.println((i!=0 ? "Data added successfully":"Failed to add data"));

        session.close();
    }

    @Test
    public void testUpd() throws IOException{
        // Call the getMapper() method in session to return the interface object
        CourseMapper cMapper = session.getMapper(CourseMapper.class);

        Course course = new Course(1,"Software Testing","Jack");

        int i = cMapper.updateCourse(course);

        session.commit();

        System.out.println((i!=0 ? "Data updated successfully":"Failed to update data"));

        session.close();
    }

    @Test
    public void testDEl() throws IOException{
        // Call the getMapper() method in session to return the interface object
        CourseMapper cMapper = session.getMapper(CourseMapper.class);

        int i = cMapper.deleteCourse(7);

        session.commit();

        System.out.println((i!=0 ? "Data deleted successfully":"Failed to delete data"));

        session.close();
    }
}
이러한 단계를 완료하면 프로젝트를 성공적으로 구성하고, 엔티티 클래스를 개선하고, MyBatis 설정을 구성하고, CourseMapper 인터페이스를 구현하고, 테스트 케이스를 구현했습니다. 이제 테스트를 실행하여 애플리케이션의 기능을 확인할 수 있습니다.
실행
다음으로, 터미널에서 컴파일하고 실행한 다음, Maven 을 사용하여 테스트 파일을 확인합니다:
cd MyBatisCourseDemo02
mvn test
챌린지 결과를 확인하려면 아래 단계를 참조하십시오.
요약
축하합니다! 이 프로젝트를 완료했습니다. LabEx 에서 더 많은 랩을 연습하여 기술을 향상시킬 수 있습니다.