소개
JavaScript 를 사용하여 간단한 슬라이딩 퍼즐 게임을 만드는 이 프로젝트에 오신 것을 환영합니다. 이 가이드가 끝나면 브라우저에서 플레이할 수 있는 3x3 슬라이딩 퍼즐 게임을 갖게 될 것입니다. 이 게임은 번호가 매겨진 타일, 타이머, 게임 시작, 일시 중지 및 재설정 컨트롤을 특징으로 합니다.
사전 경험은 필요하지 않지만, JavaScript 와 HTML 에 대한 기본적인 이해가 도움이 될 것입니다. 시작해 봅시다!
👀 미리보기

🎯 과제
이 프로젝트에서 다음을 배우게 됩니다.
- HTML 에서 게임 레이아웃을 디자인하는 방법
- 게임에 대한 CSS 스타일을 작성하는 방법
- JavaScript 에서 게임 변수를 초기화하는 방법
- 타일 이동을 처리하는 move 함수를 구현하는 방법
- 가능한 타일 이동을 결정하는 방법
- 게임 타이머를 구현하는 방법
- 시작, 일시 중지 및 재설정 기능을 사용하여 게임 흐름을 제어하는 방법
- 시작 시 또는 재설정 시 타일을 무작위로 섞는 방법
- 페이지 로드 시 게임을 초기화하는 방법
🏆 성과
이 프로젝트를 완료하면 다음을 수행할 수 있습니다.
- HTML 을 사용하여 게임의 레이아웃을 디자인합니다.
- CSS 를 사용하여 요소를 스타일링합니다.
- JavaScript 를 사용하여 게임 로직을 구현합니다.
- 사용자 입력을 처리하고 이에 따라 작업을 수행합니다.
- DOM 을 조작하여 게임 상태를 업데이트하고 정보를 표시합니다.
HTML 로 게임 레이아웃 디자인
이전 설명에서 언급했듯이 index.html에서 게임의 레이아웃을 디자인합니다.
<!doctype html>
<html lang="en">
  <head>
    <meta charset="UTF-8" />
    <title>Puzzle</title>
    <link rel="stylesheet" type="text/css" href="puzzle.css" />
    <script type="text/javascript" src="puzzle.js"></script>
  </head>
  <body>
    <div id="container">
      <!-- Outermost DIV, used to contain the inner structure -->
      <div id="game">
        <!-- Game area, which is the large DIV block -->
        <div id="d1"
        <!-- Small DIVs, which are the 8 small blocks. When clicked, the move() function is executed. The parameter is the displayed number, so we know which block was clicked -->
        <div id="d2"
        <div id="d3"
        <div id="d4"
        <div id="d5"
        <div id="d6"
        <div id="d7"
        <div id="d8"
      </div>
      <div id="control">
        <!-- Game control area -->
        <p>
          <rowspan id="timeText">Total Time</rowspan>
          <!--  "Total Time" -->
          <rowspan id="timer"></rowspan>
        </p>
        <!-- Display game time area -->
        <p>
          <rowspan id="start"
          <!--  "Start" -->
          <rowspan id="reset"
          <!--  "Retry" -->
        </p>
        <!-- Display control button area -->
      </div>
    </div>
  </body>
</html>
CSS 스타일 작성
레이아웃 구조를 완성했으니, CSS 스타일로 게임을 꾸밀 차례입니다. 이 단계에서는 게임을 원하는 대로 사용자 정의하고 디자인하여 고유한 터치와 세부 사항을 추가할 수 있습니다. 또한 게임의 미학을 향상시키기 위해 더 많은 장식 요소를 도입할 수도 있습니다. 그러나 중요한 참고 사항: 게임의 주요 DIV 의 크기를 변경하는 경우, 함께 제공되는 JavaScript 코드를 조정해야 합니다. 이에 대해서는 잠시 후에 자세히 논의하겠습니다.
puzzle.css에 다음을 추가합니다.
* {
  padding: 0;
  margin: 0;
  border: 0;
}
/* The '*' is a wildcard, removing default styles for all elements because some browsers might add default styles, which could create layout problems. */

body {
  width: 100%;
  height: 100%;
}
/* Setting body height and width to 100%, so it auto-adapts according to browser screen size. */

#container {
  position: relative;
  width: 620px;
  height: 450px;
  margin: 0 auto;
  margin-top: 100px;
  border-radius: 1px;
}
/* This is the DIV that wraps all elements. Set to 620px width and 450px height. This size can be increased, but not decreased. It should be big enough to contain all internal elements. */

#game {
  position: absolute;
  width: 450px;
  height: 450px;
  border-radius: 5px;
  display: inline-block;
  background-color: #ffe171;
  box-shadow: 0 0 10px #ffe171;
}
/* This is the game area DIV. The size is calculated based on the size of the smaller blocks. Here, the blocks are set to 150px by 150px, so the game area is 150px*3, equaling 450px. */

#game div {
  position: absolute;
  width: 149px;
  height: 149px;
  box-shadow: 1px 1px 2px #777;
  background-color: #20a6fa;
  color: white;
  text-align: center;
  font-size: 150px;
  line-height: 150px;
  cursor: pointer;
  -webkit-transition: 0.3s; /* Browser prefix for Chrome compatibility */
  -moz-transition: 0.3s; /* For Firefox */
  -ms-transition: 0.3s; /* For IE */
  -o-transition: 0.3s; /* For Opera */
  transition: 0.3s;
}
/* This sets the size of the small blocks. Positioned as absolute, changes in position won't affect the positions of other elements. The width and height are both 149px. Notably, there's a box-shadow, adding to its overall dimension. The 'transition:0.3s' property makes changes appear as animations, so when the block's position changes, an animation plays automatically. */

#game div:hover {
  color: #ffe171;
}
/* Setting mouse hover animation for the blocks. When the mouse hovers over an element, these properties replace the above ones, and it returns to the original when the mouse moves away. Here, we're changing the font color. */

#control {
  width: 150px;
  height: 450px;
  display: inline-block;
  float: right;
}
/* Control section. 'display:inline-block' allows the element to maintain block properties while not taking up a full line, and 'float:right' positions it on the right side. */

#control rowspan {
  height: 25px;
  font-size: 20px;
  color: #222;
  margin-top: 10px;
}
/* Common styles for buttons in the control area. */

#start {
  display: inline-block;
  font-size: 28px;
  width: 100px;
  height: 28px;
  background-color: #20a6fa;
  color: #ffe171;
  text-shadow: 1px 1px 2px #ffe171;
  border-radius: 5px;
  box-shadow: 2px 2px 5px #4c98f5;
  text-align: center;
  cursor: pointer;
}
/* Styles for the 'Start' button. 'cursor:pointer' makes the cursor change to a hand symbol when hovering over it. */

#reset {
  display: inline-block;
  font-size: 28px;
  width: 100px;
  height: 28px;
  background-color: #20a6fa;
  color: #ffe171;
  text-shadow: 1px 1px 2px #ffe171; /* Font shadow */
  border-radius: 5px; /* Rounded corners */
  box-shadow: 2px 2px 5px #4c98f5; /* Box shadow */
  text-align: center; /* Center text */
  cursor: pointer;
}
/* Styles for the 'Reset' button. */

#d1 {
  left: 0px;
}
#d2 {
  left: 150px;
}
#d3 {
  left: 300px;
}
#d4 {
  top: 150px;
}
#d5 {
  top: 150px;
  left: 150px;
}
#d6 {
  top: 150px;
  left: 300px;
}
#d7 {
  top: 300px;
}
#d8 {
  left: 150px;
  top: 300px;
}
/* Pre-defined positions for each of the blocks in order. */
스타일을 설정하는 것은 중요한 진전입니다. 다음으로, 퍼즐 게임에 생명을 불어넣기 위해 JavaScript 로직으로 넘어갈 것입니다. 위의 지침에 따라 초기 스타일 지정을 하는 것이 좋습니다. 게임의 기능이 잘 이해되면 창의력을 발휘하여 스타일을 더욱 사용자 정의할 수 있습니다. 그러나, 조기에 무지한 변경을 하면 예기치 않은 결함이 발생할 수 있습니다.
JavaScript 로 게임 변수 초기화
게임 기능을 추가하기 전에, 필수적인 게임 상태 변수를 초기화합니다.
puzzle.js에 다음을 추가합니다.
// puzzle.js

var time = 0;
// Save the elapsed time
var pause = true;
// Flag to indicate if the game is paused, true means it's paused
var set_timer;
// Timer function
var d = new Array(10);
// Store the number of the small DIV currently in the large DIV
var d_direct = new Array(
  [0],
  [2, 4], // The large DIV with the number 1 can go to positions 2 and 4
  [1, 3, 5],
  [2, 6],
  [1, 5, 7],
  [2, 4, 6, 8],
  [3, 5, 9],
  [4, 8],
  [5, 7, 9],
  [6, 8]
);
// Save the possible move positions for the large DIVs
var d_posXY = new Array(
  [0],
  [0, 0], // The first number represents left, the second represents top. E.g., the first block's position is left:0px, top:0px
  [150, 0],
  [300, 0],
  [0, 150],
  [150, 150],
  [300, 150],
  [0, 300],
  [150, 300],
  [300, 300]
);
// Position of the large DIVs
d[1] = 1;
d[2] = 2;
d[3] = 3;
d[4] = 4;
d[5] = 5;
d[6] = 6;
d[7] = 7;
d[8] = 8;
d[9] = 0;
// Default arrangement, the ninth large DIV is empty, so it's 0. We use 0 to represent the blank tile.
이동 함수 구현
사용자 상호 작용에 따라 타일이 이동할 수 있도록 하는 함수를 만듭니다.
puzzle.js에 다음을 추가합니다.
// puzzle.js

function move(id) {
  // Move function
  var i = 1;
  for (i = 1; i < 10; ++i) {
    if (d[i] == id) break;
  }
  // This loop finds the position of the small DIV within the large DIV
  var target_d = 0;
  // Save the possible positions for the small DIV, 0 means it can't move
  target_d = whereCanTo(i);
  // Find out where the small DIV can move to. If it returns 0, it means it can't move, otherwise, it returns the target position number
  if (target_d != 0) {
    d[i] = 0;
    // Set the current large DIV number to 0 because the small DIV has moved, so the current large DIV is now empty
    d[target_d] = id;
    // Set the target large DIV to the number of the clicked small DIV
    document.getElementById("d" + id).style.left = d_posXY[target_d][0] + "px";
    document.getElementById("d" + id).style.top = d_posXY[target_d][1] + "px";
    // Finally, set the clicked small DIV's position to the target large DIV's position
  }

  var finish_flag = true;
  // Flag to indicate if the game is completed, true means it's completed
  for (var k = 1; k < 9; ++k) {
    if (d[k] != k) {
      finish_flag = false;
      break;
    }
  }
  // Iterate from 1, check each large DIV number. If they are not in order, the game is not completed.
  if (finish_flag == true) {
    if (!pause) start();
    alert("Congratulations!");
  }
  // If true, the game is completed. If it's not paused, call the pause function and display a success message.
}
타일 이동 가능 여부 결정
현재 위치를 기반으로 타일이 어디로 이동할 수 있는지 결정하는 함수를 만듭니다.
puzzle.js에 다음을 추가합니다.
// puzzle.js

function whereCanTo(cur_div) {
  // Function to determine if a given DIV can move and to which position
  var j = 0;
  var move_flag = false;
  for (j = 0; j < d_direct[cur_div].length; ++j) {
    if (d[d_direct[cur_div][j]] == 0) {
      move_flag = true;
      break;
    }
  }
  if (move_flag == true) {
    return d_direct[cur_div][j];
  } else {
    return 0;
  }
  // If it can move, return the target position number, otherwise return 0
}
게임 타이머 구현
게임 중 경과 시간을 추적하기 위해 타이머 함수를 추가합니다.
puzzle.js에 다음을 추가합니다.
// puzzle.js

function timer() {
  // Timer function, executes every second
  time += 1;
  var min = parseInt(time / 60); // Convert seconds to minutes
  var sec = time % 60; // Get the remaining seconds
  document.getElementById("timer").innerHTML =
    min + " minutes " + sec + " seconds";
}
게임 흐름 제어
사용자 입력을 기반으로 게임을 시작, 일시 중지 또는 재설정하는 함수를 구현합니다.
puzzle.js에 다음을 추가합니다.
// puzzle.js

function start() {
  // Start or pause the game
  if (pause) {
    document.getElementById("start").innerHTML = "Pause";
    pause = false;
    set_timer = setInterval(timer, 1000);
  } else {
    document.getElementById("start").innerHTML = "Start";
    pause = true;
    clearInterval(set_timer);
  }
}
function reset() {
  // Reset the game
  time = 0;
  random_d();
  if (pause) start();
}
타일 무작위 섞기
시작 시 또는 재설정 시 타일을 무작위로 섞는 함수를 만듭니다.
puzzle.js에 다음을 추가합니다.
// puzzle.js

function random_d() {
  // Randomly shuffle the tiles
  for (var i = 9; i > 1; --i) {
    var to = parseInt(Math.random() * (i - 1) + 1);
    if (d[i] != 0) {
      document.getElementById("d" + d[i]).style.left = d_posXY[to][0] + "px";
      document.getElementById("d" + d[i]).style.top = d_posXY[to][1] + "px";
    }
    if (d[to] != 0) {
      document.getElementById("d" + d[to]).style.left = d_posXY[i][0] + "px";
      document.getElementById("d" + d[to]).style.top = d_posXY[i][1] + "px";
    }
    var tem = d[to];
    d[to] = d[i];
    d[i] = tem;
  }
}
페이지 로드 시 게임 초기화
마지막으로, 웹 페이지가 로드될 때 게임 타일이 표시되고 플레이할 준비가 되었는지 확인합니다.
puzzle.js에 다음을 추가합니다.
// puzzle.js

// Initialize the game on page load
window.onload = function () {
  reset();
};
프로젝트 실행
웹 브라우저에서
index.html을 엽니다.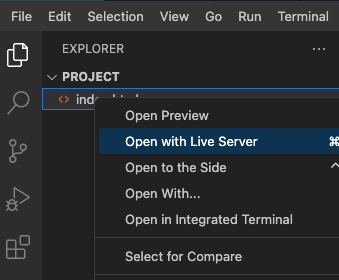
페이지의 효과는 다음과 같습니다.
요약
이제 구조적이고 체계적인 방식으로 JavaScript 를 사용하여 슬라이딩 퍼즐 게임을 성공적으로 구축했습니다! 단계별 분석을 통해 학습자가 게임 논리의 각 구성 요소를 더 쉽게 이해할 수 있습니다. 기억하세요, 이것은 기본적인 버전일 뿐이며, 개선 및 추가 기능에 대한 여지가 많습니다. 직접 해보고 자신만의 것으로 만드세요. 즐거운 코딩 되세요!