소개
추상화와 인터페이스는 Java 객체 지향 프로그래밍의 두 가지 기본적인 개념입니다. 추상 클래스와 인터페이스는 서로 다른 목적을 가지고 있지만, 몇 가지 공통적인 특징을 공유합니다. 이 랩에서는 두 개념을 이해하고 구현하는 과정을 안내하여 Java 프로그램에서 언제, 어떻게 효과적으로 사용하는지 파악할 수 있도록 돕습니다.
추상화 이해하기
추상화는 객체 지향 프로그래밍의 핵심 개념으로, 구현 세부 사항을 숨기고 사용자에게 필요한 기능만 노출하는 데 중점을 둡니다. 관련 있는 부분만 제시하고 복잡한 내부 메커니즘을 숨김으로써 객체의 단순화된 보기를 생성할 수 있습니다.
Java 에서 추상화는 다음을 통해 구현됩니다.
- 추상 클래스
- 인터페이스
추상 클래스란 무엇인가?
추상 클래스는 직접 인스턴스화할 수 없으며 추상 메서드 (구현이 없는 메서드) 를 포함할 수 있는 클래스입니다. 추상 클래스는 다른 클래스를 위한 청사진 역할을 하며, 공통 구조와 동작을 제공합니다.
추상 클래스의 주요 특징:
abstract키워드를 사용하여 선언- 추상 메서드와 비추상 메서드를 모두 포함할 수 있음
- 직접 인스턴스화할 수 없음
- 생성자와 인스턴스 변수를 가질 수 있음
- 하위 클래스는 모든 추상 메서드를 구현하거나 자체적으로 추상으로 선언해야 함
WebIDE 편집기를 열고 /home/labex/project/abstractTest.java 파일을 수정하여 추상 클래스를 만드는 방법을 살펴보겠습니다.
// Abstract class example
abstract class Animal {
    // Abstract method - no implementation
    public abstract void makeSound();

    // Concrete method - has implementation
    public void eat() {
        System.out.println("The animal is eating");
    }
}

// Concrete subclass that implements the abstract method
class Dog extends Animal {
    @Override
    public void makeSound() {
        System.out.println("Dog barks: Woof! Woof!");
    }
}

// Main class to test our implementation
public class abstractTest {
    public static void main(String[] args) {
        // Cannot create an instance of Animal
        // Animal animal = new Animal(); // This would cause compilation error

        // Create an instance of Dog
        Dog dog = new Dog();
        dog.makeSound(); // Call the implemented abstract method
        dog.eat();       // Call the inherited concrete method
    }
}
이제 이 코드를 실행하여 결과를 확인해 보겠습니다.
javac /home/labex/project/abstractTest.java
java abstractTest
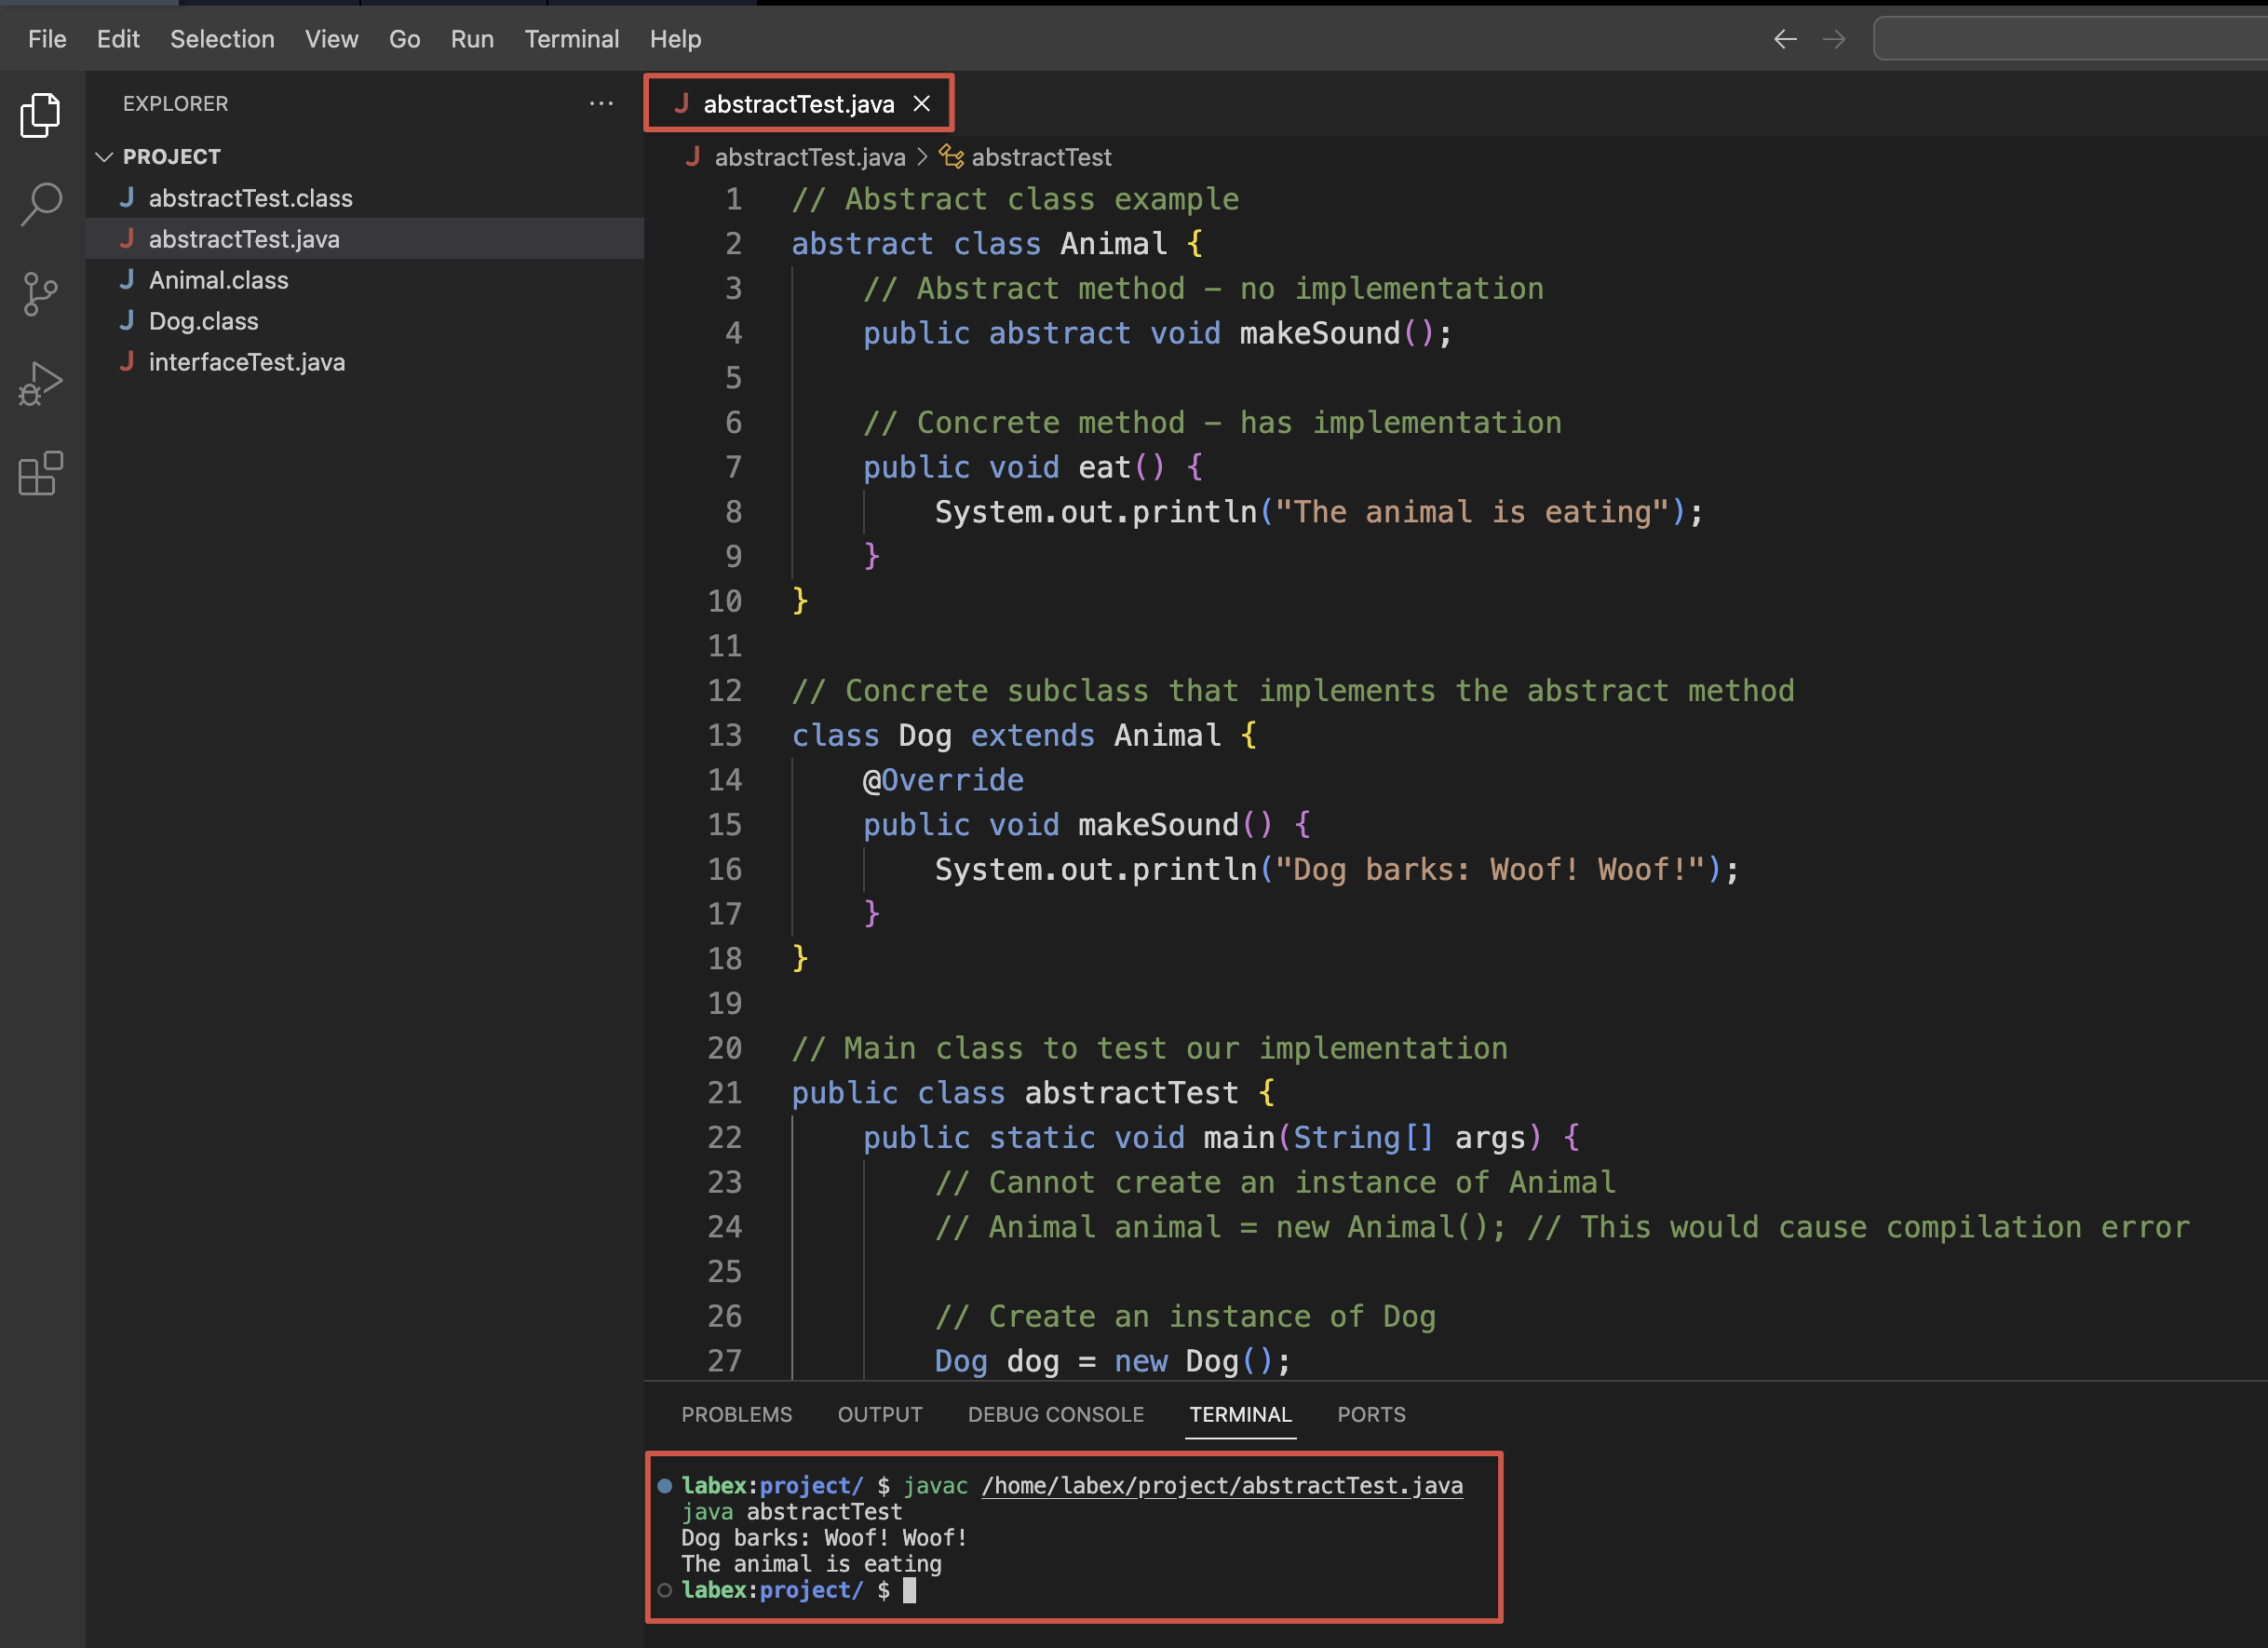
다음과 같은 출력을 볼 수 있습니다.
Dog barks: Woof! Woof!
The animal is eating
이는 추상 클래스가 하위 클래스에 대한 템플릿을 제공하는 방법을 보여줍니다. Animal 클래스는 하위 클래스가 가져야 하는 메서드 ( makeSound() 메서드) 를 정의하는 동시에 공통 기능 ( eat() 메서드) 을 제공합니다.
추상 클래스 상속
추상 클래스로 작업할 때 상속은 중요한 역할을 합니다. 이 단계에서는 추상 클래스 상속과 관련된 더 복잡한 시나리오를 살펴보겠습니다.
/home/labex/project/abstractTest.java 파일을 수정하여 추상 클래스가 다른 추상 클래스를 상속받는 방법을 시연해 보겠습니다.
// Base abstract class
abstract class Animal {
    // Instance variable
    protected String name;

    // Constructor
    public Animal(String name) {
        this.name = name;
    }

    // Abstract method
    public abstract void makeSound();

    // Concrete method
    public void eat() {
        System.out.println(name + " is eating");
    }
}

// Another abstract class that extends Animal
abstract class Bird extends Animal {
    // Constructor calling parent constructor
    public Bird(String name) {
        super(name);
    }

    // Concrete method specific to Bird
    public void fly() {
        System.out.println(name + " is flying");
    }

    // Note: Bird doesn't implement makeSound(), so it remains abstract
}

// Concrete subclass of Bird
class Sparrow extends Bird {
    public Sparrow(String name) {
        super(name);
    }

    // Implementing the abstract method from Animal
    @Override
    public void makeSound() {
        System.out.println(name + " chirps: Tweet! Tweet!");
    }
}

// Concrete subclass of Animal
class Dog extends Animal {
    public Dog(String name) {
        super(name);
    }

    @Override
    public void makeSound() {
        System.out.println(name + " barks: Woof! Woof!");
    }
}

// Main class to test our implementation
public class abstractTest {
    public static void main(String[] args) {
        // Create instances of concrete classes
        Dog dog = new Dog("Buddy");
        Sparrow sparrow = new Sparrow("Jack");

        // Test methods
        dog.makeSound();
        dog.eat();

        sparrow.makeSound();
        sparrow.eat();
        sparrow.fly();
    }
}
업데이트된 이 코드를 실행해 보겠습니다.
javac /home/labex/project/abstractTest.java
java abstractTest
다음과 같은 출력을 볼 수 있습니다.
Buddy barks: Woof! Woof!
Buddy is eating
Jack chirps: Tweet! Tweet!
Jack is eating
Jack is flying
이 예제는 몇 가지 중요한 개념을 보여줍니다.
- 추상 클래스는 생성자와 인스턴스 변수를 가질 수 있습니다.
- 추상 클래스는 다른 추상 클래스를 확장할 수 있습니다.
- 추상 클래스가 다른 추상 클래스를 확장할 때 추상 메서드를 구현할 필요가 없습니다.
- 상속 체인의 마지막에 있는 구체적인 클래스는 모든 상위 클래스의 모든 추상 메서드를 구현해야 합니다.
추상 클래스는 특히 다음과 같은 경우에 유용합니다.
- 밀접하게 관련된 클래스 간에 코드를 공유하려는 경우
- 하위 클래스가 많은 공통 메서드 또는 필드를 가질 것으로 예상되는 경우
- 일부 메서드에 대한 기본 구현을 제공해야 하는 경우
- 일부 메서드의 접근성을 제어하려는 경우
인터페이스 이해
인터페이스는 Java 에서 추상화를 달성하는 또 다른 방법을 제공합니다. 추상 클래스와 달리 인터페이스는 완전히 추상적이며 (Java 8 이전에는) 메서드 구현을 포함할 수 없습니다.
인터페이스는 구현 클래스가 따라야 하는 계약을 정의하며, 클래스가 어떻게 해야 하는지를 지시하지 않고 무엇을 할 수 있는지 지정합니다.
인터페이스란 무엇인가?
인터페이스의 주요 특징:
interface키워드를 사용하여 선언- 모든 메서드는 암시적으로 public 및 abstract (Java 8 이전)
- 모든 필드는 암시적으로 public, static 및 final (상수)
- 클래스는 여러 인터페이스를 구현할 수 있음
- 인터페이스는 여러 인터페이스를 확장할 수 있음
/home/labex/project/interfaceTest.java 파일을 수정하여 기본 인터페이스를 만들어 보겠습니다.
// Define an interface
interface Animal {
    // Constants (implicitly public, static, final)
    String CATEGORY = "Living Being";

    // Abstract methods (implicitly public and abstract)
    void makeSound();
    void move();
}

// Class implementing the interface
class Dog implements Animal {
    @Override
    public void makeSound() {
        System.out.println("Dog barks: Woof! Woof!");
    }

    @Override
    public void move() {
        System.out.println("Dog runs on four legs");
    }
}

// Main class to test the interface
public class interfaceTest {
    public static void main(String[] args) {
        // Create a Dog object
        Dog dog = new Dog();

        // Call the interface methods
        dog.makeSound();
        dog.move();

        // Access the interface constant
        System.out.println("Category: " + Animal.CATEGORY);
    }
}
이 코드를 실행하여 인터페이스가 어떻게 작동하는지 살펴보겠습니다.
javac /home/labex/project/interfaceTest.java
java interfaceTest
다음과 같은 출력을 볼 수 있습니다.
Dog barks: Woof! Woof!
Dog runs on four legs
Category: Living Being
이 예제는 인터페이스의 기본 개념을 보여줍니다. Animal 인터페이스는 Dog 클래스가 구현해야 하는 계약을 정의합니다. Animal 인터페이스를 구현하는 모든 클래스는 인터페이스에 선언된 모든 메서드에 대한 구현을 제공해야 합니다.
다중 인터페이스 및 인터페이스 상속
인터페이스의 주요 장점 중 하나는 여러 인터페이스를 구현하고 인터페이스 계층 구조를 만들 수 있다는 것입니다. 이는 단일 상속만 지원하는 추상 클래스에 비해 더 큰 유연성을 제공합니다.
/home/labex/project/interfaceTest.java 파일을 업데이트하여 이러한 개념을 시연해 보겠습니다.
// First interface
interface Animal {
    // Constants
    String CATEGORY = "Living Being";

    // Methods
    void makeSound();
    void eat();
}

// Second interface
interface Pet {
    // Constants
    String STATUS = "Domesticated";

    // Methods
    void play();
    void cuddle();
}

// Interface extending another interface
interface Bird extends Animal {
    // Additional method
    void fly();
}

// Class implementing multiple interfaces
class Dog implements Animal, Pet {
    @Override
    public void makeSound() {
        System.out.println("Dog barks: Woof! Woof!");
    }

    @Override
    public void eat() {
        System.out.println("Dog eats meat and dog food");
    }

    @Override
    public void play() {
        System.out.println("Dog plays fetch");
    }

    @Override
    public void cuddle() {
        System.out.println("Dog cuddles with its owner");
    }
}

// Class implementing the Bird interface
class Sparrow implements Bird {
    @Override
    public void makeSound() {
        System.out.println("Sparrow chirps: Tweet! Tweet!");
    }

    @Override
    public void eat() {
        System.out.println("Sparrow eats seeds and insects");
    }

    @Override
    public void fly() {
        System.out.println("Sparrow flies with its wings");
    }
}

// Main class to test our interfaces
public class interfaceTest {
    public static void main(String[] args) {
        // Create objects
        Dog dog = new Dog();
        Sparrow sparrow = new Sparrow();

        // Call methods from different interfaces
        System.out.println("--- Dog behaviors ---");
        dog.makeSound();
        dog.eat();
        dog.play();
        dog.cuddle();

        System.out.println("\n--- Sparrow behaviors ---");
        sparrow.makeSound();
        sparrow.eat();
        sparrow.fly();

        // Access constants from interfaces
        System.out.println("\n--- Interface Constants ---");
        System.out.println("Animal Category: " + Animal.CATEGORY);
        System.out.println("Pet Status: " + Pet.STATUS);
    }
}
업데이트된 이 코드를 실행해 보겠습니다.
javac /home/labex/project/interfaceTest.java
java interfaceTest
다음과 같은 출력을 볼 수 있습니다.
--- Dog behaviors ---
Dog barks: Woof! Woof!
Dog eats meat and dog food
Dog plays fetch
Dog cuddles with its owner

--- Sparrow behaviors ---
Sparrow chirps: Tweet! Tweet!
Sparrow eats seeds and insects
Sparrow flies with its wings

--- Interface Constants ---
Animal Category: Living Being
Pet Status: Domesticated
이 예제는 몇 가지 중요한 인터페이스 개념을 보여줍니다.
- 클래스는 여러 인터페이스를 구현할 수 있습니다 (
Dog는Animal과Pet을 모두 구현합니다) - 인터페이스는 다른 인터페이스를 확장할 수 있습니다 (
Bird는Animal을 확장합니다) - 인터페이스를 구현하는 클래스는 모든 메서드와 확장된 모든 인터페이스의 메서드를 구현해야 합니다.
- 인터페이스 상수는 인터페이스 이름을 사용하여 액세스할 수 있습니다.
인터페이스는 특히 다음과 같은 경우에 유용합니다.
- 구현 세부 정보 없이 계약을 정의하려는 경우
- 다중 상속이 필요한 경우
- 관련 없는 클래스가 동일한 동작을 구현해야 하는 경우
- 서비스 제공업체의 동작을 지정하되 구현 방법을 지시하지 않으려는 경우
추상 클래스 vs 인터페이스 비교
추상 클래스와 인터페이스를 모두 살펴보았으므로, 두 추상화 메커니즘을 비교하여 각각 언제 사용해야 하는지 이해해 보겠습니다.
주요 차이점
차이점을 설명하기 위해 /home/labex/project/ComparisonExample.java라는 파일을 만들어 보겠습니다.
// Abstract class example
abstract class Vehicle {
    // Instance variables
    protected String brand;

    // Constructor
    public Vehicle(String brand) {
        this.brand = brand;
    }

    // Abstract method
    public abstract void start();

    // Concrete method
    public void stop() {
        System.out.println(brand + " vehicle stops");
    }
}

// Interface example
interface ElectricPowered {
    // Constants
    String POWER_SOURCE = "Electricity";

    // Abstract methods
    void charge();
    void displayBatteryStatus();
}

// Class using abstract class and interface
class ElectricCar extends Vehicle implements ElectricPowered {
    private int batteryLevel;

    public ElectricCar(String brand, int batteryLevel) {
        super(brand);
        this.batteryLevel = batteryLevel;
    }

    // Implementing abstract method from Vehicle
    @Override
    public void start() {
        System.out.println(brand + " electric car starts silently");
    }

    // Implementing methods from ElectricPowered interface
    @Override
    public void charge() {
        batteryLevel = 100;
        System.out.println(brand + " electric car is charging. Battery now at 100%");
    }

    @Override
    public void displayBatteryStatus() {
        System.out.println(brand + " battery level: " + batteryLevel + "%");
    }
}

public class ComparisonExample {
    public static void main(String[] args) {
        ElectricCar tesla = new ElectricCar("Tesla", 50);

        // Methods from abstract class Vehicle
        tesla.start();
        tesla.stop();

        // Methods from interface ElectricPowered
        tesla.displayBatteryStatus();
        tesla.charge();
        tesla.displayBatteryStatus();

        // Access constant from interface
        System.out.println("Power source: " + ElectricPowered.POWER_SOURCE);
    }
}
이 코드를 실행해 보겠습니다.
javac /home/labex/project/ComparisonExample.java
java ComparisonExample
다음과 같은 출력을 볼 수 있습니다.
Tesla electric car starts silently
Tesla vehicle stops
Tesla battery level: 50%
Tesla electric car is charging. Battery now at 100%
Tesla battery level: 100%
Power source: Electricity
각각 언제 사용해야 할까요?
추상 클래스와 인터페이스를 언제 사용해야 하는지 결정하는 데 도움이 되는 비교 표입니다.
| 기능 | 추상 클래스 | 인터페이스 |
|---|---|---|
| 메서드 | 추상 메서드와 구체 메서드 모두 가질 수 있음 | 모든 메서드는 추상적임 (Java 8 이전) |
| 변수 | 인스턴스 변수를 가질 수 있음 | 상수만 가질 수 있음 (public static final) |
| 생성자 | 생성자를 가질 수 있음 | 생성자를 가질 수 없음 |
| 상속 | 단일 상속 지원 | 클래스는 여러 인터페이스를 구현할 수 있음 |
| 접근 제한자 | 메서드는 모든 접근 제한자를 가질 수 있음 | 메서드는 암시적으로 public |
| 목적 | "Is-a" 관계 (상속) | "Can-do" 기능 (동작) |
추상 클래스를 사용하는 경우:
- 밀접하게 관련된 클래스 간에 코드를 공유하려는 경우
- 일부 메서드에 대한 기본 구현을 제공해야 하는 경우
- 비공개 멤버 (필드, 메서드) 가 필요한 경우
- 생성자 또는 인스턴스 필드가 필요한 경우
- 하위 클래스 그룹에 대한 템플릿을 정의하는 경우
인터페이스를 사용하는 경우:
- 관련 없는 클래스가 인터페이스를 구현하도록 하려는 경우
- 구현이 아닌 동작을 지정하려는 경우
- 다중 상속이 필요한 경우
- 서비스에 대한 계약을 정의하려는 경우
많은 경우, ElectricCar 예제에서와 같이 추상 클래스와 인터페이스를 함께 사용하여 좋은 설계를 할 수 있습니다.
요약
이 랩에서는 Java 에서 강력한 두 가지 추상화 메커니즘인 추상 클래스와 인터페이스를 살펴보았습니다. 다음은 주요 내용입니다.
추상 클래스:
- 직접 인스턴스화할 수 없음
- 추상 메서드와 구체 메서드 모두 가질 수 있음
- 생성자 및 인스턴스 변수 지원
- 단일 상속 모델 따름
- "is-a" 관계 및 공유 구현에 적합
인터페이스:
- 구현 클래스가 따라야 하는 계약 정의
- 모든 필드는 상수임 (public, static, final)
- 메서드는 암시적으로 public 및 abstract 임 (Java 8 이전)
- 구현을 통해 다중 상속 지원
- "can-do" 기능 및 느슨한 결합에 완벽함
추상 클래스와 인터페이스는 모두 객체 지향 프로그래밍의 기본 원칙 중 하나인 Java 에서 추상화를 달성하는 데 필수적인 도구입니다. 둘 중 선택은 설계 요구 사항에 따라 다르며, 각기 특정 시나리오에서 특정 강점을 가지고 있습니다.
Java 프로그래밍 여정을 계속 진행하면서 추상 클래스와 인터페이스를 적절하게 사용하면 유지 관리 가능하고 유연하며 강력한 코드 구조를 만들 수 있다는 것을 알게 될 것입니다.