介绍
在这个项目中,你将学习如何创建一个天气趋势图表,该图表展示一个城市一整年的温度数据。该图表将允许用户在当月数据和接下来 7 天的数据之间切换,从而提供天气趋势的全面视图。
👀 预览
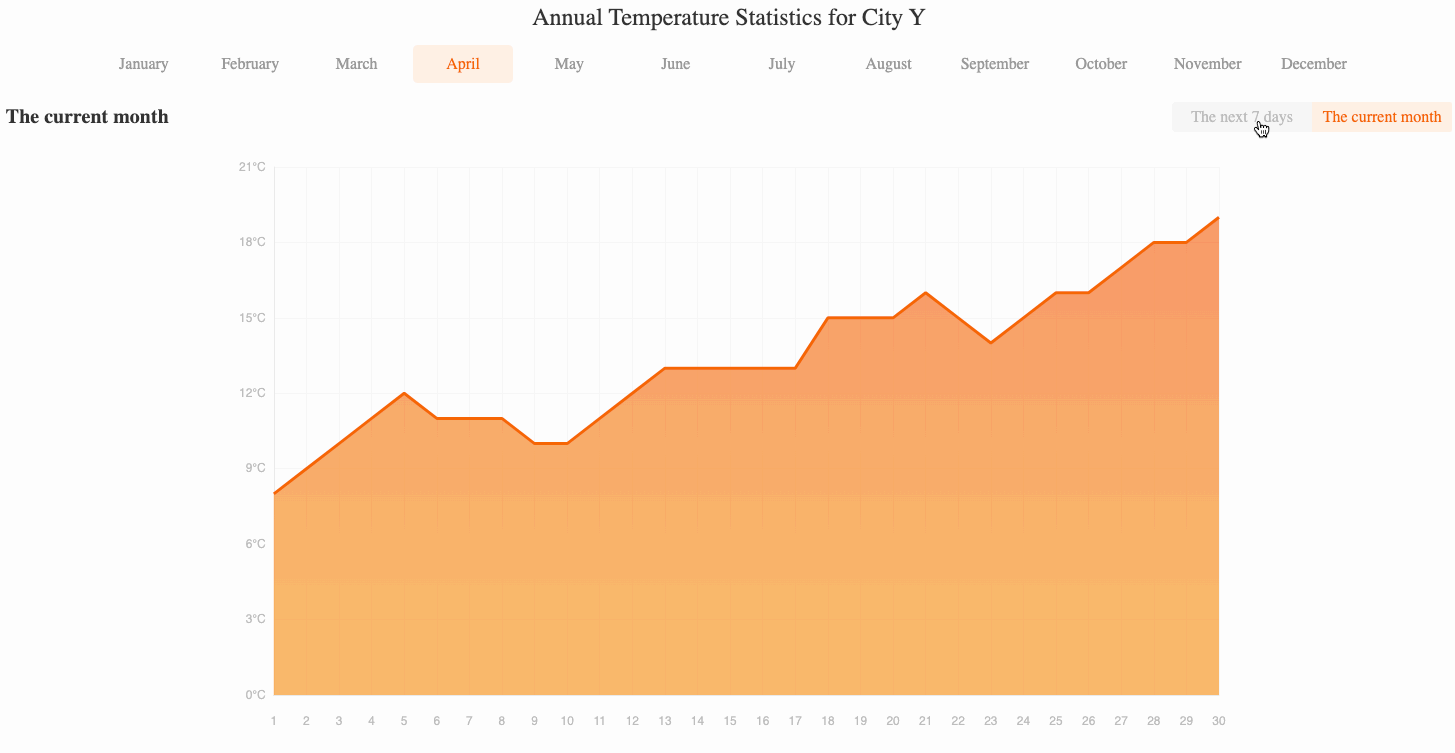
“当月”和“接下来 7 天”的切换效果如下图所示:
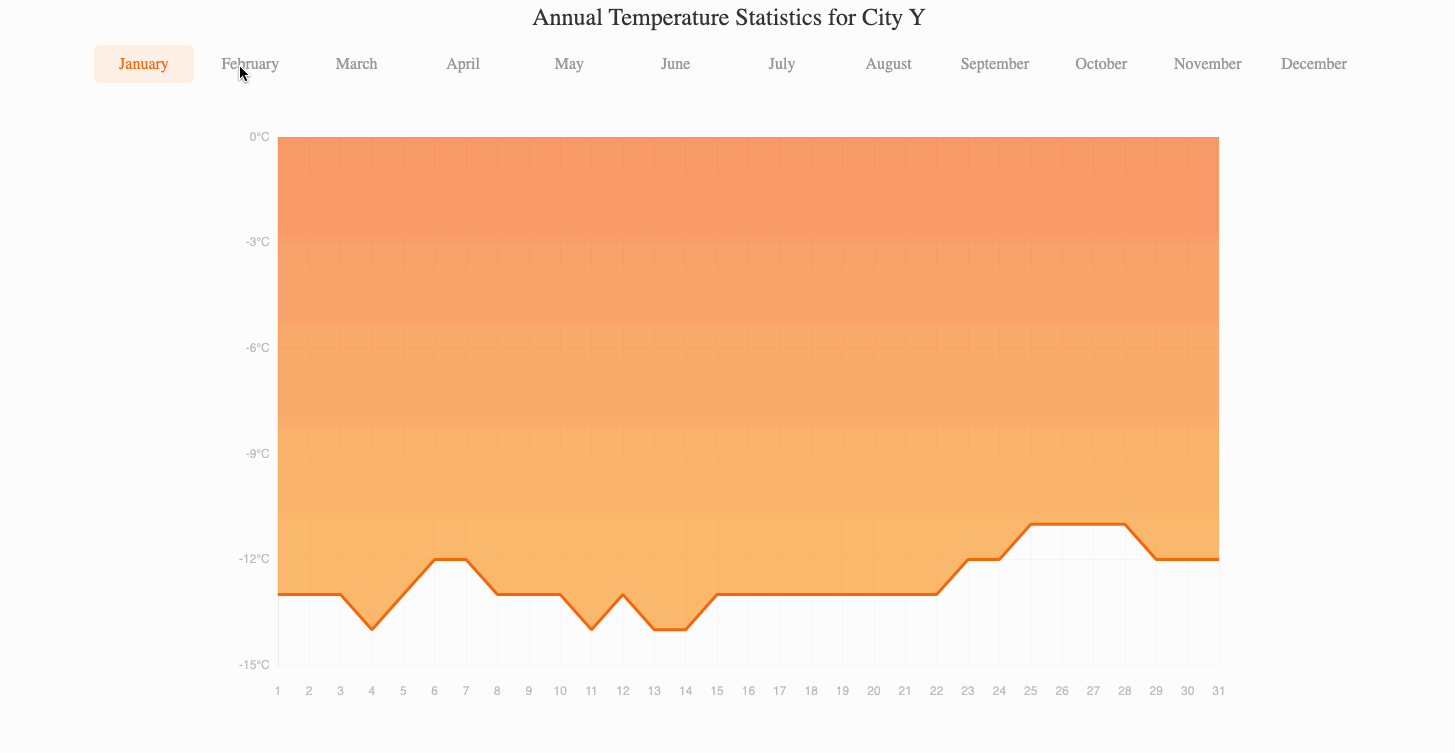
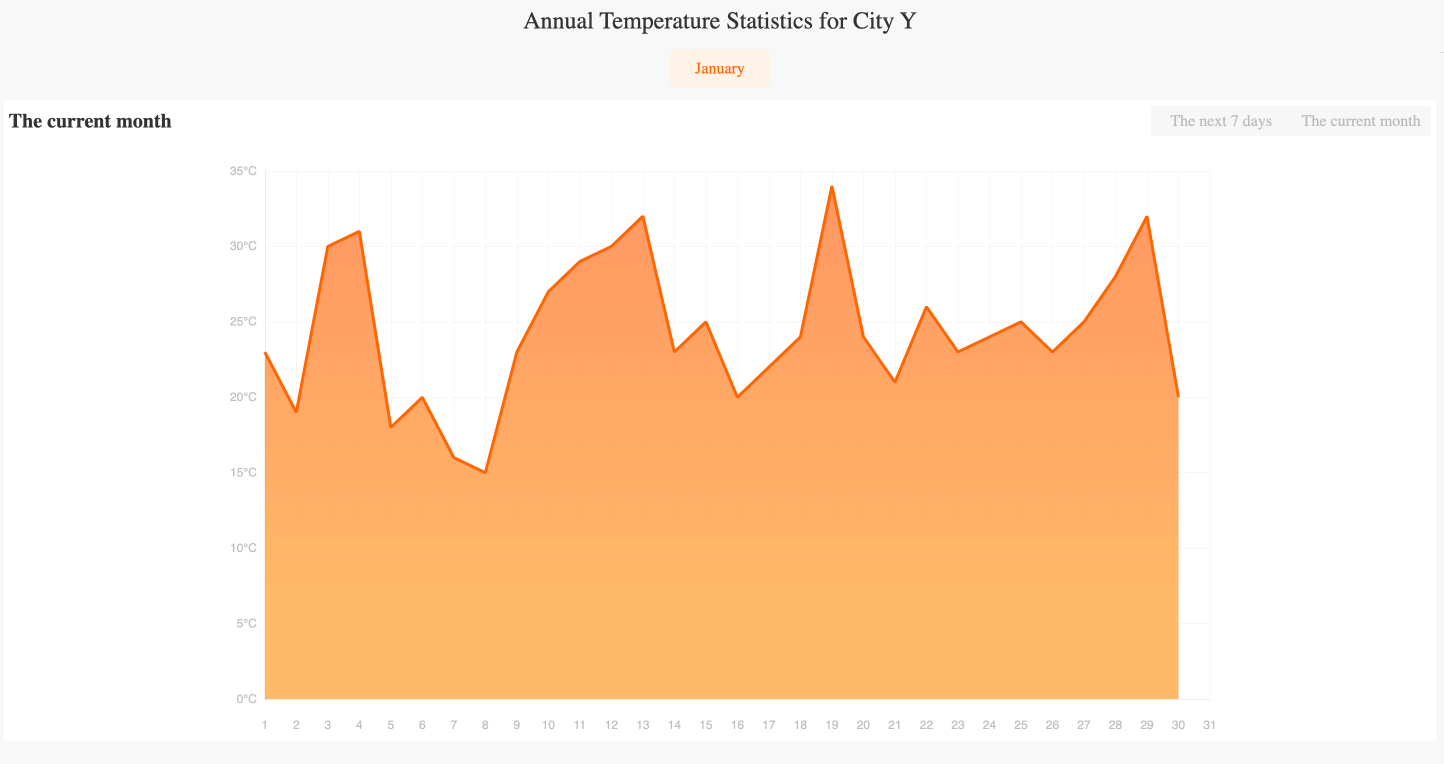
月份切换效果如下:
🎯 任务
在这个项目中,你将学习:
- 如何使用 Axios 从 JSON 文件中获取天气数据
- 如何渲染月份列表并处理点击事件以更改显示的数据
- 如何实现标签以在当月数据和接下来 7 天的数据之间切换
- 如何初始化和自定义 Echarts 图表以显示天气数据
🏆 成果
完成这个项目后,你将能够:
- 使用 Axios 从 JSON 文件中获取数据
- 使用 Vue.js 创建一个响应式且交互式的用户界面
- 使用 Echarts 创建一个具有高级功能的自定义图表
- 处理用户交互并相应地更新图表
- 应用你在前端开发、数据可视化和用户体验设计方面的知识
设置项目结构
在这一步中,你将设置项目文件和结构。按照以下步骤完成此步骤:
打开项目文件夹。目录结构如下:
├── css
│   └── style.css
├── js
│   ├── axios.js
│   ├── echarts.min.js
│   ├── vue.min.js
│   └── weather.json
└── index.html
其中:
css/style.css是样式文件。js/axios.js是 Axios 文件。js/vue.min.js是 vue2.x 文件。js/echarts.min.js是 Echarts 文件。js/weather.json是请求所需的天气数据。index.html是主页。
点击 WebIDE 右下角的“Go Live”按钮来运行项目。
接下来,在 VM 顶部打开“Web 8080”并手动刷新,你将看到页面。
获取天气数据
在这一步中,你将学习如何从提供的 JSON 文件中获取天气数据。
- 在
index.html文件中,找到文件底部的<script>标签。 - 在
<script>标签内,使用new Vue()创建一个新的 Vue 实例。 - 在 Vue 实例的
data选项中,添加以下属性并赋予初始值。
data: {
  //...
  data: [],
  yData: [],
  xData: [],
},
- 在 Vue 实例的
methods钩子中,在initChart函数里找到this.chartOptions,并将 x 轴和系列中的data更改为相应的变量,如下所示:
this.chartOptions = {
  //...
  xAxis: [
    {
      //...
      data: this.xData
    }
  ],
  //...
  series: [
    {
      //...
      data: this.yData
    }
  ]
};
- 在 Vue 实例的
mounted钩子中,使用axios.get()方法从./js/weather.json文件中获取天气数据。修改后的代码如下:
mounted: async function () {
  const res = await axios.get("./js/weather.json");
  this.data = res.data;
  this.yData = res.data[0]["January"];
  this.xData = [...this.yData.map((e, i) => i + 1)];
  this.$nextTick(() => {
    this.initChart();
  });
},
这段代码从 JSON 文件中获取天气数据,将其存储在 data 属性中,然后为图表设置初始的 yData 和 xData 属性。最后,它调用 initChart() 方法来渲染图表。
渲染月份列表
在这一步中,你将学习如何渲染月份列表并处理点击事件以更改显示的数据。
- 在
index.html文件中,在 Vue 实例的data选项中,添加以下属性并赋予初始值。
data: {
  //...
  monthName: "January",
  monthNumber: 0,
},
- 在
class="month"的<ul>元素中,使用v-for指令来渲染月份列表。为<li>元素添加一个点击事件处理程序,以便在点击某个月份时调用changeMonth()方法。
<ul>
  <li
    v-for="(item,key,index) in monthList"
    :class="[monthName===key?'active':'']"
    @click="changeMonth(key,index)"
  >
    {{item}}
  </li>
</ul>
- 在 Vue 实例的
methods部分,添加changeMonth()方法,该方法根据所选月份更新monthName、monthNumber、yData和xData属性,然后调用initChart()方法重新渲染图表。
changeMonth(month, index) {
  this.monthName = month;
  this.monthNumber = index;

  this.yData = this.data[index][month];
  this.xData = [...this.yData.map((e, i) => i + 1)];

  if (index === this.nowMonth) {
    this.type = 1;
  }
  this.initChart();
},
实现当月和接下来 7 天的标签页
在这一步中,你将学习如何实现允许用户在当月数据和接下来 7 天的数据之间切换的标签页。
- 在
index.html文件中,在 Vue 实例的data部分,添加以下属性:
data: {
  type: 1, // 接下来 7 天和当月的数据状态
  nowMonth: new Date().getMonth(),
},
- 在
id="currentMonth"的<div>中,根据monthNumber和nowMonth属性添加条件渲染。这将只显示当月的标签页。
<div id="currentMonth" v-if="monthNumber===nowMonth">
  <div class="title">
    <h3>{{typeTitle}}</h3>
    <div class="type" @click="clickType($event)">
      <span id="seven" :class="{'active':!type}">接下来 7 天</span>
      <span id="current" :class="{'active':type}">当月</span>
    </div>
  </div>
</div>
- 在 Vue 实例的
methods部分,添加clickType()方法,该方法根据点击的标签更新type、typeTitle、yData和xData属性,然后调用initChart()方法重新渲染图表。
clickType(e) {
  switch (e.target.id) {
    case "seven":
      this.type = 0;
      this.typeTitle = "接下来 7 天";
      [this.xData, this.yData] = this.getSevenData();
      break;
    case "current":
      this.type = 1;
      this.typeTitle = "当月";
      this.yData = this.data[this.monthNumber][this.monthName];
      this.xData = [...this.yData.map((e, i) => i + 1)];
      break;
  }
  this.initChart();
},
- 添加
getSevenData()方法,该方法计算接下来 7 天的 x 轴标签和 y 轴数据。
getSevenData() {
  let newXdata = [],
    newYdata = [];
  for (let i = 0; i < 7; i++) {
    let now = new Date();
    let time = now.getTime() + 1000 * 60 * 60 * 24 * i;
    now.setTime(time);
    newXdata.push(`${now.getMonth() + 1}/${now.getDate()}`);

    if (this.monthNumber === now.getMonth()) {
      newYdata.push(this.yData[now.getDate() - 1]);
    } else {
      let nextMonth = this.data[now.getMonth()];
      for (const key in nextMonth) {
        newYdata.push(nextMonth[key][now.getDate() - 1]);
      }
    }
  }
  return [newXdata, newYdata];
},
此方法计算接下来 7 天的 x 轴标签和 y 轴数据,同时考虑到月份之间的过渡。
- 保存文件并重新加载页面以查看更新后的图表。下图显示了在“当月”和“接下来 7 天”之间切换的效果(通过时间函数获取,这里假设是四月):
月份切换效果如下:
总结
恭喜!你已完成此项目。你可以在 LabEx 中练习更多实验以提升技能。