
Introduction
This project will guide you through the process of creating a VSCode extension that lets the user adjust the heading level of selected Markdown text. By the end, you'll have a functional extension that enhances the Markdown editing experience in Visual Studio Code.
👀 Preview

🎯 Tasks
In this project, you will learn:
- How to create the scaffolding for a VSCode extension using TypeScript.
- How to integrate TypeScript with Node.js and VSCode configurations.
- How to develop the core functionality to adjust heading levels of selected Markdown text.
- How to write configuration files for building, debugging, and running the extension.
🏆 Achievements
After completing this project, you will be able to:
- Design and develop VSCode extensions using TypeScript.
- Handle user interactions and text selections within the VSCode environment.
- Parse and manipulate Markdown syntax.
- Generate and manage multiple files in a project.
- Configure TypeScript, Node.js, and VSCode for seamless development.
Install smol-ai
In addition, We make use of the smol-ai framework to generate code.
smol-ai description from the README:
This is a prototype of a "junior developer" agent (aka smol dev) that scaffolds an entire codebase out for you once you give it a product spec, but does not end the world or overpromise AGI. instead of making and maintaining specific, rigid, one-shot starters, like create-react-app, or create-nextjs-app, this is basically create-anything-app where you develop your scaffolding prompt in a tight loop with your smol dev.
We like smol-ai because of its simplicity. The entire code generation logic is in a single Python file consisting of three primary functions:
- generate a list of files that are needed to carry out the prompt (eg. package.json, index.js, ...)
- generate a list of shared dependencies that are needed to carry out the prompt (eg. axios, react, ...)
- for each file in the generated file list, generate code that would go into the file, making use of shared dependencies if applicable
Note that smol-ai also provides other capabilities like the ability to debug errors and generate a prompt based on the current code base.
Tasks
Clone the smol-ai repository
You need to clone the
https://github.com/smol-ai/developerrepository to the/home/labex/projectdirectory.Configure smol-ai
You need read the
smol-aiREADME and configure the OpenAI API key.
Init This Extension
There is a basic prompt describing this project:
a vscode extension that lets the user adjust the heading level of the selected text. it should have three commands: increase heading level, decrease heading level, and set heading level
Note that the prompt is short and general. You can try to improve the prompt by adding more details about the project.
You can run smol-ai to generate the project. After a few minutes spent generating code, smol-ai created the files in the developer/generated directory.
Tasks
Initialize the project
View the
smol-aiREADME, then usingsmol-aito generate the project.Configure the project
You need to view the generated code. If necessary, the prompt can be adjusted to regenerate.
Expected Result
There is a example of the generated code in the developer/generated directory. Your result may be different.
.
├── extension
│   ├── package.json
│   ├── src
│   │   ├── commands
│   │   │   ├── decreaseHeadingLevel.ts
│   │   │   ├── increaseHeadingLevel.ts
│   │   │   └── setHeadingLevel.ts
│   │   └── extension.ts
└── shared_dependencies.md
Test This Extension
To test this extension, we need to successfully execute the following steps:
- Install Dependencies;
- Compile Code;
- Run Extension.
Install Dependencies
You need to run the following commands in the generated directory.
yarn
There may be some issues when installing dependencies. You need to fix the issues.
Tasks
Fix the issues when installing dependencies.
You can ask the AI to fix the issues.
Expected Result
When the issues are fixed, You may see the following example results.
$ yarn

...
[3/5] 🚚 Fetching packages...
[4/5] 🔗 Linking dependencies...
[5/5] 🔨 Building fresh packages...
✨ Done in 4.31s.
Build This Extension
Because typescript is a compiled language, we need to execute a build step to compile the code to javascript. The package.json comes with the following scripts:
"scripts": {
    "vscode:prepublish": "npm run compile",
    "compile": "tsc -p ./",
    "watch": "tsc -watch -p ./",
    "postinstall": "node ./node_modules/vscode/bin/install",
    "test": "npm run compile && node ./node_modules/vscode/bin/test"
},
We can build the code by running the following command:
tsc --init
yarn compile
There may be some issues when compiling the code. You need to fix the issues.
Tasks
Fix the issues when compiling the code.
You can ask the AI to fix the issues.
Expected Result
When the issues are fixed, You may see the following example results.
$ tsc -p ./
✨ Done in 0.80s.
Run This Extension
Running a vscode extension requires that you go to the "Run and Debug" panel and launch the vscode extension task when the extension.ts file is active in the editor.
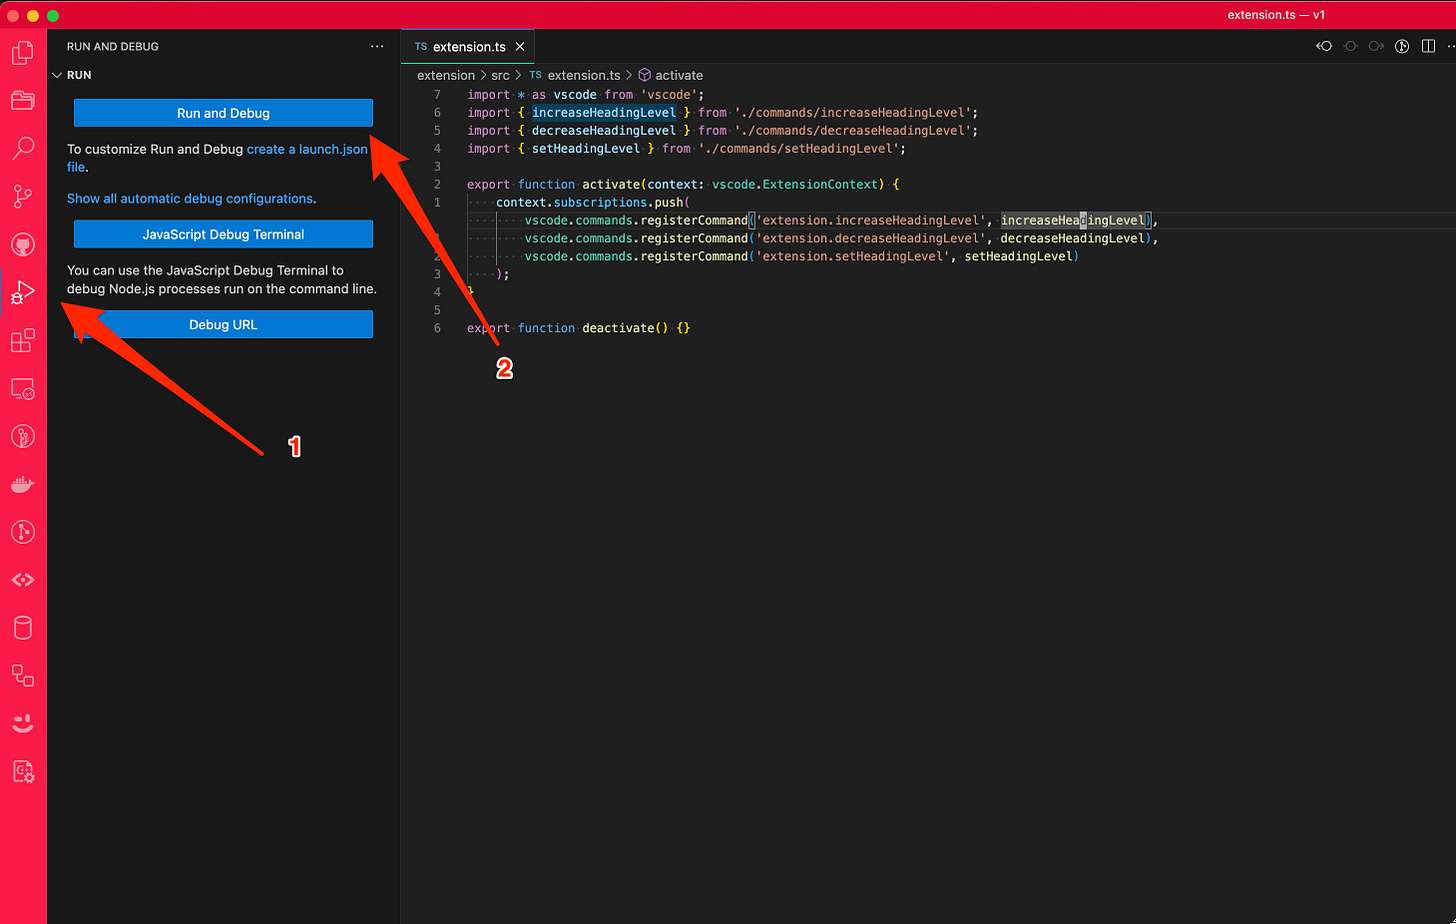
There may be some issues when running the extension. You need to fix the issues.
Tasks
Fix the issues when running the extension.
You can ask the AI to fix the issues.
Expected Result
When the issues are fixed, You may see the extension running correctly.
Summary
It works 🥳
So how did we do? We got a working extension. We got it to accomplish the goal set out in our prompt.
The journey to this point was not "automatic". We ran into many issues along the way. Lacking prior knowledge of typescript, node.js and vscode, these issues would have taken a while to debug.
And even though the code we were able to generate working code, there are still many improvements to be made:
- There are no instructions on how to develop, use, or publish the extension;
- There is no
.gitignorefor typescript/javascript/vscode artifacts; - There is no
launch.jsonfile that configures running the extension in development; - There are no tests;
- There is no code reuse.


