Introduction
Mockito is a powerful Java framework used for mocking and unit testing Java applications. In this lab, we will explore the concept of spies in Mockito. A Spy is a unique testing tool that acts as a partial mock - it tracks interactions with an object while still allowing the real methods to be called.
This dual behavior makes spies particularly useful when we want to verify interactions with objects but still need the real functionality to execute. Throughout this lab, we will learn how to create spies using different approaches, understand how to stub a spy's behavior, and compare spies with mocks to highlight their key differences.
Creating a Java Project and Understanding Mockito Spy
In this step, we will set up our project structure and understand what a Spy is in Mockito. Spies allow us to track method calls on real objects while still using their actual implementation.
Create the Java File
Let's first create our main Java file for this lab. In the WebIDE, create a new file called MockitoSpyDemo.java in the ~/project directory.

Add the following code to import the necessary dependencies:
import org.junit.Test;
import org.junit.Before;
import org.junit.runner.RunWith;
import org.mockito.Mockito;
import org.mockito.Spy;
import org.mockito.MockitoAnnotations;
import org.mockito.exceptions.misusing.NotAMockException;
import org.mockito.junit.MockitoJUnitRunner;
import java.util.ArrayList;
import java.util.List;
import static org.junit.Assert.*;

public class MockitoSpyDemo {

    public static void main(String[] args) {
        System.out.println("This is a Mockito Spy demonstration.");
        System.out.println("To run the tests, you need to use JUnit.");
    }
}
Understanding Mockito Spy
A Spy in Mockito is a wrapper around a real object that lets you:
- Track all interactions with the object (like a mock)
- Execute the real methods of the object (unlike a mock)
Think of a spy as an observer that watches what happens to an object but doesn't interfere with its normal behavior unless specifically programmed to do so.
Let's add our first test method to demonstrate the basic usage of a spy. Add the following method to your MockitoSpyDemo class:
@Test
public void basicSpyExample() {
    // Create a list and spy on it
    List<String> realList = new ArrayList<>();
    List<String> spyList = Mockito.spy(realList);

    // Using the spy to add an item (the real method is called)
    spyList.add("Hello");

    // Verify the interaction happened
    Mockito.verify(spyList).add("Hello");

    // The real method was called, so the list actually has the item
    assertEquals(1, spyList.size());
    assertEquals("Hello", spyList.get(0));

    System.out.println("Basic Spy Example - Spy List Content: " + spyList);
    System.out.println("Basic Spy Example - Spy List Size: " + spyList.size());
}
Let's compile and run our code to see if it works:
cd ~/project
javac -cp lib/junit.jar:lib/mockito-core.jar:lib/byte-buddy.jar:lib/byte-buddy-agent.jar:lib/objenesis.jar:lib/hamcrest-core.jar MockitoSpyDemo.java
java -cp .:lib/junit.jar:lib/mockito-core.jar:lib/byte-buddy.jar:lib/byte-buddy-agent.jar:lib/objenesis.jar:lib/hamcrest-core.jar MockitoSpyDemo
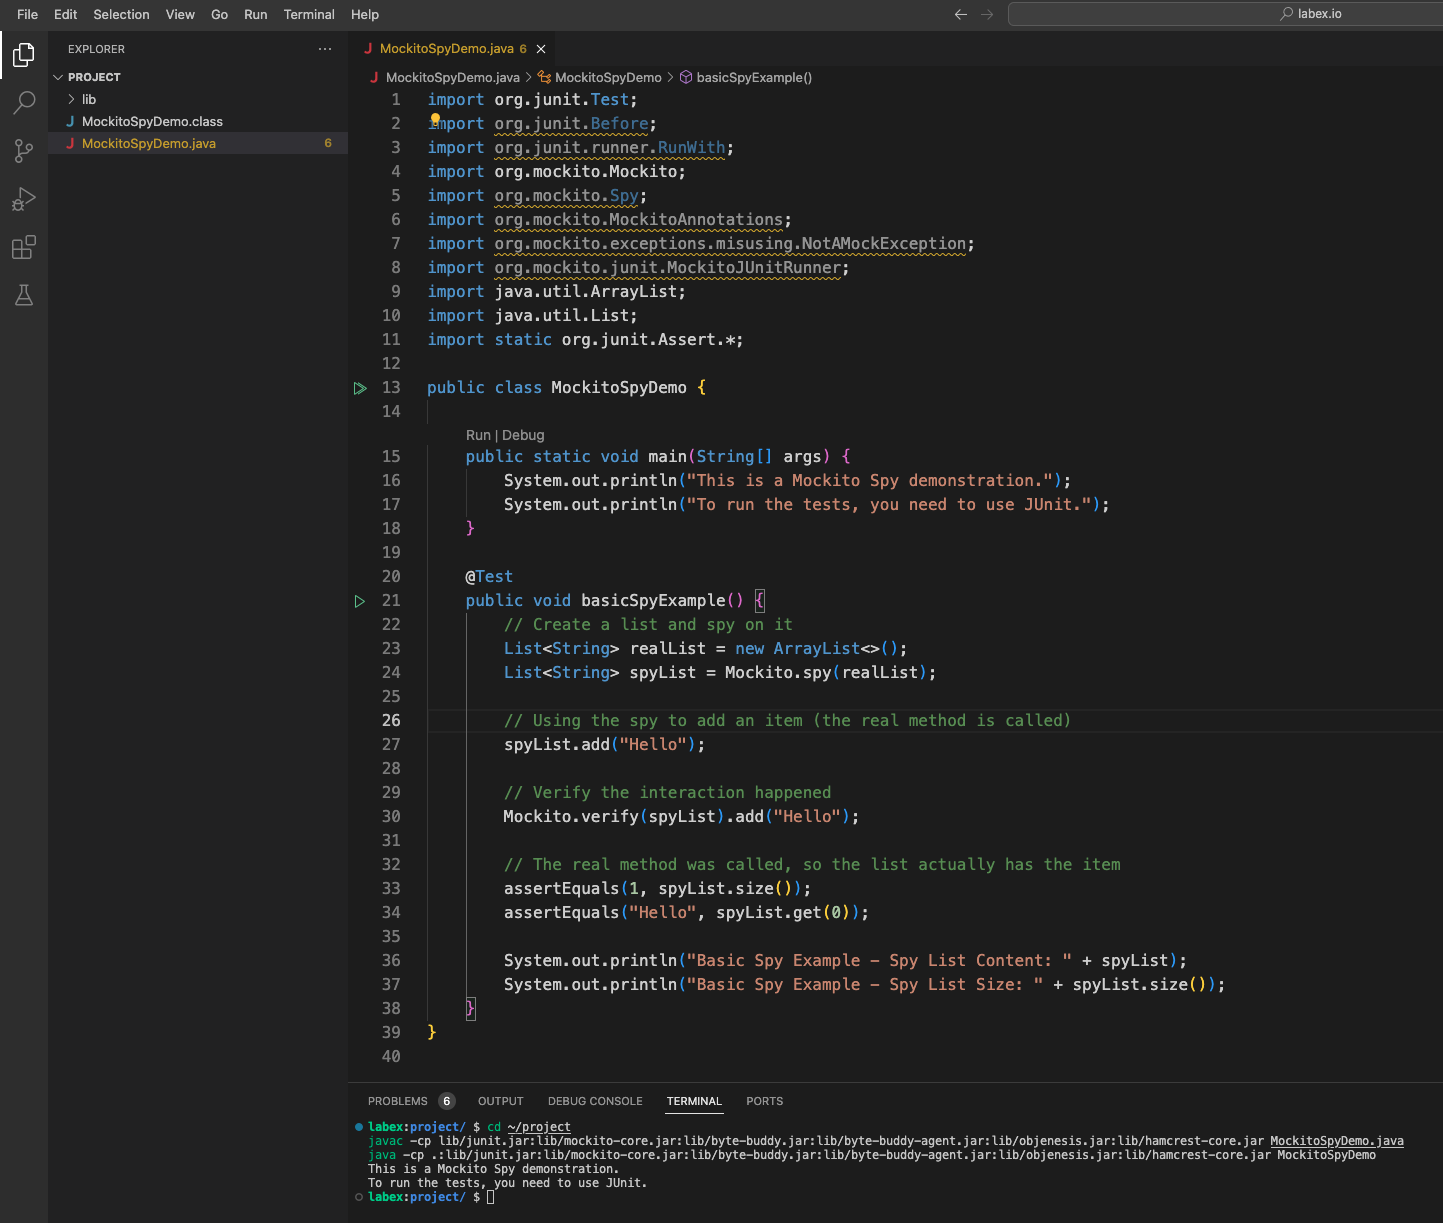
You should see the following output:
This is a Mockito Spy demonstration.
To run the tests, you need to use JUnit.
Our main method runs correctly. However, to run the tests we need to use JUnit. Instead of setting up a complex JUnit runner for this lab, we will focus on understanding the code structure and concepts.
In the next step, we will explore different ways to create spies in Mockito.
Different Ways to Create Spies in Mockito
In this step, we will explore different approaches to create spies in Mockito. We'll learn how to create spies using the Mockito.spy() method and the @Spy annotation.
Using Mockito.spy() Method
The most direct way to create a spy is by using the Mockito.spy() method. Let's add a test method that demonstrates this approach:
@Test
public void testSpyWithMockitoSpyMethod() {
    // Create an ArrayList and a spy of it
    ArrayList<Integer> realList = new ArrayList<>();
    ArrayList<Integer> spyList = Mockito.spy(realList);

    // Adding elements to the spy (real methods are called)
    spyList.add(5);
    spyList.add(10);
    spyList.add(15);

    // Verifying interactions
    Mockito.verify(spyList).add(5);
    Mockito.verify(spyList).add(10);
    Mockito.verify(spyList).add(15);

    // Verifying that elements were actually added to the list
    assertEquals(3, spyList.size());

    System.out.println("Spy Method Example - Spy List Content: " + spyList);
    System.out.println("Spy Method Example - Spy List Size: " + spyList.size());
}
Using @Spy Annotation
Another way to create a spy is by using the @Spy annotation. This approach is particularly useful when you want to initialize spies automatically. Add the following code to your MockitoSpyDemo class:
// Declare a spy using annotation
@Spy
ArrayList<Integer> annotationSpyList = new ArrayList<>();

@Before
public void initSpies() {
    // Initialize mocks and spies with annotations
    MockitoAnnotations.initMocks(this);
}

@Test
public void testSpyWithAnnotation() {
    // Adding elements to the spy
    annotationSpyList.add(5);
    annotationSpyList.add(10);
    annotationSpyList.add(15);

    // Verifying interactions
    Mockito.verify(annotationSpyList).add(5);
    Mockito.verify(annotationSpyList).add(10);
    Mockito.verify(annotationSpyList).add(15);

    // Verifying that elements were actually added to the list
    assertEquals(3, annotationSpyList.size());

    System.out.println("Annotation Spy Example - Spy List Content: " + annotationSpyList);
    System.out.println("Annotation Spy Example - Spy List Size: " + annotationSpyList.size());
}
Understanding the Difference Between Approaches
Both approaches create a spy, but they have different use cases:
Mockito.spy()is more flexible and can be used anywhere in your test methods.@Spyannotation is more convenient when you have many spies and want to initialize them all at once.
The MockitoAnnotations.initMocks(this) method is responsible for initializing all annotated fields. In real projects, you might use @RunWith(MockitoJUnitRunner.class) to have this initialization done automatically.
Let's compile our updated code:
cd ~/project
javac -cp lib/junit.jar:lib/mockito-core.jar:lib/byte-buddy.jar:lib/byte-buddy-agent.jar:lib/objenesis.jar:lib/hamcrest-core.jar MockitoSpyDemo.java
The code should compile without errors. Our test methods are now ready, but as mentioned earlier, we would need a JUnit runner to execute them automatically.
In the next step, we will learn how to stub spies to override their default behavior.
Stubbing Spies and Handling Exceptions
In this step, we will learn how to stub a spy to override its default behavior and understand how to handle exceptions that may occur when using Mockito.
Stubbing a Spy
Spies use real object methods by default, but sometimes we want to change this behavior for testing purposes. This is called "stubbing" the spy. Let's add a test method that demonstrates how to stub a spy:
@Test
public void testStubbingSpy() {
    // Create a spy of ArrayList
    ArrayList<Integer> spyList = Mockito.spy(new ArrayList<>());

    // Add an element
    spyList.add(5);

    // Verify the element was added
    Mockito.verify(spyList).add(5);

    // By default, contains() should return true for element 5
    assertTrue(spyList.contains(5));
    System.out.println("Stubbing Example - Default behavior: spyList.contains(5) = " + spyList.contains(5));

    // Stub the contains() method to always return false for the value 5
    Mockito.doReturn(false).when(spyList).contains(5);

    // Now contains() should return false, even though the element is in the list
    assertFalse(spyList.contains(5));
    System.out.println("Stubbing Example - After stubbing: spyList.contains(5) = " + spyList.contains(5));

    // The element is still in the list (stubbing didn't change the list content)
    assertEquals(1, spyList.size());
    assertEquals(Integer.valueOf(5), spyList.get(0));
    System.out.println("Stubbing Example - Spy List Content: " + spyList);
}
Important Note About Stubbing
When stubbing spy methods, it's recommended to use doReturn(), doThrow(), doAnswer(), etc., instead of when(). This is because with spies, the when().thenReturn() syntax might call the real method during stubbing, which can cause unexpected side effects.
For example:
// This might call the real get() method, causing issues if index 10 doesn't exist
Mockito.when(spyList.get(10)).thenReturn(99); // May throw IndexOutOfBoundsException

// This is the correct way to stub a spy
Mockito.doReturn(99).when(spyList).get(10); // Safe, doesn't call the real method
Handling NotAMockException
If you try to use Mockito's verification methods on a regular object (not a mock or spy), you'll get a NotAMockException. Let's add a test method to demonstrate this exception:
@Test
public void testNotAMockException() {
    try {
        // Create a regular ArrayList (not a mock or spy)
        ArrayList<Integer> regularList = new ArrayList<>();
        regularList.add(5);

        // Try to verify an interaction on a regular object
        Mockito.verify(regularList).add(5);

        fail("Expected NotAMockException was not thrown");
    } catch (NotAMockException e) {
        // Expected exception
        System.out.println("NotAMockException Example - Caught expected exception: " + e.getMessage());
        assertTrue(e.getMessage().contains("Argument passed to verify() is not a mock"));
    }
}
Let's compile our updated code:
cd ~/project
javac -cp lib/junit.jar:lib/mockito-core.jar:lib/byte-buddy.jar:lib/byte-buddy-agent.jar:lib/objenesis.jar:lib/hamcrest-core.jar MockitoSpyDemo.java
The code should compile without errors. In this step, we learned how to stub spy methods to override their default behavior and how to handle the NotAMockException that occurs when using verification methods on regular objects.
In the next step, we will compare mocks and spies to understand their key differences.
Mock vs Spy: Understanding the Differences
In this step, we will directly compare mocks and spies to understand their key differences. This comparison will help you choose the right tool for your testing needs.
Creating a Comparison Test
Let's add a test method that demonstrates the differences between mocks and spies:
@Test
public void testMockVsSpyDifference() {
    // Create a mock and a spy of ArrayList
    ArrayList<Integer> mockList = Mockito.mock(ArrayList.class);
    ArrayList<Integer> spyList = Mockito.spy(new ArrayList<>());

    // Add elements to both
    mockList.add(1);
    spyList.add(1);

    // Verify interactions (both will pass)
    Mockito.verify(mockList).add(1);
    Mockito.verify(spyList).add(1);

    // Check the size of both lists
    System.out.println("Mock vs Spy - Mock List Size: " + mockList.size());
    System.out.println("Mock vs Spy - Spy List Size: " + spyList.size());

    // Mock returns default values (0 for size) unless stubbed
    assertEquals(0, mockList.size());

    // Spy uses real method implementation, so size is 1
    assertEquals(1, spyList.size());

    // Stub both to return size 100
    Mockito.when(mockList.size()).thenReturn(100);
    Mockito.when(spyList.size()).thenReturn(100);

    // Both should now return 100 for size
    assertEquals(100, mockList.size());
    assertEquals(100, spyList.size());

    System.out.println("Mock vs Spy (After Stubbing) - Mock List Size: " + mockList.size());
    System.out.println("Mock vs Spy (After Stubbing) - Spy List Size: " + spyList.size());
}
Understanding the Key Differences
Let's summarize the key differences between mocks and spies in Mockito:
Method Behavior:
- Mock: All methods return default values (null, 0, false) unless stubbed
- Spy: Methods call the real implementation unless stubbed
Object State:
- Mock: Operations don't change the state (e.g., adding to a mock list doesn't actually add anything)
- Spy: Operations change the object's state just like a real object
Creation:
- Mock: Created from a class, not an instance (
Mockito.mock(ArrayList.class)) - Spy: Usually created from an instance (
Mockito.spy(new ArrayList<>()))
- Mock: Created from a class, not an instance (
Use Cases:
- Mock: When you want to completely control the behavior and don't need real methods
- Spy: When you want to use real methods but need to override only some behaviors
Practical Example: When to Use a Spy
Let's add one more test that shows a common use case for spies - partially stubbing a complex object:
@Test
public void testWhenToUseSpy() {
    // Create a complex data object that we want to partially mock
    StringBuilder builder = new StringBuilder();
    StringBuilder spyBuilder = Mockito.spy(builder);

    // Use the real append method
    spyBuilder.append("Hello");
    spyBuilder.append(" World");

    // Verify the real methods were called
    Mockito.verify(spyBuilder).append("Hello");
    Mockito.verify(spyBuilder).append(" World");

    // The real methods modified the state
    assertEquals("Hello World", spyBuilder.toString());
    System.out.println("When to Use Spy - Content: " + spyBuilder.toString());

    // Stub the toString() method to return something else
    Mockito.when(spyBuilder.toString()).thenReturn("Stubbed String");

    // Now toString() returns our stubbed value
    assertEquals("Stubbed String", spyBuilder.toString());
    System.out.println("When to Use Spy - After Stubbing toString(): " + spyBuilder.toString());

    // But other methods still work normally
    spyBuilder.append("!");
    Mockito.verify(spyBuilder).append("!");

    // toString() still returns our stubbed value
    assertEquals("Stubbed String", spyBuilder.toString());
}
Let's compile our updated code:
cd ~/project
javac -cp lib/junit.jar:lib/mockito-core.jar:lib/byte-buddy.jar:lib/byte-buddy-agent.jar:lib/objenesis.jar:lib/hamcrest-core.jar MockitoSpyDemo.java
The code should compile without errors. In this step, we learned the key differences between mocks and spies, and when to use each one. Mocks completely replace the original object's behavior, while spies maintain the original behavior but allow you to override specific methods when needed.
Summary
In this lab, we explored the concept of spies in Mockito, a powerful feature for Java unit testing. Here are the key points we covered:
Creating Spies: We learned how to create spies using both the
Mockito.spy()method and the@Spyannotation. The former is more flexible, while the latter is more convenient when you have many spies.Spy Behavior: Spies track method calls like mocks but execute the real methods by default. This dual nature makes them particularly useful for testing real objects while still maintaining the ability to verify interactions.
Stubbing Spies: We discovered how to override the default behavior of spy methods using
doReturn(),doThrow(), and other stubbing methods. This allows us to control specific behaviors while keeping others intact.Exception Handling: We explored the
NotAMockExceptionthat occurs when trying to use Mockito verification methods on regular objects, and how to handle it properly.Mock vs Spy: We compared mocks and spies to understand their key differences. Mocks completely replace the original behavior with default or stubbed responses, while spies maintain the original behavior but allow overriding specific methods.
Spies are a powerful tool in the Mockito arsenal, offering a balance between the complete control of mocks and the realism of actual objects. They're particularly useful when:
- You want to test a real object but need to verify certain interactions
- You need to override only specific methods while keeping the rest of the object's behavior intact
- You're working with complex objects where mocking all methods would be impractical
By understanding when and how to use spies, you can write more effective and maintainable unit tests for your Java applications.