Introduction
In this lab, you will learn how to conduct brute-force attacks on HTTP services using Hydra, a versatile password-cracking tool. You'll explore setting up a Python HTTP server with basic authentication and testing its security through systematic credential attacks.
The exercise covers creating wordlists, configuring Hydra parameters, and analyzing attack results to identify authentication weaknesses. This practical session demonstrates essential techniques for assessing web service security against brute-force attempts.
Install a Local HTTP Server
In this step, you will install a local HTTP server using Python's built-in module. This server will simulate a real web server with basic authentication, which we'll use as the target for our Hydra brute-force attack later. Understanding how web servers work is fundamental before attempting to test their security.
Python's http.server module provides a quick way to create a basic web server for testing purposes. While not suitable for production, it's perfect for our lab as it demonstrates HTTP protocol basics without complex setup. The server will run on port 8000 by default.
- First, navigate to your project directory. This ensures all files are organized in one place:
cd ~/project
- Create a dedicated directory for your web server files. Keeping web content separate helps maintain organization:
mkdir http_server
cd http_server
- Create a simple homepage. This HTML file will be served when someone accesses your web server:
echo "<h1>Welcome to LabEx HTTP Server</h1>" > index.html
- Start the Python HTTP server. The
&symbol runs it in the background so you can continue using the terminal:
python3 -m http.server 8000 &
Press Enter, if you want to continue using the terminal.
- Verify the server is running. The
netstatcommand shows active network connections and listening ports:
netstat -tulnp | grep 8000
You should see output confirming Python is listening on port 8000:
tcp 0 0 0.0.0.0:8000 0.0.0.0:* LISTEN 1234/python3
- Test the server functionality. The
curlcommand retrieves the webpage to confirm everything works:
curl http://localhost:8000
You should receive the HTML content you created, proving the server is operational:
<h1>Welcome to LabEx HTTP Server</h1>

With the basic web server running, we're ready to implement authentication in the next step. This foundation is crucial because Hydra will interact with this server exactly as it would with any real web server using basic authentication.
Configure HTTP Server with Basic Auth
In this step, you will configure basic authentication for the HTTP server you installed earlier. Basic authentication is a simple method where the client sends a username and password with each request. This creates a security layer we'll later test by attempting to brute-force it using Hydra - which demonstrates why weak passwords are dangerous.
- First, ensure you're in the correct directory where we'll set up our protected web server:
cd ~/project/http_server
- Create a password file using the
htpasswdutility. This tool comes with theapache2-utilspackage (already installed in LabEx VM) and helps manage password files for basic authentication:
htpasswd -c .htpasswd admin
When prompted, enter password123 as the password. We're intentionally using a weak password here to demonstrate how easily simple passwords can be cracked.
- Now we'll create a Python script to serve HTTP content with basic authentication. This script will check credentials before allowing access:
nano auth_server.py
- Paste the following Python code. This creates a custom HTTP server that:
- Requires Basic Authentication
- Validates credentials against our .htpasswd file
- Serves content only after successful authentication
from http.server import HTTPServer, BaseHTTPRequestHandler
import base64

class AuthHandler(BaseHTTPRequestHandler):
    def do_GET(self):
        auth_header = self.headers.get('Authorization')
        if not auth_header or not auth_header.startswith('Basic '):
            self.send_response(401)
            self.send_header('WWW-Authenticate', 'Basic realm="LabEx"')
            self.send_header('Content-type', 'text/html')
            self.end_headers()
            self.wfile.write(b'Authentication required')
            return

        auth_decoded = base64.b64decode(auth_header[6:]).decode('utf-8')
        username, password = auth_decoded.split(':', 1)

        if username == 'admin' and password == 'password123':
            self.send_response(200)
            self.send_header('Content-type', 'text/html')
            self.end_headers()
            with open('index.html', 'rb') as f:
                self.wfile.write(f.read())
        else:
            self.send_response(401)
            self.send_header('WWW-Authenticate', 'Basic realm="LabEx"')
            self.end_headers()
            self.wfile.write(b'Authentication failed')

if __name__ == '__main__':
    server_address = ('', 8000)
    httpd = HTTPServer(server_address, AuthHandler)
    print("Server running on port 8000...")
    httpd.serve_forever()
- Save the file (Ctrl+O, Enter, Ctrl+X in nano) and stop the previous HTTP server that didn't have authentication:
pkill -f "python3 -m http.server"
- Start our new authenticated HTTP server in the background:
python3 auth_server.py &
- Let's test the authentication by trying to access the server without credentials:
curl -v http://localhost:8000
You should receive a 401 Unauthorized response, which means our authentication is working.
- Now try accessing with the correct credentials we set up earlier:
curl -v -u admin:password123 http://localhost:8000
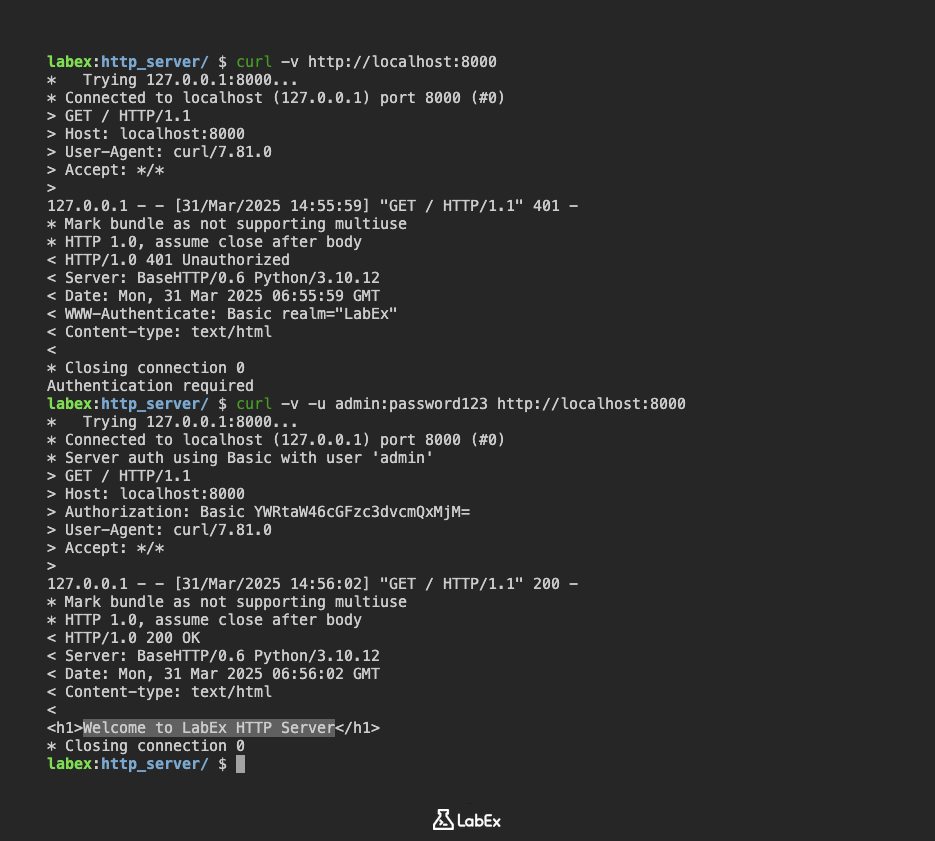
You should now see the HTML content from your index.html file, proving the authentication works correctly.
The server is now properly protected with basic authentication and ready for our brute-force attack demonstration in the next steps. This setup mimics real-world scenarios where web servers use basic auth, showing both how it works and its potential vulnerabilities.
Prepare Username and Password Lists
In this step, you'll create wordlists that Hydra will use to test possible username and password combinations against the HTTP basic authentication. These lists form the foundation of a dictionary attack, where we systematically try common credentials rather than guessing randomly.
- First, navigate to your project directory. This ensures all your files stay organized in one place:
cd ~/project
- Create a dedicated directory for your wordlists. Keeping them separate makes them easier to manage:
mkdir wordlists
cd wordlists
- Create a username list file using nano, a simple text editor. We'll populate it with common administrative usernames that are frequently used as defaults:
nano usernames.txt
Add these common usernames (one per line):
admin
root
user
test
guest
administrator
- Similarly, create a password list file. These are passwords that are commonly used or easy to guess:
nano passwords.txt
Add these common passwords (one per line):
password123
password
123456
admin
letmein
qwerty
- Verify the contents of your files to ensure they were created correctly. The
catcommand displays file contents in the terminal:
cat usernames.txt
cat passwords.txt
- (Optional) Generate additional passwords using crunch, a wordlist generator. This command creates up to 100 4-digit number combinations, which is useful for testing simple numeric passwords:
crunch 4 4 0123456789 | head -n 100 > numbers.txt
- Combine your password lists into a single file. This gives Hydra more variations to test during the attack:
cat passwords.txt numbers.txt > combined_passwords.txt
- Verify the combined password list. The
headcommand shows just the first 10 lines, giving you a quick check that the merge worked:
head combined_passwords.txt
You should see output like:
password123
password
123456
admin
letmein
qwerty
0000
0001
0002
0003
These wordlists contain both the correct credentials (admin/password123) we configured earlier and many incorrect combinations. This setup realistically simulates how an attacker would attempt to brute-force a login by trying numerous possible credentials. In the next step, we'll use Hydra to automate testing these combinations against our HTTP server.
Run Hydra Attack on HTTP Service
In this step, you will use Hydra to perform a brute-force attack against the HTTP basic authentication service you configured earlier. Hydra is a powerful password-cracking tool that systematically tries all username/password combinations from wordlists to find valid credentials. This demonstrates why weak passwords are vulnerable to automated attacks.
- First, ensure your HTTP server is still running. This command checks if the server process exists and restarts it if needed:
pgrep -fa "python3 auth_server.py" || cd ~/project/http_server && python3 auth_server.py &
- Navigate to your wordlists directory where you stored the username and password files. These files contain the combinations Hydra will test:
cd ~/project/wordlists
- Run Hydra with this command to attack the HTTP service. The -L flag specifies the username list, -P the password list, and http-get / indicates we're attacking a basic HTTP GET request:
hydra -L usernames.txt -P combined_passwords.txt localhost -s 8000 http-get /
- Observe Hydra's output as it tries combinations. When successful, you'll see output showing which credentials worked:
[DATA] attacking http-get://localhost:8000/
[8000][http-get] host: localhost   login: admin   password: password123
1 of 1 target successfully completed, 1 valid password found
- To see more detailed output including each attempt Hydra makes, add the -v (verbose) flag:
hydra -v -L usernames.txt -P combined_passwords.txt localhost -s 8000 http-get /
- (Optional) Save the results to a file for later analysis. The -o flag specifies the output file:
hydra -L usernames.txt -P combined_passwords.txt localhost -s 8000 http-get / -o hydra_results.txt
- Check the saved results file to see the successful credentials:
cat hydra_results.txt
The attack should successfully find the credentials (admin/password123) that we set up earlier. This shows how quickly weak credentials can be discovered through automated brute-force attacks, emphasizing the importance of strong passwords.
Summary
In this lab, you have learned how to set up a local HTTP server with Python and implement basic authentication for security testing purposes. The process included creating web directories, configuring authentication with htpasswd, and verifying server functionality using common tools like curl.
Additionally, you gained practical experience in preparing credential lists and executing brute-force attacks against HTTP services using Hydra. This exercise demonstrated the importance of strong passwords and the vulnerabilities of basic authentication mechanisms when weak credentials are used.