
Introduction
In this lab, participants will learn how to embed and customize video elements in HTML using the powerful <video> tag. The lab covers essential techniques for creating interactive video players, including adding controls, configuring video sources, implementing custom thumbnails, and exploring various video tag attributes to enhance the playback experience.
Through a step-by-step approach, learners will gain practical skills in HTML5 video embedding, starting from basic video element creation to advanced configurations. Participants will discover how to add multiple video sources, control playback settings, set custom thumbnails, and create more engaging and user-friendly video experiences directly within web pages.
Create Basic Video Element with Controls
In this step, you'll learn how to create a basic video element in HTML with essential controls. HTML5 provides a simple and powerful <video> tag that allows you to embed videos directly into web pages.
First, let's create an HTML file to demonstrate video embedding. Open the WebIDE and create a new file named video-demo.html in the ~/project directory.
touch ~/project/video-demo.html
<!doctype html>
<html lang="en">
  <head>
    <meta charset="UTF-8" />
    <title>Basic Video Element</title>
  </head>
  <body>
    <h1>My First Video Element</h1>

    <video controls width="640" height="360">
      Your browser does not support the video tag.
    </video>
  </body>
</html>
Let's break down the key components of the video element:
<video>tag: The main container for embedding video contentcontrolsattribute: Adds default video player controls (play, pause, volume)widthandheightattributes: Set the dimensions of the video player- Text inside the tag: Fallback message for browsers that don't support HTML5 video
The controls attribute is crucial as it provides users with standard playback controls like play, pause, volume adjustment, and fullscreen mode.
Notes: Learn more about How to preview HTML files in the WebIDE.
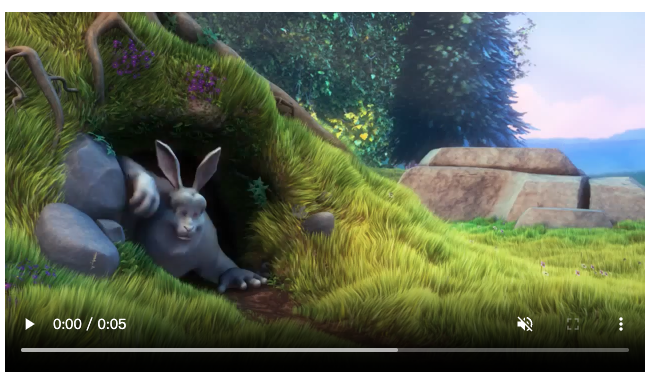
Add Video Source and Mute Playback
In this step, you'll learn how to add video sources to your HTML video element and control its initial playback state. We'll modify the previous video-demo.html file to include video sources and demonstrate how to mute the video by default.
Open the ~/project/video-demo.html file in the WebIDE and update its content:
<!doctype html>
<html lang="en">
  <head>
    <meta charset="UTF-8" />
    <title>Video Source and Mute</title>
  </head>
  <body>
    <h1>Video with Multiple Sources</h1>

    <video controls width="640" height="360" muted>
      <source
        src="https://sample-videos.com/video321/mp4/720/big_buck_bunny_720p_1mb.mp4"
        type="video/mp4"
      />
      <source
        src="https://sample-videos.com/video321/webm/720/big_buck_bunny_720p_1mb.webm"
        type="video/webm"
      />
      Your browser does not support the video tag.
    </video>
  </body>
</html>
Let's break down the new additions:
<source>tags: Allow you to specify multiple video formats for cross-browser compatibility- First source is an MP4 file
- Second source is a WebM file (alternative format)
- Browsers will use the first supported format
mutedattribute: Automatically mutes the video when it loads- Useful for preventing unexpected audio playback
- Can be removed if you want sound by default
typeattribute: Specifies the MIME type of the video source- Helps browsers determine if they can play the video
The sample video URLs are public domain sample videos that demonstrate multiple source formats. In a real-world scenario, you would replace these with your own video file paths.
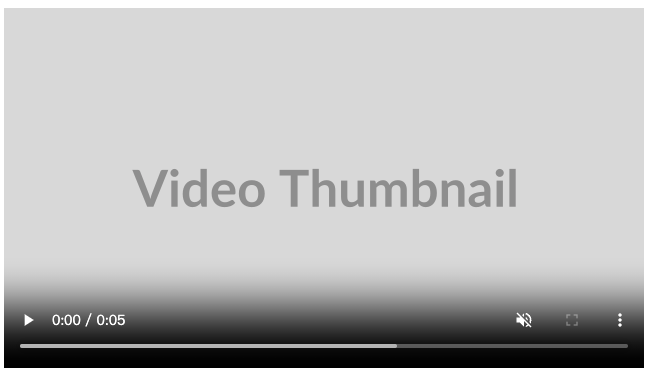
Implement Video Poster for Custom Thumbnail
In this step, you'll learn how to use the poster attribute to add a custom thumbnail image to your video element before playback begins. First, let's download a sample image to use as our poster.
Use the following command to download a sample image:
wget https://placehold.co/640x360.png?text=Video+Thumbnail -O ~/project/video-thumbnail.png
Now, update the ~/project/video-demo.html file with the poster attribute:
<!doctype html>
<html lang="en">
  <head>
    <meta charset="UTF-8" />
    <title>Video with Custom Poster</title>
  </head>
  <body>
    <h1>Video with Custom Thumbnail</h1>

    <video controls width="640" height="360" muted poster="video-thumbnail.png">
      <source
        src="https://sample-videos.com/video321/mp4/720/big_buck_bunny_720p_1mb.mp4"
        type="video/mp4"
      />
      <source
        src="https://sample-videos.com/video321/webm/720/big_buck_bunny_720p_1mb.webm"
        type="video/webm"
      />
      Your browser does not support the video tag.
    </video>
  </body>
</html>
Key points about the poster attribute:
- Displays a custom image before video playback starts
- Replaces the first video frame as the preview
- Helps create a more engaging user interface
- Works with local or remote image files
The poster image provides a preview of the video content and can improve user experience by giving context before playback begins.
Explore Video Tag Attributes and Configurations
In this step, you'll dive deeper into the various attributes and configurations available for the HTML5 video element. Update the ~/project/video-demo.html file to explore these advanced settings:
<!doctype html>
<html lang="en">
  <head>
    <meta charset="UTF-8" />
    <title>Advanced Video Configurations</title>
  </head>
  <body>
    <h1>Exploring Video Tag Attributes</h1>

    <video
      controls
      width="640"
      height="360"
      muted
      poster="video-thumbnail.png"
      preload="metadata"
      loop
      playsinline
    >
      <source
        src="https://sample-videos.com/video321/mp4/720/big_buck_bunny_720p_1mb.mp4"
        type="video/mp4"
      />
      <source
        src="https://sample-videos.com/video321/webm/720/big_buck_bunny_720p_1mb.webm"
        type="video/webm"
      />
      Your browser does not support the video tag.
    </video>
  </body>
</html>
Let's explore the new attributes:
preload="metadata":- Controls how the video is loaded before playback
- Options:
auto(load entire video),metadata(load only metadata),none(don't preload)
loop:- Makes the video replay automatically when it ends
- Useful for background or repeating content
playsinline:- Allows video to play inline on mobile devices
- Prevents automatic fullscreen mode on iOS devices
Additional useful attributes you can experiment with:
autoplay: Starts video playback automaticallycrossorigin: Handles cross-origin video sourcesdisablepictureinpicture: Prevents picture-in-picture mode
Pro Tips:
- Not all browsers support every attribute
- Always test across different devices and browsers
- Consider user experience when using autoplay or loop
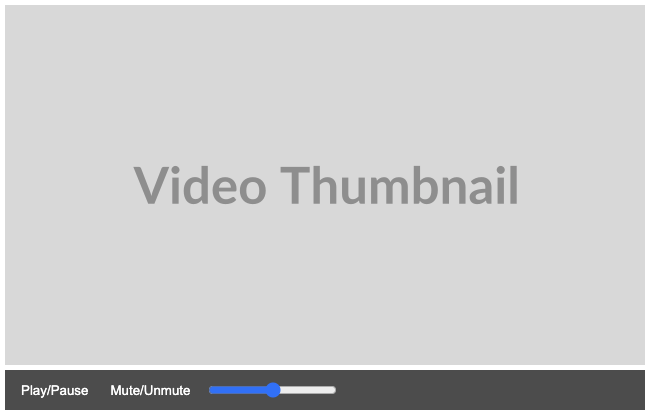
Enhance Video Playback Experience
In this step, you'll learn how to enhance the video playback experience by adding custom controls and styling. Create a new file ~/project/video-enhanced.html with the following content:
<!doctype html>
<html lang="en">
  <head>
    <meta charset="UTF-8" />
    <title>Enhanced Video Player</title>
    <style>
      .video-container {
        max-width: 640px;
        margin: 0 auto;
        position: relative;
      }
      .custom-controls {
        display: flex;
        background-color: rgba(0, 0, 0, 0.7);
        color: white;
        padding: 10px;
      }
      .custom-controls button {
        background: none;
        border: none;
        color: white;
        margin-right: 10px;
        cursor: pointer;
      }
    </style>
  </head>
  <body>
    <div class="video-container">
      <video id="myVideo" width="640" height="360" poster="video-thumbnail.png">
        <source
          src="https://sample-videos.com/video321/mp4/720/big_buck_bunny_720p_1mb.mp4"
          type="video/mp4"
        />
        Your browser does not support the video tag.
      </video>

      <div class="custom-controls">
        <button
        <button
        <input
          type="range"
          min="0"
          max="100"
          value="50"
        />
      </div>
    </div>

    <script>
      const video = document.getElementById("myVideo");

      function togglePlay() {
        if (video.paused) {
          video.play();
        } else {
          video.pause();
        }
      }

      function muteToggle() {
        video.muted = !video.muted;
      }

      function changeVolume(value) {
        video.volume = value / 100;
      }
    </script>
  </body>
</html>
Don't worry if you're new to CSS and JavaScript. This example provides a simple way to create custom video controls and style the video player interface.
Key enhancements in this example:
Custom Video Controls:
- Create a custom control panel with play/pause and mute buttons
- Add a volume slider for precise volume control
CSS Styling:
- Style the video container and controls
- Use flexbox for layout
- Add semi-transparent background to controls
JavaScript Interactions:
togglePlay(): Manually control video play/pausemuteToggle(): Toggle video mute statechangeVolume(): Adjust video volume programmatically
This approach gives you more flexibility in designing video player interfaces compared to default browser controls.
Summary
In this lab, participants learned how to embed and customize video elements in HTML using the <video> tag. The lab covered essential techniques for creating interactive video players, including adding basic controls, specifying multiple video sources, and configuring playback settings. Key skills developed include setting video dimensions, implementing fallback content, adding default player controls, and managing video muting and source selection.
Participants explored practical HTML5 video embedding techniques by creating a demo video element with standard features like play/pause controls, width and height configuration, and support for different video formats. The lab provided hands-on experience in understanding video tag attributes and enhancing user interaction with embedded video content through various configuration options.


