
Introduction
In the bustling digital landscape of "Pet's House," a website dedicated to providing premium pet care services, our protagonist, Jordan, a talented web developer, is tasked with enhancing the website's layout and design. The scene is set in a cozy office overlooking the city's skyline, where Jordan is determined to optimize the user experience by meticulously applying the CSS Box Model and Margins principles.
In this lab, we'll use properties like CSS Box Model and Margins to refine the layout.
Understanding the Box Model
Think about how we can get the elements to appear where we have designed them to appear.
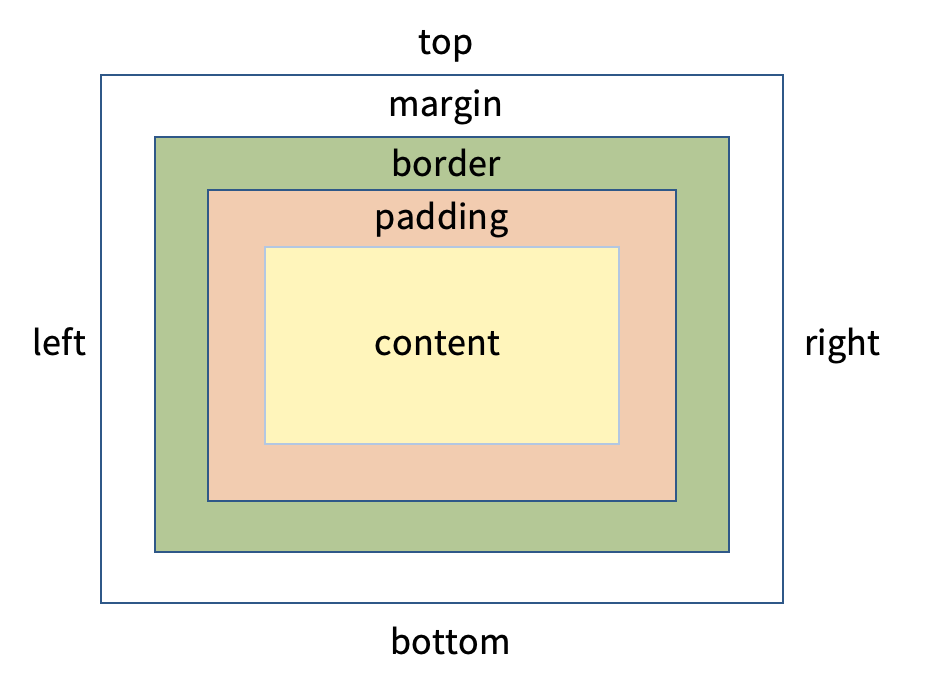
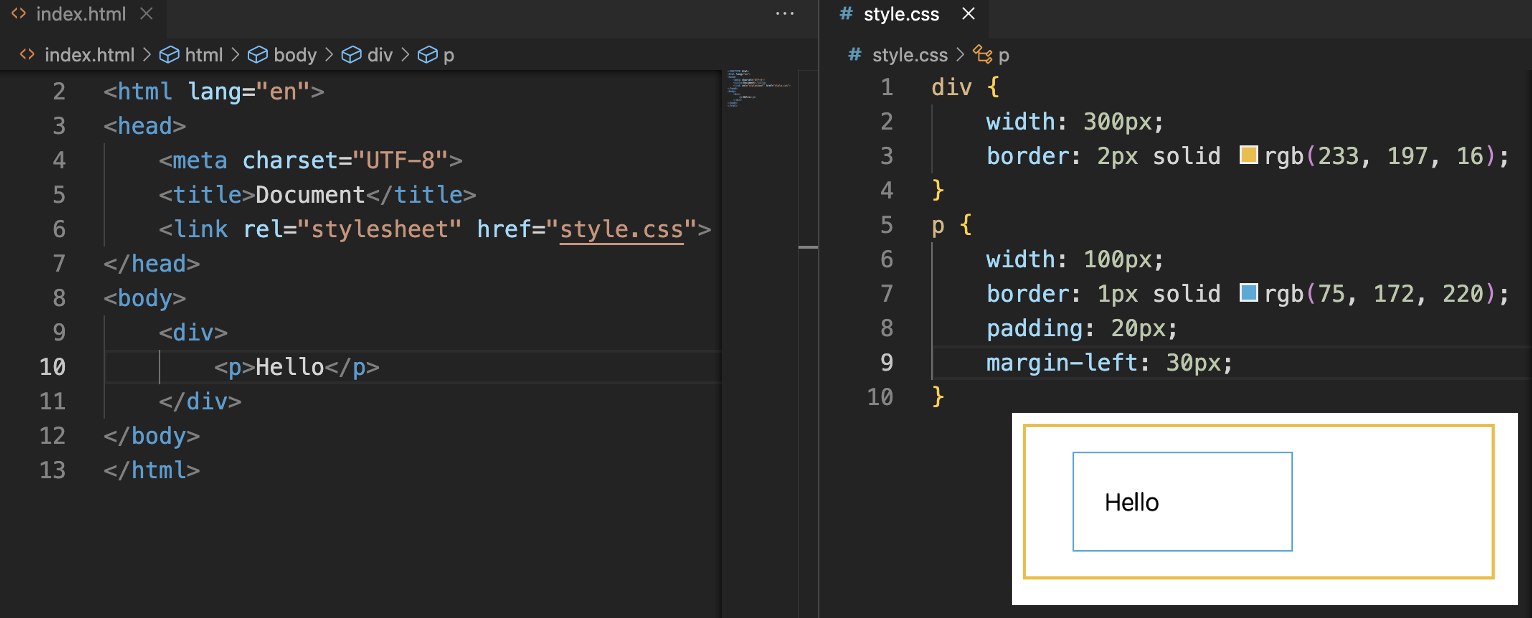
In this step, you will delve into the CSS Box Model, a fundamental concept that governs the layout of web pages. Each element on a page is considered a box, consisting of margins, borders, padding, and the actual content. This model allows developers to control the spacing and sizing of elements precisely.
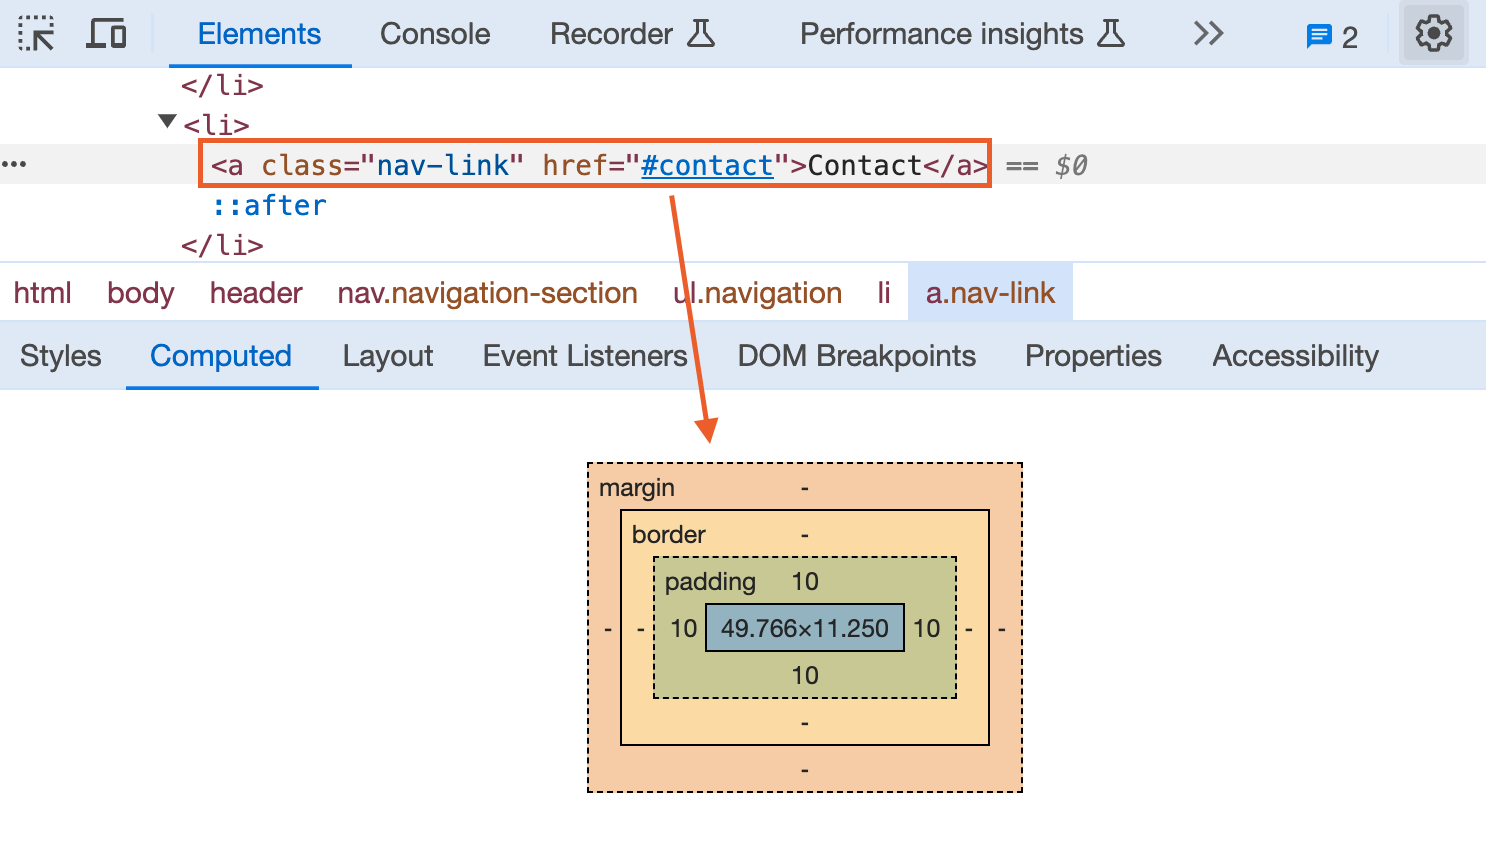
By pressing F12 to open the developer tools, as shown in the figure below when selecting an <li> element, we can see the element's box model in the Computed section.
Next, let's introduce three important properties of the box model:
- border
- padding
- margin
Border
The border shorthand CSS property sets an element's border. It sets the values of border-width, border-style, and border-color.
The usage format is as follows:
border: width style color;
For example, to add a border to a <p> element, you can use the following CSS:
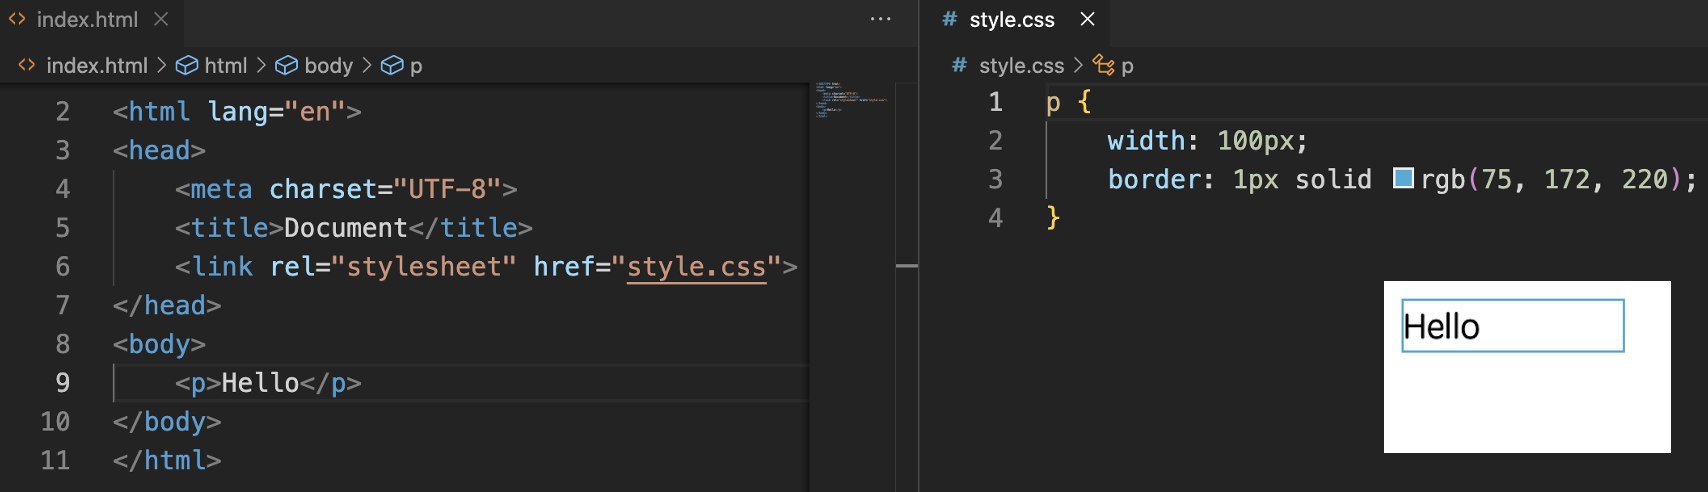
In the pet page, if the buttons within the form have border, you can add the following content to the style.css file to style them:
form .btn {
  text-align: center;
  background-color: #e6e8e8;
  color: #000;
  font-weight: 700;
  letter-spacing: 2px;
  border: 2px solid #eaeaea;
}
Additionally, we can achieve a rounded corner effect on the buttons using the border-radius property. Here's how you can add it:
form .txt-box {
  width: 100%;
  border-radius: 2px;
  border: 2px transparent;
  color: #3d3939;
}
form .btn {
  text-align: center;
  background-color: #e6e8e8;
  color: #000;
  font-weight: 700;
  letter-spacing: 2px;
  border: 2px solid #eaeaea;
  border-radius: 4px;
}
In the "About Us" section, to display a circular image effect, you can indeed use the border-radius property. Here's how to apply it:
.circle {
  width: 950px;
  height: 650px;
}
.circle img {
  border-radius: 100%;
  width: 70%;
  height: 100%;
}
Padding
The padding CSS shorthand property sets the padding area on all four sides of an element at once.
The usage format is as follows:
padding: top right bottom left;

padding-top: top padding value;
padding-left: left padding value;
padding-right: right padding value;
padding-bottom: bottom padding value;
For example, to add a padding to a <p> element, you can use the following CSS:
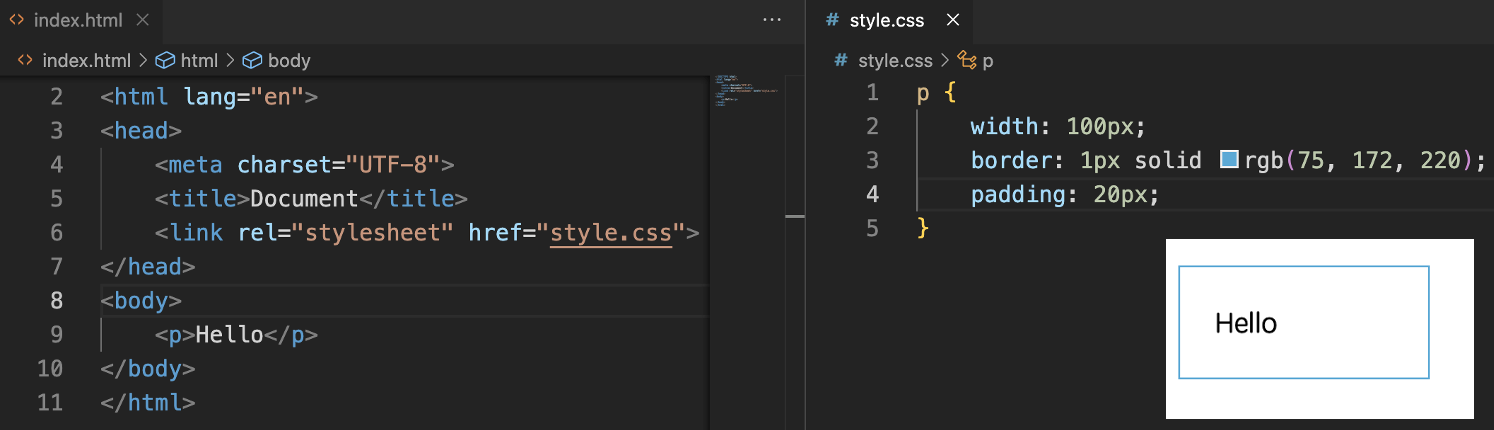
Add the following to the style.css file:
h1 {
  padding-bottom: 30px;
  padding-left: 0.5em;
  text-align: center;
  font-size: 4em;
}
h2 {
  font-size: 2.8vw;
  padding-bottom: 15px;
  text-transform: uppercase;
}
header {
  background-color: rgb(233, 174, 87);
  width: 100%;
  max-height: max-content;
  min-height: 1em;
  padding-top: 1%;
  padding-bottom: 1%;
  text-transform: uppercase;
}
.navigation li a {
  text-decoration: none;
  color: black;
  padding: 10px;
}
.container {
  padding: 0px;
  padding-top: 1em;
  width: 100%;
}
section {
  width: 100%;
  padding: 10% 0;
}
.cover-sect {
  padding: 5% 0;
}
.title-text {
  width: 40%;
  text-align: center;
  color: black;
  padding: 0 20px;
}
.service figcaption {
  bottom: 0;
  left: 0;
  right: 0;
  background-color: rgba(0, 0, 0, 0.5);
  color: #fff;
  padding: 10px;
}
.contact-section p {
  padding-right: 2em;
  padding-left: 3em;
}

.form-box {
  padding-top: 1em;
}

form .form-content {
  padding: 0.8em 0;
}

form .txt-box {
  width: 100%;
  padding: 0.7em 0;
  border-radius: 2px;
  border: 2px transparent;
  color: #3d3939;
}
form .btn {
  text-align: center;
  background-color: #e6e8e8;
  color: #000;
  font-weight: 700;
  letter-spacing: inherit;
  border: 2px solid #eaeaea;
  border-radius: 4px;
  padding: 0.7em;
}
Margin
The margin CSS shorthand property sets the margin area on all four sides of an element.
The usage format is as follows:
margin: top right bottom left;

margin-top: top margin value;
margin-left: left margin value;
margin-right: right margin value;
margin-bottom: bottom margin value;
For example, to add a margin to a <p> element, you can use the following CSS:
Add the following to the style.css file:
* {
  margin: auto;
}
.logo-section {
  width: 10%;
  margin-left: initial;
}
.logo {
  margin-left: 0.8em;
  max-width: 60%;
}
section div {
  width: 50%;
  margin: 0 auto;
}
.cover-sect {
  margin-top: 0px;
  padding: 5% 0;
}
.title-text {
  width: 40%;
  text-align: center;
  color: black;
  margin: auto;
  padding: 0 20px;
}
.circle img {
  border-radius: 100%;
  width: 70%;
  height: 100%;
  margin-left: 15%;
}
.services {
  width: 90%;
  margin: 20px auto;
}
form .txt-box {
  margin-top: 0.3em;
  width: 100%;
  padding: 0.7em 0;
  border-radius: 2px;
  border: 2px transparent;
  color: #3d3939;
}
footer div {
  margin-right: 2em;
}

footer span {
  text-align: center;
  margin-left: 2em;
}

footer .company-info {
  margin-left: 20em;
}

footer .contact-us {
  margin-left: 25em;
}
Box Shadow
On the pet page, to add a shadow effect to the submit button in the form, you can use the box-shadow property.
The box-shadow property is used to add one or more box shadows, creating a visual effect as if the box has a shadow.
Its syntax format is as follows:
box-shadow: h-shadow v-shadow blur spread color inset;
The meaning of each value is described below:
| Value | Description |
|---|---|
| h-shadow | Required. The horizontal position of the shadow, negative values are allowed. |
| v-shadow | Required. The vertical position of the shadow, negative values are allowed. |
| blur | Optional. The blur distance. |
| spread | Optional. The size of the shadow. |
| color | Optional. The color of the shadow. |
| inset | Optional. Changes the shadow from an outer shadow to an inner shadow. |
Add the following to the style.css file:
form .btn {
  text-align: center;
  background-color: #e6e8e8;
  color: #000;
  font-weight: 700;
  letter-spacing: inherit;
  border: 2px solid #eaeaea;
  box-shadow: 0px 0px 10px 1px #29393e;
  border-radius: 4px;
  padding: 0.7em;
}
Note: Although we've covered a lot of CSS properties, it's understandable that the page layout may still seem disorganised. Don't worry, we'll be introducing several page layout techniques later on. These techniques will help to organise and structure the page more effectively, including Flexbox, Grid and other CSS layout models. These models provide powerful tools for designing responsive, flexible, and well-organised layouts.
Summary
In this lab, you journeyed through the intricacies of the CSS Box Model and Margins with Jordan, enhancing the "Pet's House" website's layout and design. Starting with understanding the box model's components—margins, borders, padding, and content—you applied these principles to improve the site's structure and user interface. By manipulating margins, you learned to control the spacing between elements effectively. Padding adjustments were made to ensure content within elements is presented clearly and attractively. This lab not only honed your CSS skills but also emphasized the importance of meticulous layout design in creating engaging and user-friendly web experiences.


